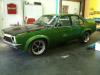
This thing is looking wild. I too would paint the door handles black to break up the sexy green


Lotsa Posts!


Posted 05 March 2012 - 08:52 PM

Posted 05 March 2012 - 09:30 PM
Posted 05 March 2012 - 11:38 PM
Forum Fixture
Posted 06 March 2012 - 06:30 PM
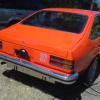
looking good, whats the go with the front and rear screens? do they build it up to that height with urethane so that theyre level with the body? also what covers the edge inside the car where the old rubber normally wraps around?
cheers
Posted 07 March 2012 - 08:39 AM
Posted 07 March 2012 - 09:33 AM
Forum Fixture
Posted 09 March 2012 - 02:34 PM
 P1020493.JPG 81.91K
4 downloads
P1020494.JPG 96.09K
2 downloads
P1020493.JPG 81.91K
4 downloads
P1020494.JPG 96.09K
2 downloadslooks like a beast what colour green is it?
Forum Fixture
Posted 28 April 2012 - 08:59 PM
P1020496.JPG 102.95K
4 downloads
P1020498.JPG 113.27K
3 downloads
P1020501.JPG 100.95K
4 downloads
P1020500.JPG 106.05K
2 downloads
P1020503.JPG 83.21K
5 downloads
Posted 29 April 2012 - 10:05 AM
Forum Fixture
Posted 29 April 2012 - 12:54 PM
best looking uc by far mate
cant wait to see it in action will it be ready for the forum drag day ?
Forum Fixture
Posted 01 May 2012 - 08:53 PM
P1020517.JPG 67.56K
4 downloads
P1020519.JPG 69.42K
7 downloadsForum Member
Posted 01 May 2012 - 09:51 PM
Posted 01 May 2012 - 09:56 PM
Lotsa Posts!
Posted 01 May 2012 - 10:45 PM
Posted 02 May 2012 - 11:14 PM
Forum Fixture

Posted 03 May 2012 - 06:07 AM

Forum Fixture
Posted 03 May 2012 - 08:18 AM

Oh My, Don't you post alot

Posted 03 May 2012 - 10:54 AM
Posted 03 May 2012 - 04:02 PM

Forum Fan
Posted 03 May 2012 - 07:18 PM
Forum Fixture
Posted 03 May 2012 - 08:34 PM
I haven't had a chance to check out the threads Andrew, but please let us know when you make it to WSID! Would be great to catch up!
This car has turned out real nice struggler! the only thing it loses marks for in my book is the wheels. I could imagine a nice set of convo's on this machine..join the convo army you know you wanna!
its a drag / burnout car........ no one worries about the looks of the rims at it hurtles down the strip.
sounds tuff... when are we going to see some quarter mile times?
Forum Fixture
Posted 04 May 2012 - 08:09 PM
P1020527.JPG 76.43K
2 downloads
P1020528.JPG 73.79K
2 downloads
P1020529.JPG 84.68K
2 downloads
P1020530.JPG 82.33K
3 downloads
Posted 07 May 2012 - 12:06 AM


0 members, 1 guests, 0 anonymous users

