
Best lookin UC I've ever seen. Well Done!
 1 votes
Fixing my brothers UC hatch
Started by
_dirtbag_
, Dec 30 2009 01:19 PM
1690 replies to this topic
#177
 _evil UC hatch_
_evil UC hatch_
-

- Guests
Posted 18 January 2010 - 07:00 PM
I was in warana, but I have ventured south for work in the last few months. I still have friends scattered over the coast including Nambour, that seems to be where I always end up when I go back up there. I used to also work in Autobarn in Nambour, that was fun.....NOT
#178
_dirtbag_
_dirtbag_
-
- Guests
Posted 18 January 2010 - 07:52 PM
Autobarn hey. Was it owned by Paul when you worked there? I've been working on a couple of his cars lately.
Did you have the UC hatch when you were here? What colour is it?
Did you have the UC hatch when you were here? What colour is it?
#179
_evil UC hatch_
_evil UC hatch_
-
- Guests
Posted 18 January 2010 - 07:57 PM
yeah Pauls and Michelle were owners, and still are as far as I know. I have had my UC for about 5 or 6 years but it has been unregistered for a bit over 4 years now
#180
_dirtbag_
_dirtbag_
-
- Guests
Posted 18 January 2010 - 07:59 PM
Yeah, they still own it. Bloody nice people in my opinion. They have some awesome cars now.
What are you going to do with the hatch? Wanna sell????
What are you going to do with the hatch? Wanna sell????
#181
Stinga
-

- Members
-

- 2,114 posts
.
- Name:Stinga
- Location:Wollongong, NSW
- Car:HD Holden ute, and sedan, UC torana
- Joined: 05-December 05
Posted 18 January 2010 - 08:06 PM
ohhh looks more like a beer keg chopped in half than a set of wheels!!
#182
_evil UC hatch_
_evil UC hatch_
-
- Guests
Posted 18 January 2010 - 08:14 PM
Im slowly getting mine ready for paint, and putting in an injected 5.0 like many have done before. I started and apprenticeship about 4 months ago so its going to be a slow process. luckily I have already got the motor, diff and some of the brakes. its mostly in primer now, Im hoping to have colour on it within the next month or 2. my biggest hurdles are going to be paying for a gearbox and an exhaust, it will happen eventually
#183
_dirtbag_
_dirtbag_
-
- Guests
Posted 19 January 2010 - 06:00 PM
Sounds like you've been good and busy. What sort of gearbox are you going to use? I hope you mean "gearbox" and not a stupid oil pump. Manuals are the go : )
#184
_evil UC hatch_
_evil UC hatch_
-
- Guests
Posted 19 January 2010 - 06:26 PM
I will most likley end up with a T5 5 speed because of the whole $$ thing, but what I really want is a Tremec TKO or one of the new versions of the T56
when I bought my motor I was offered a shift kitted T700 with some sort of hi stall for an extra $500, I had no intrest in that at all because it wasnt a manual
when I bought my motor I was offered a shift kitted T700 with some sort of hi stall for an extra $500, I had no intrest in that at all because it wasnt a manual
Edited by evil UC hatch, 19 January 2010 - 06:29 PM.
#185
_dirtbag_
_dirtbag_
-
- Guests
Posted 19 January 2010 - 08:49 PM
Yeah, turbo 700s are good boxes, but they're nowhere near as fun as a manual.
Today was a fun old day. We went out into an old wrecking yard, in the Qld summer heat and cut the dash out of an old LX sedan. Yippee.
It was a rusty old beast too. Scored a few cuts from rusty edges.
Here's the dash donor.

Pretty sweet ride huh : )

After a lot of sweating and a bit of swearing, we had the dash out. The ends are a bit rusty, but we can't be too picky. Not many of these lying around these parts.

Here's the old UC dash that has to be removed. This is mainly so people can see the difference. I've never done this before, so I didn't know the difference until now.

With the dash out, there sure is a lot of room : )

Had to do a trial fit of the LX dash. I put the dash pad on just to get an idea of alignment. Looks a million bucks already.

Pity the new dash had the rust in it. Otherwise it would be all fitted by now. Instead I need to add some metal to the ends.

The LX dash lines up fine. Looks a lot better too.

The lower lip of the windscreen frame was sanded back to metal and holes drilled for the new dash to get plug welded in.

Here's the rust on the drivers side of the dash repaired. Fiddly crap work, this is : )

It's starting to look a bit better now.

The left side needs a little bit of a repair too.

Another trial fit during the rust repairs, just to make sure it still fits. Once it's all done and tacked into place, I'll put the dash together and make sure it's in the exact right position. Once I'm sure it's right I'll strip the dash again and weld it in properly.

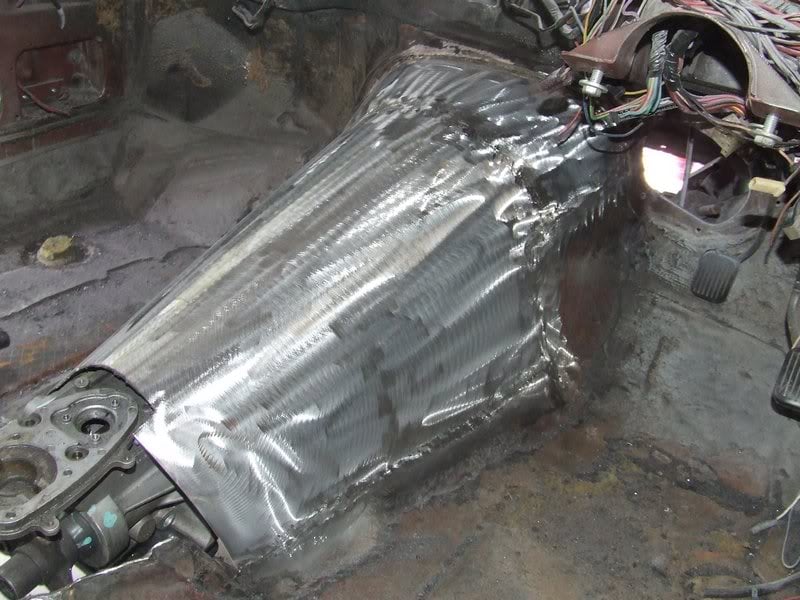
The gearbox tunnel is the next thing to get replaced. The T56 is a big box, so will need a larger tunnel. It's been cut open so I can fit the box to determine how big to make the new tunnel.

Today was a fun old day. We went out into an old wrecking yard, in the Qld summer heat and cut the dash out of an old LX sedan. Yippee.
It was a rusty old beast too. Scored a few cuts from rusty edges.
Here's the dash donor.
Pretty sweet ride huh : )
After a lot of sweating and a bit of swearing, we had the dash out. The ends are a bit rusty, but we can't be too picky. Not many of these lying around these parts.
Here's the old UC dash that has to be removed. This is mainly so people can see the difference. I've never done this before, so I didn't know the difference until now.
With the dash out, there sure is a lot of room : )
Had to do a trial fit of the LX dash. I put the dash pad on just to get an idea of alignment. Looks a million bucks already.
Pity the new dash had the rust in it. Otherwise it would be all fitted by now. Instead I need to add some metal to the ends.
The LX dash lines up fine. Looks a lot better too.
The lower lip of the windscreen frame was sanded back to metal and holes drilled for the new dash to get plug welded in.
Here's the rust on the drivers side of the dash repaired. Fiddly crap work, this is : )
It's starting to look a bit better now.
The left side needs a little bit of a repair too.
Another trial fit during the rust repairs, just to make sure it still fits. Once it's all done and tacked into place, I'll put the dash together and make sure it's in the exact right position. Once I'm sure it's right I'll strip the dash again and weld it in properly.
The gearbox tunnel is the next thing to get replaced. The T56 is a big box, so will need a larger tunnel. It's been cut open so I can fit the box to determine how big to make the new tunnel.
#186
orangeLJ
-

- Members
-
- 10,261 posts
Yes, yes I do post alot!
- Joined: 02-May 06
Posted 20 January 2010 - 07:20 AM
With all the custom work, did you contemplate coming up with a custom dash design?
something stock-ish, but different enough to set it apart?
something stock-ish, but different enough to set it apart?
#187
_dirtbag_
_dirtbag_
-
- Guests
Posted 20 January 2010 - 07:44 AM
It's custom for a UC : )
The answer is no though. It'll be a stock LX dash for this car. That's what my brother wants, and I agree with his taste, they're a nice simple design. I've seen a fair few LH/LXs with custom dashes but am yet to see one I really like.
The answer is no though. It'll be a stock LX dash for this car. That's what my brother wants, and I agree with his taste, they're a nice simple design. I've seen a fair few LH/LXs with custom dashes but am yet to see one I really like.
#188
_dirtbag_
_dirtbag_
-
- Guests
Posted 21 January 2010 - 11:18 PM
Finally the inside of the car got cleaned out. I hadn't even removed the rear seat of side panels. A good friend of mine took all the crap that was stored in there too. Thanks Paul. All the metal looks good in there too, which is a nice change.

With the rust in the dash on the left side fixed it was time for another trial fit.

I then mounted the lower part of the dash so I could see if it was all square and looked decent. I like it.

I thought the dash could stay out until the new tunnel was made and the A/C fitted, just to make access a bit easier.
Time to look at fitting the T56.
It's a big unit. Here it is with the CRS crossmember fitted.

With the tunnel split we were able to get the box into position.
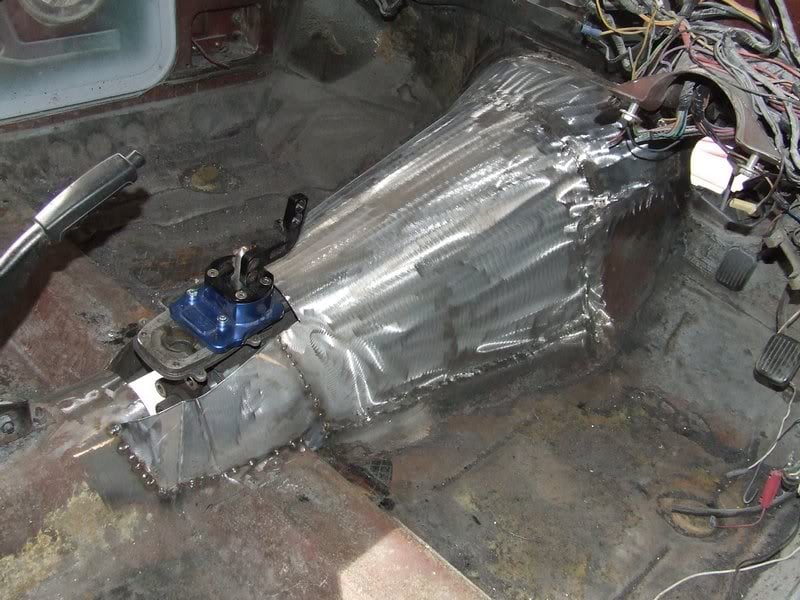
See how close the gearstick and shifter base are. I was thinking I'd have to move the handbrake, but a different shifter will solve the problem. It's a B&M unit. I had to take apart the old shifter and this one bolts on over the top of the plate that mounted the original shifter.

I also turned the gear stick mount around 180 degrees to get the shifter away from the handbrake. That's the black "L" shaped thingy.

The crossmember is a nice piece of work.

Next step is to start making the new tunnel. I cut nearly all of the old one out, and will make the new one in sections.

I then shaped up a bit of metal to form the mid section of the tunnel. I made it so it overlapped with the floor. Once I was happy with it's placement, I tacked it in. I then ran a 1mm cut off wheel along the overlap, in sections, so it became a butt weld with no overlaps. Looks much neater and doesn't trap moisture.


The next piece to get added was the part that covers the bellhousing. It takes a little while to get the shape right, but it's not hard to do.
The area around the shifter will be done in a few pieces. I've only tacked in one side at this stage, but will get it finished soon. I hope : )
With the rust in the dash on the left side fixed it was time for another trial fit.
I then mounted the lower part of the dash so I could see if it was all square and looked decent. I like it.
I thought the dash could stay out until the new tunnel was made and the A/C fitted, just to make access a bit easier.
Time to look at fitting the T56.
It's a big unit. Here it is with the CRS crossmember fitted.
With the tunnel split we were able to get the box into position.
See how close the gearstick and shifter base are. I was thinking I'd have to move the handbrake, but a different shifter will solve the problem. It's a B&M unit. I had to take apart the old shifter and this one bolts on over the top of the plate that mounted the original shifter.
I also turned the gear stick mount around 180 degrees to get the shifter away from the handbrake. That's the black "L" shaped thingy.
The crossmember is a nice piece of work.
Next step is to start making the new tunnel. I cut nearly all of the old one out, and will make the new one in sections.
I then shaped up a bit of metal to form the mid section of the tunnel. I made it so it overlapped with the floor. Once I was happy with it's placement, I tacked it in. I then ran a 1mm cut off wheel along the overlap, in sections, so it became a butt weld with no overlaps. Looks much neater and doesn't trap moisture.
The next piece to get added was the part that covers the bellhousing. It takes a little while to get the shape right, but it's not hard to do.
The area around the shifter will be done in a few pieces. I've only tacked in one side at this stage, but will get it finished soon. I hope : )
#189
_dirtbag_
_dirtbag_
-
- Guests
Posted 21 January 2010 - 11:24 PM
The controversial bonnet scoop got bolted on today : )
The top of the scoop is a bit ordinary, so it'll need a bit of attention to get it looking nice.
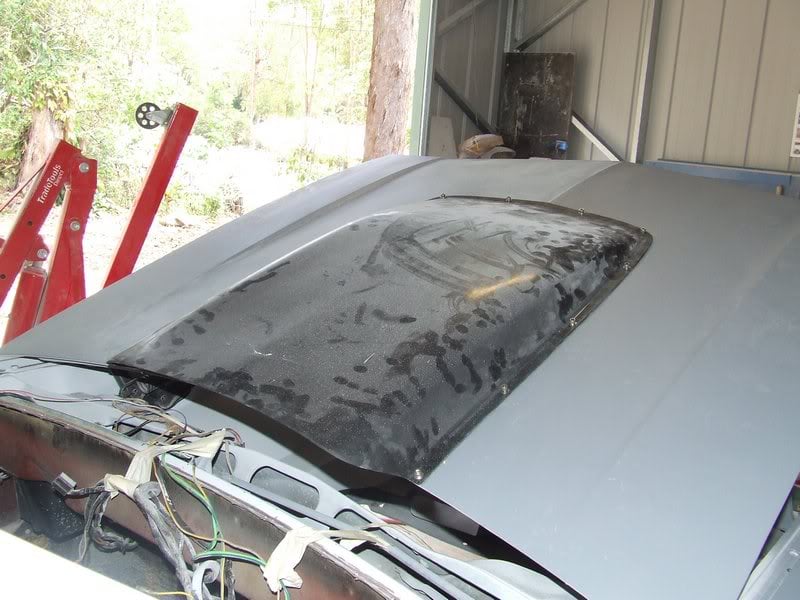
It's hard to see in the pic. but the top is sagged in the middle. The front needs a bit of work too.
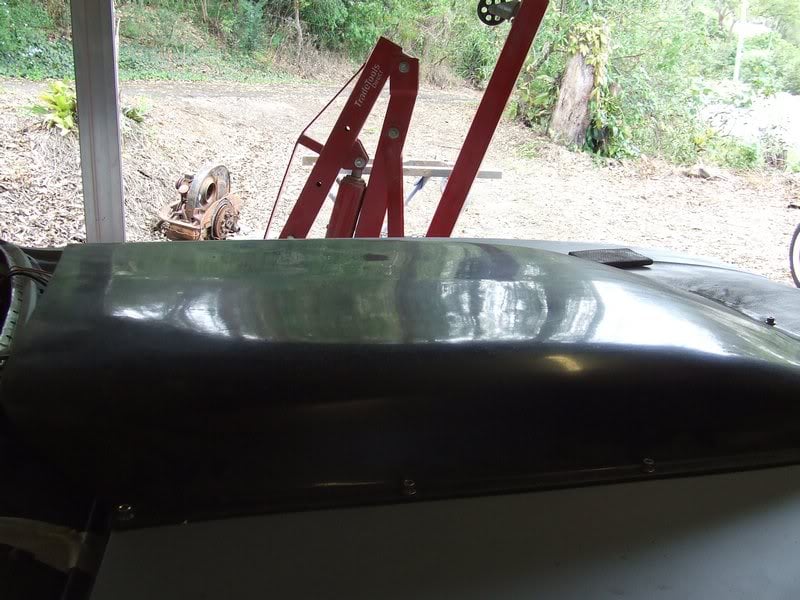
A few hours with some filler and sandpaper later.....
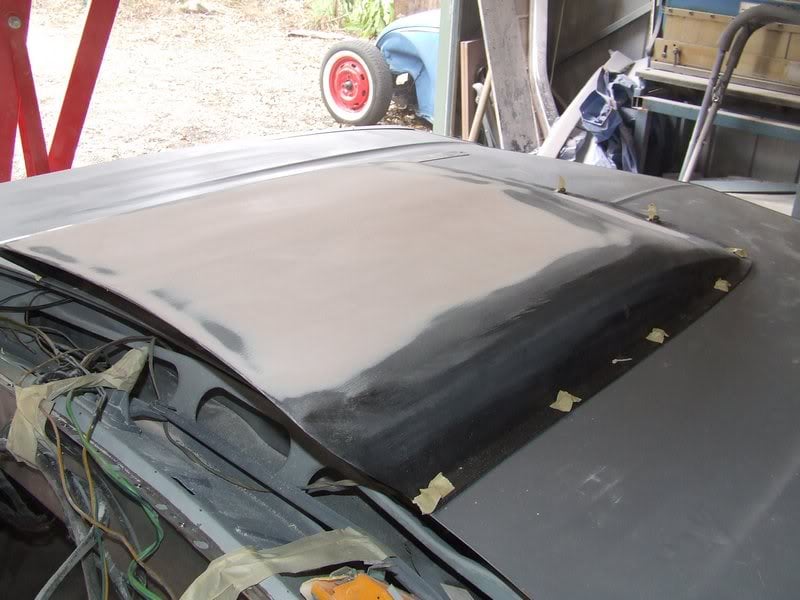
The scoop still needs more work, as it's still a little low in the middle, but that's what tomorrow is for : )
The top of the scoop is a bit ordinary, so it'll need a bit of attention to get it looking nice.
It's hard to see in the pic. but the top is sagged in the middle. The front needs a bit of work too.
A few hours with some filler and sandpaper later.....
The scoop still needs more work, as it's still a little low in the middle, but that's what tomorrow is for : )
#190
Stinga
-
- Members
-
- 2,114 posts
.
- Name:Stinga
- Location:Wollongong, NSW
- Car:HD Holden ute, and sedan, UC torana
- Joined: 05-December 05
Posted 21 January 2010 - 11:51 PM
great work on the tunnel. would mind running beers while you work sometime just to get an idea of how much time you spend doing each bit as the pics make it look like its done in no time... oh and when should i drop off my hd??
#191
_dirtbag_
_dirtbag_
-
- Guests
Posted 21 January 2010 - 11:59 PM
Hey MCH11N. Beers while working on a car. In the heat of a Qld summer. Gee, that's a tough one. Can you come over tomorrow? 
Drop off your HD? I love HDs. Hardly ever see one any more. You can drop it off whenever you like. Can't guarantee I'll give it back though:P
Drop off your HD? I love HDs. Hardly ever see one any more. You can drop it off whenever you like. Can't guarantee I'll give it back though:P
#192
Stinga
-
- Members
-
- 2,114 posts
.
- Name:Stinga
- Location:Wollongong, NSW
- Car:HD Holden ute, and sedan, UC torana
- Joined: 05-December 05
Posted 22 January 2010 - 12:19 AM
you can see my hd sedan im going to tackle when i finally get some time at home here.. http://www.gmh-toran...=1
thinking of going similar ls2 route to your hatch
thinking of going similar ls2 route to your hatch
#193
_dirtbag_
_dirtbag_
-
- Guests
Posted 22 January 2010 - 01:40 AM
I believe LS2 in HD = lots of smiles 
6 speed manual I hope?
6 speed manual I hope?
#194
_dirtbag_
_dirtbag_
-
- Guests
Posted 22 January 2010 - 01:47 AM
I see in you thread you were thinking of a 1UZFE. Not interested any more? Would be nice with a supra box.
The Nissan V8s are really big. I'm in the process of stuffing a VH45 into my wifes 1968 firebird and it took a lot of work to get it in there. We bought a complete front cut for $1800. Bargain.
Your ute looks awesome BTW, and the sedan looks like the perfect base for a project. Look forward to seeing what you do.
#195
lxsstorana
-

- Members
-
- 2,499 posts
Forum Fixture
- Name:Mick
- Location:Eastwood, Sydney
- Car:SS Hatchback
- Joined: 23-March 06
Posted 22 January 2010 - 05:13 AM
This is a great thread on the hatchback. 
Really enjoying it and love the work and the fast progress.
Really enjoying it and love the work and the fast progress.
#196
_AD_75_
_AD_75_
-
- Guests
Posted 22 January 2010 - 04:23 PM
Coming along well Tim! love the the tranny tunnel and dash conversion very professional cant wait to see more.
#197
_dirtbag_
_dirtbag_
-
- Guests
Posted 24 January 2010 - 04:11 AM
There's been a bit more done.
The tranny tunnel is pretty much done now. I've just got to make the bolt on top section that will cover the gearstick and have a rubber shield to stop gunk from coming inside the car from underneath.


The next job on the list while the dash was still removable was to fit the A/C unit. It's a cool old school unit, but is a little heavy and awkward to get into position myself. I struggled with it for a while before deciding I'd just rip the dash out and mount it to the dash on the work bench.


It was much easier to sort it out on the bench, however I did have to do some figuring in the car, as it's a fairly big unit and I had to not have it hit the firewall.
Once all the measurements were taken, I mounted the unit to the dash with the mounts that came with the unit. I also added a brace from the top of the dash to one of the mounts, just to help support it. Now it's really solid even out of the car. Yay.
It's not pretty, but it does the job. This pic is during test fitting, so is only tacked together. It's all welded now.

Not only is there exposed wires everywhere, they used masking tape to insulate the joins. Nice! : )

Here's the dash clamped back into place with the A/C fitted.

It was hard to get a pic, as there's no room, but you can sort of see through the glove box opening how close to the firewall the unit sits, without actually touching it.

Just a view from the passengers side. I like the retro look to it. Suits the dash. Wont look so weird when the interior is in.

There's not a lot to say it's a UC anymore apart from the handbrake. That's the best bit.

The scoop is still getting some work to fix the saggy look. I hate using filler, but in this case it's a necessary evil.
Plus, it makes the front of the scoop look like a butt print : )

The tranny tunnel is pretty much done now. I've just got to make the bolt on top section that will cover the gearstick and have a rubber shield to stop gunk from coming inside the car from underneath.
The next job on the list while the dash was still removable was to fit the A/C unit. It's a cool old school unit, but is a little heavy and awkward to get into position myself. I struggled with it for a while before deciding I'd just rip the dash out and mount it to the dash on the work bench.
It was much easier to sort it out on the bench, however I did have to do some figuring in the car, as it's a fairly big unit and I had to not have it hit the firewall.
Once all the measurements were taken, I mounted the unit to the dash with the mounts that came with the unit. I also added a brace from the top of the dash to one of the mounts, just to help support it. Now it's really solid even out of the car. Yay.
It's not pretty, but it does the job. This pic is during test fitting, so is only tacked together. It's all welded now.
Not only is there exposed wires everywhere, they used masking tape to insulate the joins. Nice! : )
Here's the dash clamped back into place with the A/C fitted.
It was hard to get a pic, as there's no room, but you can sort of see through the glove box opening how close to the firewall the unit sits, without actually touching it.
Just a view from the passengers side. I like the retro look to it. Suits the dash. Wont look so weird when the interior is in.
There's not a lot to say it's a UC anymore apart from the handbrake. That's the best bit.
The scoop is still getting some work to fix the saggy look. I hate using filler, but in this case it's a necessary evil.
Plus, it makes the front of the scoop look like a butt print : )
#198
TerrA LX
-

- Members
-
- 14,241 posts
Fulcrum Fixture
- Location:Sid 'n' knee
- Joined: 31-May 06
Posted 24 January 2010 - 07:22 AM
How did you know where the box would sit with no motor?
Did you just trust that the g/box x member would place it correctly?
Did you just trust that the g/box x member would place it correctly?
#199
_Herne_
_Herne_
-
- Guests
Posted 24 January 2010 - 07:39 AM
Lovely work, if it wasnt for Callums dad I might have missed this thread :( Glad he pointed it out to me.
One thing troubles me a bit, you are bogging up an old saggy scoop but why didnt you opt for a new one? Its not like they are expensive or hard to come by!
This has to be one of the most informative threads I have read here in ages. I am so glad you chose to show us.
Cheers
Herne
One thing troubles me a bit, you are bogging up an old saggy scoop but why didnt you opt for a new one?
Its not like they are expensive or hard to come by!This has to be one of the most informative threads I have read here in ages.
I am so glad you chose to show us.Cheers
Herne
#200
_dirtbag_
_dirtbag_
-
- Guests
Posted 24 January 2010 - 08:32 AM
Well Herne, I'm actually bogging up a brand new scoop.  I'm not sure where my brother got the bodykit, but as you can see in the thread it's needed a lot of work to get right.
As for fitting the gearbox without the motor - when we had the motor in place I measured how far it was from the firewall, to see how much room there would be for bellhousing bolts. So when the box went in I set it up at the same measurement.
I'm not sure where my brother got the bodykit, but as you can see in the thread it's needed a lot of work to get right.As for fitting the gearbox without the motor - when we had the motor in place I measured how far it was from the firewall, to see how much room there would be for bellhousing bolts. So when the box went in I set it up at the same measurement.


1 user(s) are reading this topic
0 members, 1 guests, 0 anonymous users

