Jump to content


Photo

Home Zinc plating.


  • Please log in to reply
47 replies to this topic

#1 slar

slar

    Forum Fan

  • Members
  • PipPipPipPip
  • 498 posts
  • Name:AL
  • Location:Newcastle
  • Car:Rusty the Torana......Nearly complete
  • Joined: 14-September 09
Garage View Garage

Posted 03 September 2013 - 07:38 PM

Hi Just wondering if any one has tried home zinc plating of your hard to get bits and pieces.


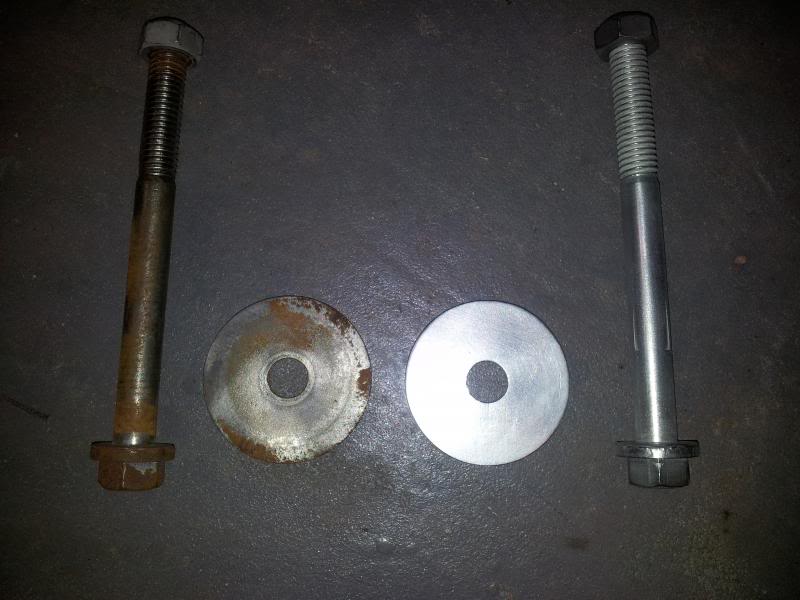
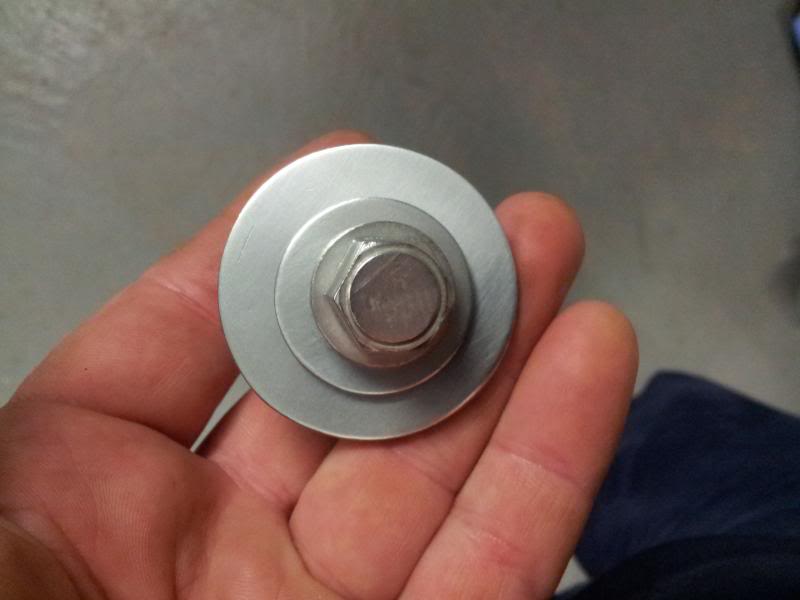
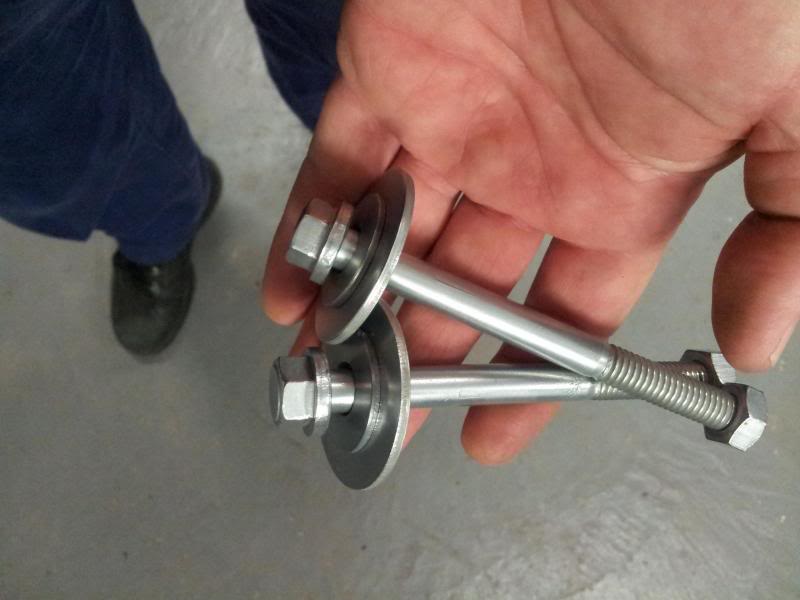
I gave it a go on the weekend with exceptional results, I started with my K frame to chassis rail bolts and was very happy with the outcome so I decided to try the rear trailing arm bolts and hand brake bits and pieces.


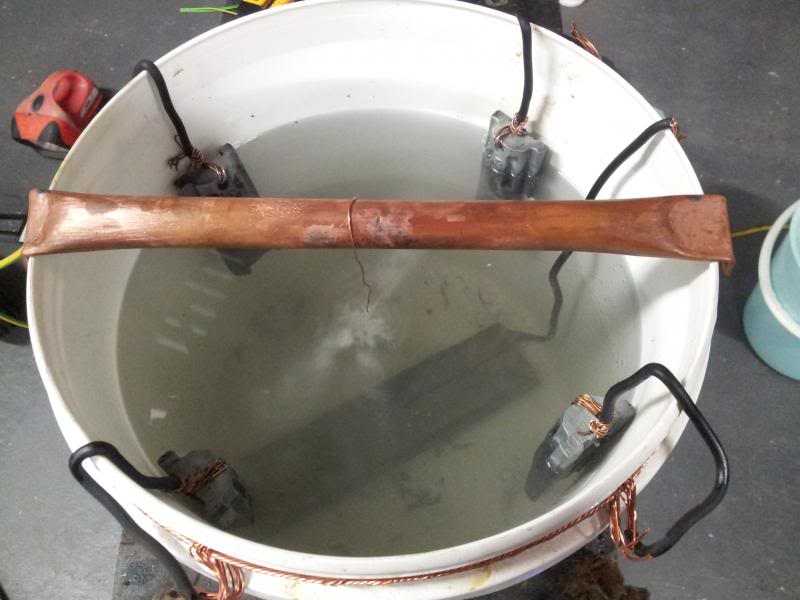
This is what I call the zinc bucket.


20130829_181445.jpg


Before and after


20130829_181317.jpg


20130829_201407.jpg


20130829_201426.jpg


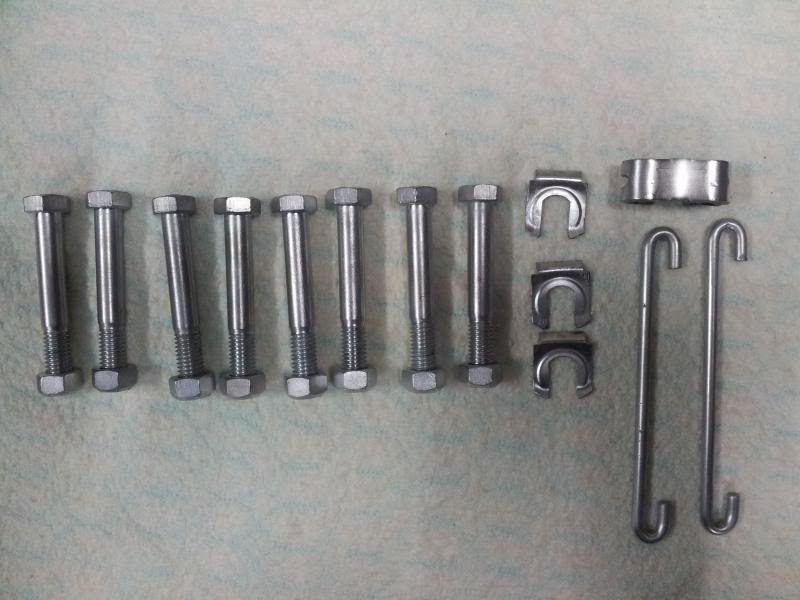
And finally the rear trailing arm bolts and handbrake parts, clips


20130903_191001.jpg


What do you reckon, worth it or not


#2 hanra

hanra

    Oh My, Don't you post alot

  • Members
  • PipPipPipPipPipPipPip
  • 10,916 posts
  • Name:Brad
  • Location:Farrrrrr North Qld
  • Car:1975 LH SL/R 5000, 1967 Morris Cooper S, E36 BMW, Toyota Corolla, Isuzu DMax
  • Joined: 24-March 11

Posted 03 September 2013 - 07:48 PM

Very nice. Is it a Janes DIY kit?

#3 sibhs

sibhs

    Lotsa Posts!

  • Members
  • PipPipPipPipPipPip
  • 2,707 posts
  • Name:Martin
  • Location:Perth
  • Car:LJ Coupe S
  • Joined: 27-July 12

Posted 03 September 2013 - 07:53 PM

Results look excellent, zinc plating is pretty cheap if you have someone close, but otherwise keep doing what your doing.  If you keep it inhouse it won't get lost. That's my fear about sending stuff to zinc platers.

Marty


#4 LJGTR6

LJGTR6

    Forum Fan

  • Members
  • PipPipPipPip
  • 309 posts
  • Name:Steve
  • Location:NSW
  • Car:1977 LX SL 4 Door and 1973 LJ 2 Door
  • Joined: 06-April 10
Garage View Garage

Posted 03 September 2013 - 07:54 PM

Pretty damn good i say.


#5 _Bomber Watson_

_Bomber Watson_
  • Guests

Posted 03 September 2013 - 07:58 PM

That is frOcking sexy.


The public demands details.


Cheers.


#6 slar

slar

    Forum Fan

  • Members
  • PipPipPipPip
  • 498 posts
  • Name:AL
  • Location:Newcastle
  • Car:Rusty the Torana......Nearly complete
  • Joined: 14-September 09
Garage View Garage

Posted 03 September 2013 - 08:03 PM

Very nice. Is it a Janes DIY kit?

Nope its a home made job, just a bit of studying on the internet and youtube.

I wanted a true home made way of doing this with readily available chemicals you can buy from the supermarket.


#7 AbsynthHatch

AbsynthHatch

    Forum Fixture

  • Members
  • PipPipPipPipPip
  • 736 posts
  • Name:Mark
  • Location:Cairns, Qld.
  • Joined: 10-March 09

Posted 03 September 2013 - 08:07 PM

Do tell more please.

#8 hanra

hanra

    Oh My, Don't you post alot

  • Members
  • PipPipPipPipPipPipPip
  • 10,916 posts
  • Name:Brad
  • Location:Farrrrrr North Qld
  • Car:1975 LH SL/R 5000, 1967 Morris Cooper S, E36 BMW, Toyota Corolla, Isuzu DMax
  • Joined: 24-March 11

Posted 03 September 2013 - 08:07 PM

Awesome. Well done. Do share!!!!

#9 _Bomber Watson_

_Bomber Watson_
  • Guests

Posted 03 September 2013 - 08:44 PM

That is frOcking sexy.


The public demands details.


Cheers.


It appears, as usual, Bomber knows best.


THE PUBLIC DEMANDS DETAILS.


Cheers.


#10 _76lxJAS_

_76lxJAS_
  • Guests

Posted 03 September 2013 - 08:59 PM

I done a far bit of this also.
First opinion was great. Left out side for a few days and wet and they rust it in spots.
Thow mine was a cobalt nickle kit.
Doesnt compair to a good triple plated chrome job..

#11 _Bomber Watson_

_Bomber Watson_
  • Guests

Posted 03 September 2013 - 09:01 PM

Zink coating isnt supposed to compare to chrome, and nickle isnt as good as zink....


#12 _76lxJAS_

_76lxJAS_
  • Guests

Posted 03 September 2013 - 09:06 PM

Lol I know that. For the less intelligent people that may think it is as good as chrome I was giving them a heads up. And yes as I said though mine was cobalt nickle. Wasnt compairing anything to each other. Just letting ppl know options.

#13 _Bomber Watson_

_Bomber Watson_
  • Guests

Posted 03 September 2013 - 09:20 PM

Cool as. 


#14 slar

slar

    Forum Fan

  • Members
  • PipPipPipPip
  • 498 posts
  • Name:AL
  • Location:Newcastle
  • Car:Rusty the Torana......Nearly complete
  • Joined: 14-September 09
Garage View Garage

Posted 03 September 2013 - 09:22 PM

That is frOcking sexy.


The public demands details.


Cheers.

Ok no worries.

Things you will need to get started.


9 Litre plastic bucket

Zinc anodes... enough to surround the bucket and at least one large piece in the bottom of the bucket...you can buy this from a boat shop or chandlery very cheap $15.00 for what you see in the bucket and that's enough zinc to plate about 200 Toranas

1kg of Epsom salts

8 litres of white vinegar...coles cheap stuff $1.98/2ltrs

1.2kg of white sugar.... used as a brightener.

Some decent gauge copper wire for the anodes

A few strands of light guage copper wire for hanging parts.

1 piece of copper water pipe for the cathode hanger

1 6v power supply rated at 500Ma to 1 amp

200ml of muraic acid (hydrochloric acid) to be used as an acid dip before plating... buy this at any hardware shop.

And aluminium cleaner ( chemtech BLITZ) as this contains a small amount of phosphoric acid... for cleaning the plated parts to a bright shine.

Small stainless parts cleaning brush....supercheap autos

And a little fine grade steel wool.


Method

Electrolyte

Mix Vinegar, Epsom salts and sugar together until dissolved in the bucket.

Cut your anodes into equal sizes and drill a 6 mm hole in each piece, then attach reasonable lengths of the heavier gauge copper wire to them and place them in the bucket at equal spacing.... bend the wire over the edge of the bucket to support them in place and wire them in such a way that they are all connected, refer to the first picture. 

You now have Zinc anodes ready to go.

Next get your copper pipe and flatten the ends the same width as the bucket so it doesn't roll and while doing this squash a piece of heavy gauge wire in one end... this will be your cathode hanger.

Place this on top of the bucket and make sure it is not touching any of your anode wiring or it will short out.

Grab your power supply and cut the pin plug off the end and strip each wire back about 40mm and twist up tight.....the wire with the white strip on it is the positive+ and the plain black one is the Negative-.

Attach the positive to the anode (Zinc) wiring and the negative to the cathode wire (copper pipe).... turn on power and your almost ready to start.

Now before plating your good parts you need to plate out the electrolyte... this sets up the solution for complete surface coating.... this means you have to get zinc ions in the solution for it to plate quickly and evenly.

To do this you need roughly a square piece of say body metal about 50mm square that has been wire brushed of all contaminates and dipped in the hydrochloric solution (will get that in a minute) and hang this submerged in your electrolyte with the power on. You should see a slight fizzing going on....this needs to run like this overnight if possible.


Hydrochloric solution.

1 litre of water to 200ml of acid mixed well.....wear gloves and glasses as this stuff burns like nothing else and will blind you if you get it in your eyes. :furious:

This will be your parts dip..... keep another bucket of plain water handy to rinse parts after dipping.


Parts cleaning and plating

I clean all dirt and grease of the parts before doing anything else....use a water soluble degreaser in a spray can... cheap stuff will do the trick.

Then hang your parts in the hydrochloric solution... you may see some fizzing going on, this will be the previous zinc coating being dissolved by the acid and this will also remove surface rust.

After the fizzing has stopped rinse the part thoroughly and dry off with a rag.

Next you need to wire wheel the part back to bright steel.

Once that is done dip your part into the hydrochloric acid quickly and then rinse quickly then hang in the zinc bucket submerged, if you wait to long to hang it, it will flash rust and you will have to start again.

Now that it is in the zinc bucket you can let the system do its stuff, you see some fizzing and that's good, it is now being plated with zinc. Leave it in the zinc bucket for 30  minutes or until completely plated evenly

When you pull the part out it will have a blueish grey appearance however it should be completely coated in zinc.


Brightening up the part.

I use a week solution of aluminium cleaner (chemtech BLITZ) available at auto stores mixed with water

Dip your parts in this one at a time and using a stainless parts cleaning brush brush the parts to a bright shine then finish of with fine steel wool.... when satisfied rinse off with water and dry. ( wear gloves and glasses when doing this.) :furious:

You can replate at this stage if you want a heavier coating of zinc then repeat the cleaning procedure.


There you have it, very long winded instructions but it sounds more complicated than it really is.

Once your set up and going its really simple and very satisfying to plate your own parts back to new.


The total cost of all the above was $35.00 and this set up will do all your parts, all your friends parts with heaps left over.

I done all those bolts on Saturday in between working on the torry.


Its not hard and does a good job and saves you running around to the platers with small parts that tend to get lost.


I just like doing all my own stuff on the car if I can cause I find it enjoyable when some one asks who done that, I can say I did lol.


If you haven't got the patience stick with your local plater... no worries.

Cheers

Al :clappin:


Just an addition... don't use any power supply over 1amp max for doing small parts as this will burn the plating black and that's not good, 500ma is great for small parts but if using a 1amp supply you can plate several parts at once as the amperage is balanced out by the surface area of the parts.

Ie 500ma will plate 2 bolts and 2 washers and 2 nuts at once or 1amp will plate 4 bolts 4 washers and 4 nuts.


Edited by slar, 03 September 2013 - 09:32 PM.


#15 _Bomber Watson_

_Bomber Watson_
  • Guests

Posted 03 September 2013 - 09:31 PM

You sir, are a gentleman and a connoisseur. 


Cheers. 


#16 TerrA LX

TerrA LX

    Fulcrum Fixture

  • Members
  • PipPipPipPipPipPipPip
  • 14,241 posts
  • Location:Sid 'n' knee
  • Joined: 31-May 06

Posted 03 September 2013 - 10:01 PM

On the to do list...


#17 hanra

hanra

    Oh My, Don't you post alot

  • Members
  • PipPipPipPipPipPipPip
  • 10,916 posts
  • Name:Brad
  • Location:Farrrrrr North Qld
  • Car:1975 LH SL/R 5000, 1967 Morris Cooper S, E36 BMW, Toyota Corolla, Isuzu DMax
  • Joined: 24-March 11

Posted 03 September 2013 - 10:01 PM

Excellent.

#18 WhiteA9XS

WhiteA9XS

    .

  • Members
  • PipPipPipPipPip
  • 1,646 posts
  • Name:Shaun
  • Location:Billys Creek
  • Car:LJ LX
  • Joined: 08-November 05
Garage View Garage

Posted 03 September 2013 - 10:30 PM


Looks like you have it working well looking at the parts you have plated slar.

I did a few years of electro plating for my first job and its pretty simple , once the item is prepped it only take a few minutes to coat in the solution.

I use a fish tank air pump and some tube to keep the solution mixed , also a fish tank heater to keep the solution at 26 degrees , 12 volt transformer adjusted to 1.5 volts .

Titanium plates work well to give of the positive current .

#19 Ando

Ando

    Forum Fixture

  • Members
  • PipPipPipPipPip
  • 527 posts
  • Location:Coolangatta
  • Car:6/'76 L32 SS white & black. 9/'76 L31 SS gold. 5/'77 L31 SS Chamois. 3/'79 UC SL Deluxe hatch.
  • Joined: 10-February 08
Garage View Garage

Posted 04 September 2013 - 05:40 AM

This thread needs to be pinned.


#20 Mort

Mort

    Lotsa Posts!

  • Members
  • PipPipPipPipPipPip
  • 2,760 posts
  • Name:Mort
  • Location:Moranbah, QLD.
  • Car:74 LH SL/R 4.2, 75 LH 4 door 186
  • Joined: 16-December 07
Garage View Garage

Posted 04 September 2013 - 02:27 PM

Excellent work slar, i will put it on the to do list.


+1 with Ando, it needs to be pinned, stickied, have it's own 'how to' thread, anything to save it from disappearing and make it easy to find.


#21 torana?

torana?

    Forum Member

  • Members
  • PipPipPip
  • 94 posts
  • Location:QLD
  • Joined: 23-May 06

Posted 04 September 2013 - 03:29 PM

I did my master cylinder cap and bonnet catch myself and they came out really good


Edited by torana?, 04 September 2013 - 03:35 PM.


#22 slar

slar

    Forum Fan

  • Members
  • PipPipPipPip
  • 498 posts
  • Name:AL
  • Location:Newcastle
  • Car:Rusty the Torana......Nearly complete
  • Joined: 14-September 09
Garage View Garage

Posted 04 September 2013 - 05:47 PM

No problems people, I put this up because this is truly a home method of plating Zinc with out all the exotic chemicals and special power supplies, call it if you like (the shed method) that anyone can do with basic stuff.

Cheers
Glad you liked
Al

#23 _oldjohnno_

_oldjohnno_
  • Guests

Posted 04 September 2013 - 08:47 PM

Great stuff, thank you.


#24 _aussie too_

_aussie too_
  • Guests

Posted 04 September 2013 - 09:35 PM

Thankyou very much, I have been trying for awhile now to nut out a home kit.
Will be starting straight away,once again...... really appreciate you sharing your research that would have gone into making this work.

#25 _Viper_

_Viper_
  • Guests

Posted 05 September 2013 - 12:16 AM

Got a DIY triple plate chrome writeup? :D


1 user(s) are reading this topic

0 members, 1 guests, 0 anonymous users