
Gemini Coupe Rebuild!!!
Started by
_Viper_
, Jan 07 2008 11:18 PM
203 replies to this topic
#51
 _Viper_
_Viper_
-

- Guests
Posted 15 June 2009 - 07:29 PM
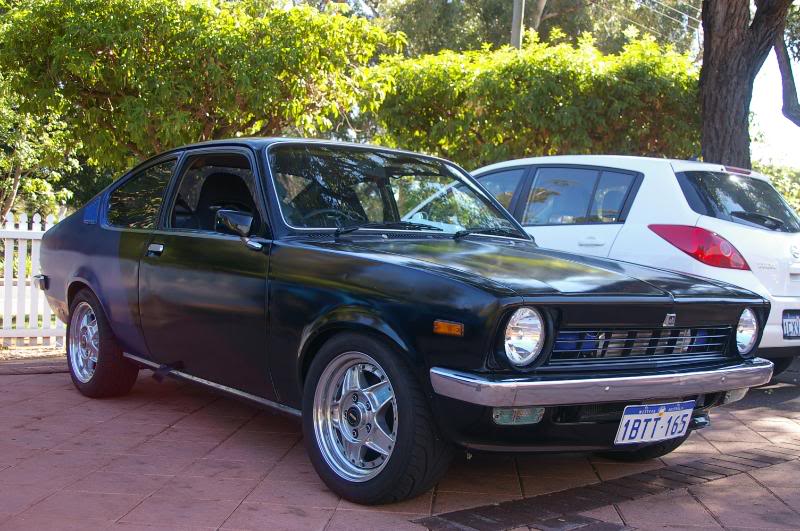
Just a pic from the GemsWA.com cruise on Sunday (ignore the seatbelt haha)
#52
_BAILLIE_
_BAILLIE_
-
- Guests
Posted 15 June 2009 - 09:04 PM
Nice gemmy mate, looks like you'll be ready to paint in no time.
Great little cars too, easy to work on and really fun to slide around in.
Great little cars too, easy to work on and really fun to slide around in.
#54
Heath
 View Garage
-

- Administrators
-

- 18,385 posts
I like cars.
- Name:Heath
- Location:Eastern Suburbs, Melbourne
- Car:Heavily Modified UC Sunbird Hatchback
- Joined: 07-November 05
View Garage
Posted 16 June 2009 - 08:07 AM
Throw your seatbelt back in before you close your door! hahahhahaha
#55
_Viper_
_Viper_
-
- Guests
Posted 16 June 2009 - 09:53 PM
Or better yet, order some decent seatbelts that actually retract lol... thats the plan anyway.... and I said Ignore the seatbelt 
#56
Rockoz
-

- Members
-
- 4,031 posts
Oh My, Don't you post alot
- Name:Rob
- Location:Cowra NSW
- Joined: 21-September 08
Posted 16 June 2009 - 11:44 PM
Viper
Question about your windows.
The power windows are after market?
When installed does the winder shaft protrude through the door lining?
Is the switch located to cover this?
Thanks
Rob
Question about your windows.
The power windows are after market?
When installed does the winder shaft protrude through the door lining?
Is the switch located to cover this?
Thanks
Rob
#58
Rockoz
-
- Members
-
- 4,031 posts
Oh My, Don't you post alot
- Name:Rob
- Location:Cowra NSW
- Joined: 21-September 08
Posted 18 June 2009 - 08:44 PM
Thanks
Rob
Rob
#59
_panthervs_
_panthervs_
-
- Guests
Posted 18 June 2009 - 09:15 PM
where in perth did u get ur diff done mate?
#60
_LJ355_
_LJ355_
-
- Guests
Posted 18 June 2009 - 09:24 PM
Nice project mate should go alright
Had 13B bridgeport gemini for while
Lotsa fun
Had 13B bridgeport gemini for while
Lotsa fun
#61
DanWA
-

- Members
-
- 2,440 posts
Forum Fixture
- Location:Southwest W.A
- Car:LS1 LX 4 Door
- Joined: 27-April 06
Posted 18 June 2009 - 09:28 PM
Would have been Final Drive in Oconnor panthervs
#62
Peter UC
-
- Members
-
- 770 posts
Forum Fixture
- Location:Emerald Vic
- Joined: 08-November 05
Posted 18 June 2009 - 10:54 PM
What gas injection system are you using?
#63
_Viper_
_Viper_
-
- Guests
Posted 19 June 2009 - 07:49 PM
Where did I get my diff done???
Its a stock Gem diff, just cleaned up, painted it with POR15, fitted VN-VS rear discs (new discs, reco calipers from Perth Brake parts), Welded the center, Re-drilled Gemi axles to 5-stud (bought from a forum member) with disc brake seals fitted, White line adjustable sway bar, Torque Tube strengthened by Rotormotion and Heavy duty bushes. fitted it all myself.
And its a Profire LPG Vapour Injection system supplied and fitted by Rage LPG Racing
#64
_Viper_
_Viper_
-
- Guests
Posted 09 September 2009 - 11:52 PM
Ran the Coupe down the motorplex tonight, Managed a best time of 13.808 and top speed of 101.8mph/163.8kph 
#65
mranarot
-

- Members
-
- 397 posts
Forum Fan
- Name:Michael
- Location:the pub
- Car:turbo lj
- Joined: 30-December 06
Posted 10 September 2009 - 01:49 AM
sh*t thats respectable mate well done!
#67
_Viper_
_Viper_
-
- Guests
Posted 10 September 2009 - 09:44 PM
Cheers
Maybe someone could shed some light, When I was launching alot of the times the rear end would bounce and shake about a fair bit, Whats that caused by? I thought that only really happened with leaf spring cars?
Also can anyone tell me the potential ET with a 101mph trap speed? And how do you work it out?
#68
_Viper_
_Viper_
-
- Guests
Posted 23 December 2009 - 09:21 PM
Well I started Holidays this week and decided to try and give the Coupe a paint job in time for Motorvation Jan 16th (eek) Im basically working on it from 8am - 5pm everyday so fingers crossed.
Been at it last 2 days (did a little bit earlier inc paint strip bootlid and weld flutes into the guards) but so far Ive got the bootlid and passenger door in Hi-fill, filled the doors and boot locks, Repaired rust in the drivers door and stripped it back to metal.


Wish me luck...
Been at it last 2 days (did a little bit earlier inc paint strip bootlid and weld flutes into the guards) but so far Ive got the bootlid and passenger door in Hi-fill, filled the doors and boot locks, Repaired rust in the drivers door and stripped it back to metal.
Wish me luck...
#69

Posted 24 December 2009 - 06:18 AM
Good luck!
Looking good so far, its not a fun job sometimes but great to see some results
Looking good so far, its not a fun job sometimes but great to see some results
#70
Stinga
-

- Members
-
- 2,114 posts
.
- Name:Stinga
- Location:Wollongong, NSW
- Car:HD Holden ute, and sedan, UC torana
- Joined: 05-December 05
Posted 24 December 2009 - 10:09 AM
sweet looking gem! i only like the coupes and the vans. love the flutes in the guards! cant wait to see it painted up
p.s the simmons look much tougher than the previous wheels!!
p.s the simmons look much tougher than the previous wheels!!
#71
_Viper_
_Viper_
-
- Guests
Posted 27 December 2009 - 10:27 PM
Update time...
Both doors are in Hi-fill

Fitted the front spoiler, man that was a kent... is supposedly to suit a Gem but had to cut Heaps out of the front apron and trim abit from the spoiler in places. but got it there in the end and fits alright.


Slept in a little this morning but after getting up at 10am spent pretty much all day fitting the front flares and modifying the guards to suit.
Well thought itd be ok to just flare the guards under the bolt on flares... So off I went and flared them with a hammer and dolly only to find it was nowhere near enough angle to make use of the room the bolt on flare gives... so out came the grinder and cut the guard out about 15mm shy of the flares bolt holes. Now as most would know this takes all the strength out of the guard as the rolled lip is what gives it its stiffness. So first off just using some bullnose pliers I went around the edge and folded about 10mm back creating a lip just like factory. Then using a hammer and dolly went around and straightened it. And wallah, as strong as factory but much more room!

Also fitted the rear flares and marked out where im gonna cut out. Is the same as a Torana with a double skin... so ill be following Rutz guide on this one 
Both doors are in Hi-fill
Fitted the front spoiler, man that was a kent... is supposedly to suit a Gem but had to cut Heaps out of the front apron and trim abit from the spoiler in places. but got it there in the end and fits alright.
Slept in a little this morning but after getting up at 10am spent pretty much all day fitting the front flares and modifying the guards to suit.
Well thought itd be ok to just flare the guards under the bolt on flares... So off I went and flared them with a hammer and dolly only to find it was nowhere near enough angle to make use of the room the bolt on flare gives... so out came the grinder and cut the guard out about 15mm shy of the flares bolt holes. Now as most would know this takes all the strength out of the guard as the rolled lip is what gives it its stiffness. So first off just using some bullnose pliers I went around the edge and folded about 10mm back creating a lip just like factory. Then using a hammer and dolly went around and straightened it. And wallah, as strong as factory but much more room!
Also fitted the rear flares and marked out where im gonna cut out. Is the same as a Torana with a double skin... so ill be following Rutz guide on this one
Edited by Viper, 27 December 2009 - 10:30 PM.
#72
_Bomber Watson_
_Bomber Watson_
-
- Guests
Posted 27 December 2009 - 11:44 PM
Looking good mate keep it up.
#73
xu1kid
-

- Members
-
- 364 posts
Forum Fan
- Name:anthony
- Location:Albury
- Car:lj gtr xu1
- Joined: 30-December 08
Posted 27 December 2009 - 11:47 PM
great work mate good to see a true back yarder having a crack rather than paying people to do it, it may take longer but doesnt cost as much, great project by the way
#74
_Viper_
_Viper_
-
- Guests
Posted 28 December 2009 - 03:05 PM
Yay lunch time...
Just about finished one of the rear guards.
Marked out:

Chopped the outer and inner skin... leaving the inner abit longer.

Then I cut slots along the inner skin then hammered them over to meet the outer skin

Then welded the inner and outer together:

Shot from the inside.

This is at ride height:

And on bumpstops

Little bit of tidying left to do then onto the other side.
Just about finished one of the rear guards.
Marked out:
Chopped the outer and inner skin... leaving the inner abit longer.
Then I cut slots along the inner skin then hammered them over to meet the outer skin
Then welded the inner and outer together:
Shot from the inside.
This is at ride height:
And on bumpstops
Little bit of tidying left to do then onto the other side.


2 user(s) are reading this topic
0 members, 2 guests, 0 anonymous users

