
Viper good stuff mate! have been reading this with interest, always had a soft spot for the old gemmi's. Your Torana is coming along nicely too! keep us updated.
Gemini Coupe Rebuild!!!
Started by
_Viper_
, Jan 07 2008 11:18 PM
203 replies to this topic
#102
 _Woodsy_
_Woodsy_
-

- Guests
Posted 01 May 2010 - 11:52 PM
GO the Gemi's!! I had a trick little Orange wagon nicknamed ' Fanta ' lol
Before i bought it. I took the spotties off it and i put Piazza wheels on.
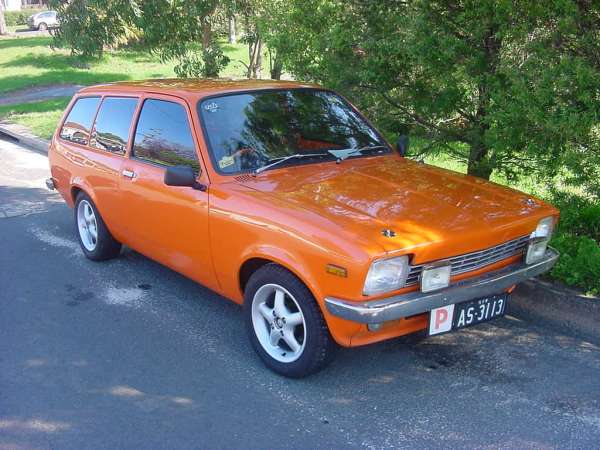
I'd own another in a heartbeat
Before i bought it. I took the spotties off it and i put Piazza wheels on.
I'd own another in a heartbeat
Edited by Woodsy, 02 May 2010 - 12:05 AM.
#103
_Viper_
_Viper_
-
- Guests
Posted 19 May 2010 - 01:17 AM
Neat wagon  I also got a TD wagon which is just a stocker but runs like a dream and was doing plenty of k's in it untill they gave me the work ute back.
But What a day, just got home from Cams workshop... Got there about lunch time and we had to finish wet sanding the shell, got it all sanded and masked up by about 6:00 then sprayed her up
wow ppg it comes out soo perfect on flat horizontal panels as you can put it on niiiice and wet.. Cant quite go as wet on the side panels which amounts to a little orange peel but im pretty happy with it...
I got 3 runs on the rear but only in the clear, and 1 is covered by the bumper the other is covered by the tail lights panel but the 3rd is just below the tail light but we will just sand and polish it out
Here's some pics, Enjoy...


I also dropped the bare metal bonnet off to him today, didnt get warped this time, so he will prep that next and will spray the boot and bonnet this weekend hopefully.
I also got a TD wagon which is just a stocker but runs like a dream and was doing plenty of k's in it untill they gave me the work ute back.But What a day, just got home from Cams workshop... Got there about lunch time and we had to finish wet sanding the shell, got it all sanded and masked up by about 6:00 then sprayed her up
wow ppg it comes out soo perfect on flat horizontal panels as you can put it on niiiice and wet.. Cant quite go as wet on the side panels which amounts to a little orange peel but im pretty happy with it...
I got 3 runs on the rear but only in the clear, and 1 is covered by the bumper the other is covered by the tail lights panel but the 3rd is just below the tail light but we will just sand and polish it out
Here's some pics, Enjoy...
I also dropped the bare metal bonnet off to him today, didnt get warped this time, so he will prep that next and will spray the boot and bonnet this weekend hopefully.
#104
Stinga
-

- Members
-

- 2,114 posts
.
- Name:Stinga
- Location:Wollongong, NSW
- Car:HD Holden ute, and sedan, UC torana
- Joined: 05-December 05
Posted 20 May 2010 - 07:43 AM
nice colour! forgot about this weapon. cant wait to see it coming together, will look sweet all painted up with the flares on.
#105
Heath
 View Garage
-

- Administrators
-
- 18,385 posts
I like cars.
- Name:Heath
- Location:Eastern Suburbs, Melbourne
- Car:Heavily Modified UC Sunbird Hatchback
- Joined: 07-November 05
View Garage
Posted 20 May 2010 - 03:51 PM
Sweet as
#106
_SS Hatchback_
_SS Hatchback_
-
- Guests
Posted 21 May 2010 - 09:15 PM
Great thread and love the colour, alot of very neat mods too, My nephew is doing one of these up at the moment, Great cars
#107
lcgtr1970
-

- Members
-
- 1,702 posts
Forum Fixture
- Name:Jordan
- Location:having a beer, looking at the torana
- Joined: 13-March 06
Posted 21 May 2010 - 09:25 PM
look how good it looks on the rear quarter photo! like a mirror off the gun....sweet!
#109
_Viper_
_Viper_
-
- Guests
Posted 30 May 2010 - 12:20 AM
Another marathon Saturday, getting up for work in Pinjarra at 5am finishing work at 2pm, then hour n half drive to Bullsbrook to do some wetsanding untill 7pm then spraying untill 8:30 to finally make it home at 9:30, jump straight on the forum to post pics lol.
Sprayed the bootlid (top and bottom) Door mirrors and fuel flaps today. All went well so thats good. Only the bonnet, front guards, front apron and front spoiler to go!
Only had my phone camera this time so pics are not the best but yea, ya get what your given.


Cam also hung the doors for me during the week, shells looks awesome, cant wait to get it out into the sun,

Sprayed the bootlid (top and bottom) Door mirrors and fuel flaps today. All went well so thats good. Only the bonnet, front guards, front apron and front spoiler to go!
Only had my phone camera this time so pics are not the best but yea, ya get what your given.
Cam also hung the doors for me during the week, shells looks awesome, cant wait to get it out into the sun,
Edited by Viper, 30 May 2010 - 12:21 AM.
#110
Heath
View Garage
-
- Administrators
-
- 18,385 posts
I like cars.
- Name:Heath
- Location:Eastern Suburbs, Melbourne
- Car:Heavily Modified UC Sunbird Hatchback
- Joined: 07-November 05
View Garage
Posted 01 June 2010 - 04:04 PM
Man that just looks like glass. Love it
#111
_Viper_
_Viper_
-
- Guests
Posted 07 June 2010 - 10:58 PM
Almost there... Sprayed the Bonnet and one of the guards, only the other guard, apron and front spoiler left now!


#112
_wblje_
_wblje_
-
- Guests
Posted 26 June 2010 - 02:07 PM
love the gemi.....................still want to see a rover v8 in there thou
#113
_Viper_
_Viper_
-
- Guests
Posted 26 June 2010 - 05:26 PM
Hehe yea, Ive got a V8 in the Torana tho, so dont mind something different in the gem... Were doing a rover conversion into a friends gem tho.
Coupe comes home tommorow all the paintings done and he has cut back and polished out all the runs I got haha.
Coupe comes home tommorow
all the paintings done and he has cut back and polished out all the runs I got haha.
#114
_Viper_
_Viper_
-
- Guests
Posted 27 June 2010 - 04:31 PM
Well after the most stressful drive home ever with the car trailer its home safe


The bonnet/roof/boot lid look absolutely mint, the sides have a little bit of orange peel so I might get them color sanded so there the same as the top, but besides that Im REALLY happy with it, wasnt all that sunny today but the few bits we got and the color changes from a Coke sorta browny/goldie color to more or a purple and then to a cherry red and back to a very dark purple in the shade
Cant wait to get the flares on and fat wheels...
Edited by Viper, 27 June 2010 - 04:33 PM.
#115
GML-31
-

- Members
-
- 5,239 posts
Oh My, Don't you post alot
- Name:Kev
- Location:Highland Park
- Car:too many
- Joined: 08-November 05
Posted 27 June 2010 - 04:51 PM
that looks bloody fantastic
#116
its Paul
-

- Members
-
- 1,577 posts
Formerly lx8vd77
- Name:Paul
- Location:Gold Coast
- Car:LXSS, VUSS, VESSv & the mighty HB
- Joined: 07-January 08
Posted 27 June 2010 - 05:06 PM
Viper that looks brilliant......... Now wash ya bloody Ute.
#117
Stinga
-
- Members
-
- 2,114 posts
.
- Name:Stinga
- Location:Wollongong, NSW
- Car:HD Holden ute, and sedan, UC torana
- Joined: 05-December 05
Posted 28 June 2010 - 01:51 AM
looks awesome as i expected. going to look kick ass with the flares on!!
#118
Heath
View Garage
-
- Administrators
-
- 18,385 posts
I like cars.
- Name:Heath
- Location:Eastern Suburbs, Melbourne
- Car:Heavily Modified UC Sunbird Hatchback
- Joined: 07-November 05
View Garage
Posted 28 June 2010 - 11:01 PM
And your wheels & tyres hahaha that will make it look great
Still that body looks pretty breath-taking to me
Still that body looks pretty breath-taking to me
#119
_Woodsy_
_Woodsy_
-
- Guests
Posted 29 June 2010 - 07:06 PM
Go The Coupe! Makes me wish i still had mine, not sure if i have mentioned it before, it ran a turbo motor was engineered etc but i got it as a rolling shell.
#120
MODNIZD
-

- Members
-
- 460 posts
Forum Fan
- Name:Phil
- Location:Perth WA
- Car:4 Door LC RB25DET
- Joined: 12-November 05
Posted 30 June 2010 - 01:48 AM
Clint your as bad as me. Get stuck back into the torry. I am.
#121
_Viper_
_Viper_
-
- Guests
Posted 11 July 2010 - 01:10 AM
Haha but Gemini cruise is coming up so goto get it ready for then! 
Yay progress, I spoke to the trimmer last week and since im working away was hard to get the car down to his workshop so we organized for him to come and do it at my place, which he did friday
Sorry only got my sh!tl sh!tl phone camera which doesn't take good pics in low light, but will give you an idea till I get hold of Mels camera.
Roof Lining:

C-pillar:

Rear Panel:

Last but not least the Dash... he said this was the hardest dash he has ever done because of the sharp angles etc, he redid it twice because he wasn't happy with it... still isn't 100% happy as there is a couple of creases in places as you can see... but yea, still heaps better then it was originally... and once all the other stuffs together wont be that bad. well Ill keep telling myself that anyway...

He also dropped off my new carpet and the newly trimmed sunvisors, I still goto trim the parcel shelf and door trims myself tho.
Oh a Little present was at my doorstep also


Its a Detroit True-Trac helical Gear LSD for my Hilux diff, they usually sell for just shy of $1000 but I scored it brand new still in the box from Ebay for $500 was so stoked...
http://www.eaton.com...etrac/index.htm
Well I had asked the trimmer to trim the B-pillar and the section under the rear 1/4 window also, but he rang me yesterday and said he couldnt do it because there is nowhere to tuck the materiel under because the slot where the rear trim panel slots into is too tight and another layer of vinyl would stop you from fitting it... So I jus said oh ok guess ill have to paint that area.
But was looking at it and thought nah its do-able so I gave it a shot today...
Before:
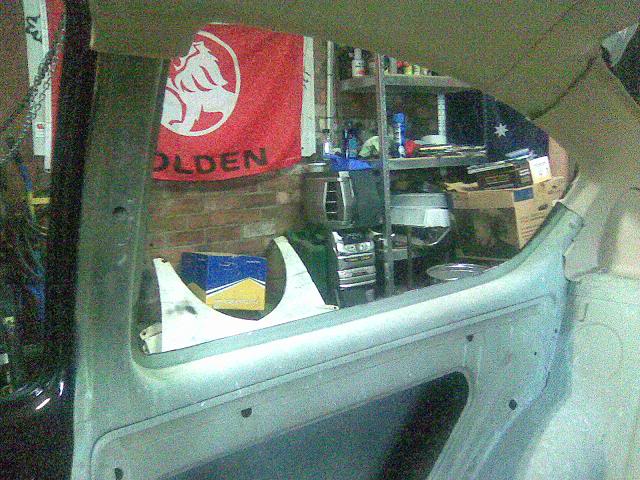
After:
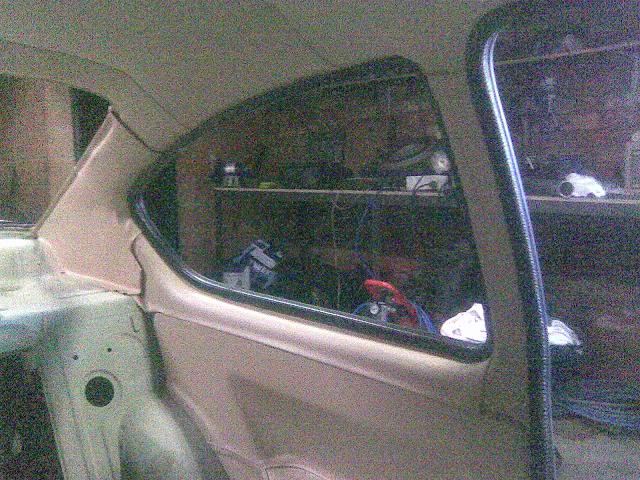
All I had to do was to bend the lip out a little more to allow for the extra layer of vinyl and it turned out pretty neat. altho It took my like 4 hrs to do that one side haha, making sure I cut the vinyl right... but ive got a template now so the other side should be easy
See people, dont be scared to give something a go... even if someone tells you its not possible...
Yay progress, I spoke to the trimmer last week and since im working away was hard to get the car down to his workshop so we organized for him to come and do it at my place, which he did friday
Sorry only got my sh!tl sh!tl phone camera which doesn't take good pics in low light, but will give you an idea till I get hold of Mels camera.
Roof Lining:
C-pillar:
Rear Panel:
Last but not least the Dash... he said this was the hardest dash he has ever done because of the sharp angles etc, he redid it twice because he wasn't happy with it... still isn't 100% happy as there is a couple of creases in places as you can see... but yea, still heaps better then it was originally... and once all the other stuffs together wont be that bad. well Ill keep telling myself that anyway...
He also dropped off my new carpet and the newly trimmed sunvisors, I still goto trim the parcel shelf and door trims myself tho.
Oh a Little present was at my doorstep also
Its a Detroit True-Trac helical Gear LSD for my Hilux diff, they usually sell for just shy of $1000 but I scored it brand new still in the box from Ebay for $500
was so stoked... http://www.eaton.com...etrac/index.htm
Well I had asked the trimmer to trim the B-pillar and the section under the rear 1/4 window also, but he rang me yesterday and said he couldnt do it because there is nowhere to tuck the materiel under because the slot where the rear trim panel slots into is too tight and another layer of vinyl would stop you from fitting it... So I jus said oh ok guess ill have to paint that area.
But was looking at it and thought nah its do-able so I gave it a shot today...
Before:
After:
All I had to do was to bend the lip out a little more to allow for the extra layer of vinyl and it turned out pretty neat. altho It took my like 4 hrs to do that one side haha, making sure I cut the vinyl right... but ive got a template now so the other side should be easy
See people, dont be scared to give something a go... even if someone tells you its not possible...
Edited by Viper, 11 July 2010 - 01:12 AM.
#122

Posted 11 July 2010 - 08:26 AM
^ Absolutely, try anything once!
Good score on the True-trac, car is coming together nicely
Good score on the True-trac, car is coming together nicely
#123
_Viper_
_Viper_
-
- Guests
Posted 11 July 2010 - 11:37 PM
Worked on the coupe all day and feels like I didnt get much done, spent ages stuffing around with one of the window seals :/
But I did manage to clean all the dust and most of the overspray off the interior, neaten up the wiring a little and fit the Dynamat to the floor.

I was actually easier to fit then I thought, is quite malleable and presses into shape easily. It took 6 or maybe it was 7 sheets to do the floor, Ive still got 2 and a half sheets left over so will probly do the parcel shelf and inside the rear quarter panels.
Also because Ive shaved my boot lock ive got a late model boot catch fitted as its got a built in position for a release cable... But the late model striker wont bolt onto the gem rear and the early model one doesnt suit so had to make a new one.


Nothing fancy, but ill give it a polish tommorow and get it chromed.
Ahh 2 days left.
But I did manage to clean all the dust and most of the overspray off the interior, neaten up the wiring a little and fit the Dynamat to the floor.
I was actually easier to fit then I thought, is quite malleable and presses into shape easily. It took 6 or maybe it was 7 sheets to do the floor, Ive still got 2 and a half sheets left over so will probly do the parcel shelf and inside the rear quarter panels.
Also because Ive shaved my boot lock ive got a late model boot catch fitted as its got a built in position for a release cable... But the late model striker wont bolt onto the gem rear and the early model one doesnt suit so had to make a new one.
Nothing fancy, but ill give it a polish tommorow and get it chromed.
Ahh 2 days left.
#124
_Viper_
_Viper_
-
- Guests
Posted 12 July 2010 - 10:26 PM
Umm dont really have too much to show for my days work. I did manage to sort out both my door and boot seals tho!
Put Dynamat on the Parcel shelf... Still have 1.5 sheets left, Think ill put abit on the boot floor.

Also following in Tim/Dirtbags footsteps and got hold of a Nutsert gun

Also picked up my hilux diff from final drive, to have the old mounts cut off, resized, lower gemini mounts fitted and holden diff ends fitted cost $520, high quality work too, very nice welds.


Windscreens are booked in to be fitted tomorrow
Put Dynamat on the Parcel shelf... Still have 1.5 sheets left, Think ill put abit on the boot floor.
Also following in Tim/Dirtbags footsteps and got hold of a Nutsert gun
Also picked up my hilux diff from final drive, to have the old mounts cut off, resized, lower gemini mounts fitted and holden diff ends fitted cost $520, high quality work too, very nice welds.
Windscreens are booked in to be fitted tomorrow
#125
_Bomber Watson_
_Bomber Watson_
-
- Guests
Posted 12 July 2010 - 10:35 PM
Are they alloy Nutserts??
If so i hope you put some sealer around them, otherwise you will get corrosion due to the contact of dissimilar metals...
Appart from that, looking shit hot mate.
Cheers.
If so i hope you put some sealer around them, otherwise you will get corrosion due to the contact of dissimilar metals...
Appart from that, looking shit hot mate.
Cheers.


2 user(s) are reading this topic
0 members, 2 guests, 0 anonymous users

