
What is a file finish that I keep hearing about, sorry to sound like a dumb arse but I've never seen it, and whats involved that makes it the ducks guts?
What's A File Finish Look Like?
Started by
_Brewster_
, Feb 27 2008 07:05 PM
13 replies to this topic
#2

Heath
 View Garage
-

- Administrators
-

- 18,380 posts
I like cars.
- Name:Heath
- Location:Eastern Suburbs, Melbourne
- Car:Heavily Modified UC Sunbird Hatchback
- Joined: 07-November 05
View Garage
Posted 27 February 2008 - 08:16 PM
No bog... lead wiping/filling and filing/sanding down metal only. So it will last as long as the paint will last, rather than how long the filler will last, if that makes sense.
Is the "bee's knees" in car restoration, but realistically most paintjobs get a bit tired through minor wear - don't just instantly turn from a showcar quality paintjob to absolute shit when the filler starts falling apart. It isn't economically worth it but I think that's part of the attraction. If someone is capable of doing it themselves then they are SERIOUSLY good, and if someone pays someone to do it for them it is like a statement saying that "no expense was spared on this rebuild". It's bragging rights of course, not that anyone will really know whether it genuinely is or isn't "file finished" apart from the people who see it in the body shop just before it has paint applied
But yeah I believe the last person who bought the black HO PHIII immediately pulled it down for a "file finish" respray even though the paint was awesome before that hahahaha. I was told he did it so that no one could pick on the car for any reason - you know how elitists are for judging other people's vehicles!!!
Wank factor 10/10 generally, my understanding is that a correctly applied good quality filler will last for a long long time anyway so I don't think I'd ever bother, but that's just me.
Edited by Heath, 27 February 2008 - 08:19 PM.
#3
ls2lxhatch
-

- Members
-
- 5,332 posts
- Location:Perth
- Car:LX Hatch
- Joined: 29-May 06
Posted 27 February 2008 - 08:42 PM
Have a look at the topics pinned at the top of this forum.
http://www.gmh-toran...hp?showforum=15
Metal Finishing
http://www.gmh-toran...showtopic=24343
http://www.gmh-toran...hp?showforum=15
Metal Finishing
http://www.gmh-toran...showtopic=24343
#4
_Yella SLuR_
_Yella SLuR_
-

- Guests
Posted 27 February 2008 - 08:42 PM
^^ That aint right. It is metal finish, no fillers whatsoever, not even lead. Lead wiping is banned, so not even worth discussing. Bog is the new lead.
The finish largely refers to the tool used to get the finish, a panel file (if necessary I can photograph one for you). Much easier attained in the modern day with an Easybeat (a slide hammer that self welds onto the panel using minimal current/heat) to pull your lows back up.
Can also be achieved using a simple dolly and hammer, if good access is afforded to the rear of the panel (difficult with side intrusion bars on doors). Refer to Pete's article on preparing a guard (Part 4) where he does a metal file finish there using very simple tools. He's also done an excellent job of it.
Do the Automotive Restoration Course at tech, that will get you started on the way sheet metal behaves.
Edited by Yella SLuR, 27 February 2008 - 08:43 PM.
#5
_Yella SLuR_
_Yella SLuR_
-
- Guests
Posted 27 February 2008 - 08:46 PM
Borrowed from Pete's thread.
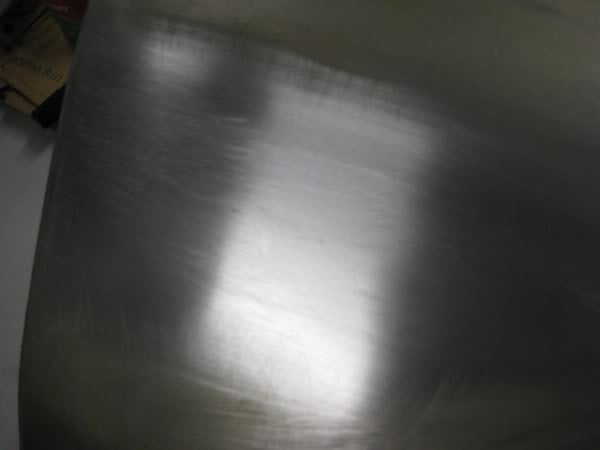
^ That's what a file finish ends up looking like. Perfect bare metal, no bends, ripples, highs, or lows.
Almost a shame to paint.
^ That's what a file finish ends up looking like. Perfect bare metal, no bends, ripples, highs, or lows.
Almost a shame to paint.
Edited by Yella SLuR, 27 February 2008 - 08:52 PM.
#6
_Yella SLuR_
_Yella SLuR_
-
- Guests
Posted 27 February 2008 - 09:09 PM
To demonstrate how loose a term it is, Pete didn't even use a body file, well I don't think he did.
#7
_Brewster_
_Brewster_
-
- Guests
Posted 27 February 2008 - 09:18 PM
I did read these guides, I didn't realise that was the ' file ' finish everyone keeps talking about.Have a look at the topics pinned at the top of this forum.
http://www.gmh-toran...hp?showforum=15
Metal Finishing
http://www.gmh-toran...showtopic=24343
Thanks Yella, where do you get the panel file from?
#8
_Yella SLuR_
_Yella SLuR_
-
- Guests
Posted 27 February 2008 - 09:30 PM
Gawd, that is a good question. I paid my panel beater mate to pick one up for me at trade price. I'm pretty sure you can buy them from most Auto-Paint shops though. The files for them are separate. A bit useless on their own though, they form a suite of tools used for panel work.
The most basic tools you need are:-
1. Panel File
2. Plenishing Hammer
3. Basic set of dolly's (Supercheap dollys are OK, must hammers are crap)
4. A speed file
5. A decent dolly.
^ I think that's what they said the minimum are (need to recheck tech notes).
Disk sander is also good to have, but you need to work it across and down the panel to get a stripey pattern to the metal. Try not to use your panel file on paint, they don't like it too much (get blunt).
Your getting into a whole new area of endeavour, which is hugely challenging, but rewarding.
#9
_Yella SLuR_
_Yella SLuR_
-
- Guests
Posted 27 February 2008 - 09:32 PM
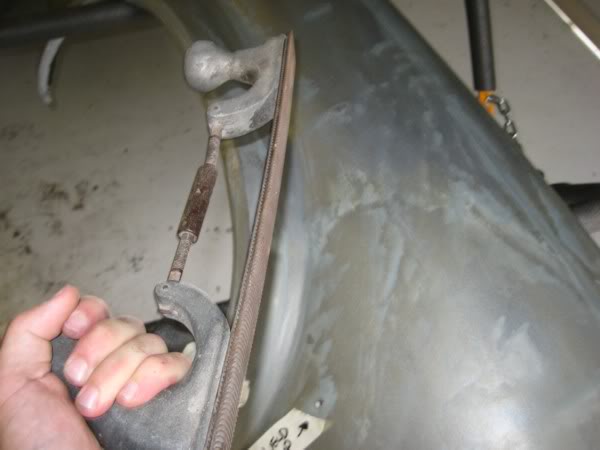
I was wrong, he did use a panel file. Here is one of the critters:
#10
_Brewster_
_Brewster_
-
- Guests
Posted 27 February 2008 - 09:35 PM
Top stuff Yella, thank you for your time mate.
#11
_Pete_
_Pete_
-
- Guests
Posted 27 February 2008 - 09:37 PM
I do use a Body Metal File when achieving this kind of finish. But it is really only used lightly as Torana steel isnt THAT thick compared to the really older stuff.
The metal file is used to lightly knock the top off tiny high spots caused in the metal bumping process. Also helps you identify low spots that need to be brought up as they won't be touched by the file's teeth.
I'm not a fan of lead myself, I've rectified enough ruined paint jobs caused by contamination in the leading process to know that modern 2K fillers are a better alternative. I've also dug enough lead out of poorly repaired dents to know that Cowboys who claim to be Craftsmen are no different to the BOG Barons out there.
Metal Files are available at any Automotive Paint Suppliers, I'd suggest starting with the finer tooth version so you don't over do it.

#13
_Yella SLuR_
_Yella SLuR_
-
- Guests
Posted 27 February 2008 - 09:43 PM
No worries mate, just winding down for the day.
If your real interested, do the Auto Restoration course, they cover all this stuff. They just don't give you enough time to perfect it, that takes practice.
^ oh, and you get to make a hub cap and a wheel chock in the process from 1.6mm steel sheet.
If your real interested, do the Auto Restoration course, they cover all this stuff. They just don't give you enough time to perfect it, that takes practice.
^ oh, and you get to make a hub cap and a wheel chock in the process from 1.6mm steel sheet.
Edited by Yella SLuR, 27 February 2008 - 09:45 PM.
#14
_Restocody_
_Restocody_
-
- Guests
Posted 10 July 2015 - 12:18 PM
This is a file finish that i done on an 211 merc
1) got lines out
2) worked the dent up a little
3) used a slapper and dolly to hit most of the dent up
4) quick wizz to get most of the paint
5) started to file
6) got rid of highs and lows with hammer dolly and slapper
7) filed again .. cross filed (repeat 6)
8) when i was happy wizzed it to send for paint.
Hope this helped
#bogfree
Attached Files
-
 20140917_080932.jpg 100.3K
8 downloads
20140917_080932.jpg 100.3K
8 downloads
-
20140917_083325.jpg 98.09K
7 downloads
-
20140917_094715.jpg 108.34K
8 downloads
-
20140917_094720.jpg 113.35K
8 downloads
-
20140917_112245.jpg 123.06K
8 downloads
-
20140917_143858.jpg 97.47K
8 downloads


1 user(s) are reading this topic
0 members, 1 guests, 0 anonymous users

