Jump to content


Chassis rail extensions


  • Please log in to reply
45 replies to this topic

#26 Heath

Heath

    I like cars.

  • Administrators
  • PipPipPipPipPipPipPip
  • 18,368 posts
  • Name:Heath
  • Location:Eastern Suburbs, Melbourne
  • Car:Heavily Modified UC Sunbird Hatchback
  • Joined: 07-November 05
Garage View Garage

Posted 03 June 2010 - 11:22 AM

Howard you need to get rid of the javascript on your page lol

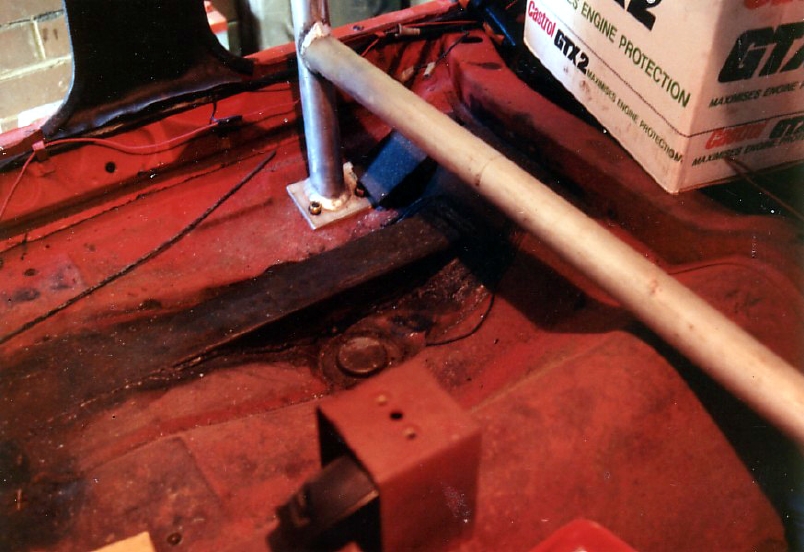
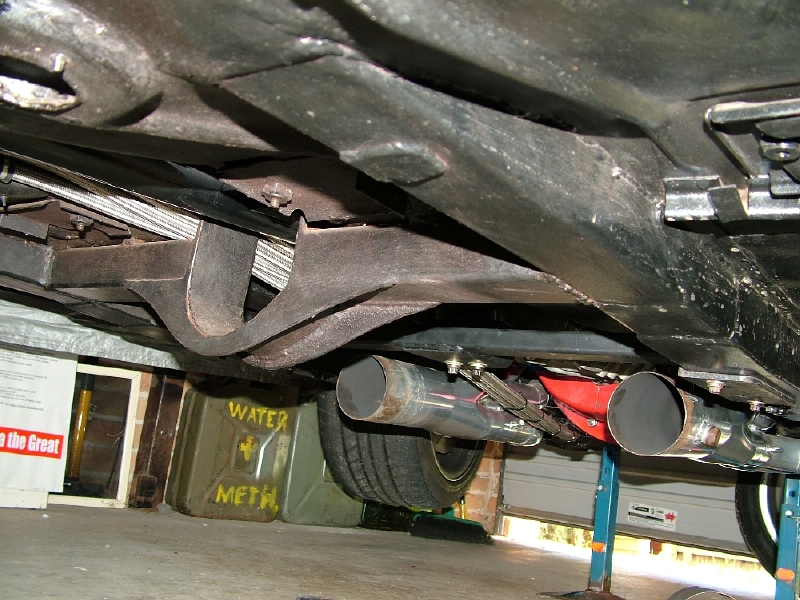
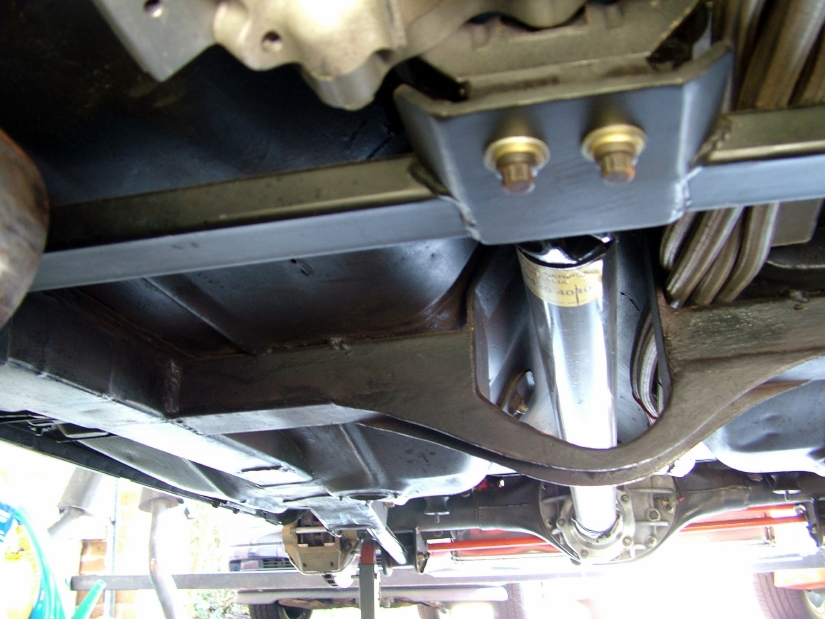
Stolen from L8.com
Posted Image
Posted Image
Posted Image

#27 myss427

myss427

    Forum Fixture

  • Members
  • PipPipPipPipPip
  • 1,636 posts
  • Location:Canberra
  • Car:427 hatch, CV8 Monaro, Ve SSV ute. Was part owner A9X sedan until he sold it without telling me!
  • Joined: 17-November 05
Garage View Garage

Posted 03 June 2010 - 11:45 AM

When I did mine years ago I used the RHS through the floor but also plated the rails in 3mm up to the front cross member mounting point. Then used diagonal joiners from the rear mounts to the rails that hold the spring rear section. Also we seam welded the whole car at the time. It was overkill but this was what the engineer wanted (never had a big block registered before in a Torana). The car when he did a flex and twist test with dial gauges on all 4 corners was over 100% increase in stiffness.

#28 enderwigginau

enderwigginau

    Admin Wrangler

  • Moderators
  • PipPipPipPipPipPipPip
  • 2,000,527 posts
  • Name:Grant
  • Location:Brisneyland
  • Car:76 LX Sedan, 4 seater
  • Joined: 04-February 07

Posted 03 June 2010 - 12:55 PM

Torana's are a monocoque. It IS NOT the chassis rails (for want of a better term, for the monocoque structure) that twist.
It is the body of the car, through the cabin, which is the weakest point torsion-wise.

Hence, joining the front and rear chassis clips transfers this moment from one end to the other, and like a sway bar reduces it.
The body is no longer able to compress on torsion as much.
As has been stated, you need to triangulate or join them (like Howard's tailshaft loop, or the CRS gearbox crossmember) to increase the rigidity where possible.

Anyone who has not felt an increase in stiffness after doing this obviously already has significant twist in the body.
Beefing up the rear swaybar at the same time may be a good idea as you will be loading up the back corner even more.

Grant..

#29 Heath

Heath

    I like cars.

  • Administrators
  • PipPipPipPipPipPipPip
  • 18,368 posts
  • Name:Heath
  • Location:Eastern Suburbs, Melbourne
  • Car:Heavily Modified UC Sunbird Hatchback
  • Joined: 07-November 05
Garage View Garage

Posted 03 June 2010 - 01:11 PM

What's the CRS gearbox crossmember like? All of the crossmembers that I've seen would do virtually nothing for torsional rigidity, but I'd never thought of making one to benefit the structure before...

#30 enderwigginau

enderwigginau

    Admin Wrangler

  • Moderators
  • PipPipPipPipPipPipPip
  • 2,000,527 posts
  • Name:Grant
  • Location:Brisneyland
  • Car:76 LX Sedan, 4 seater
  • Joined: 04-February 07

Posted 03 June 2010 - 01:32 PM

Look at the pic of Howard's tailshaft loop above.
I have seen quite few like this and it kills two bords with one stone.

I recall Peter in Cairns has quite a nice gearbox crossmember.

Grant..

#31 ls2lxhatch

ls2lxhatch

  • Members
  • PipPipPipPipPipPipPip
  • 5,332 posts
  • Location:Perth
  • Car:LX Hatch
  • Joined: 29-May 06

Posted 03 June 2010 - 02:15 PM

To get the maximum benefit, the chassis rail "extensions' should really tie to the front rails and the rear lower suspension pickup. Mine do.


Are you saying that you have run the SHS inside the Torana chassis rail up to the k-frame mount? I can see that would strengthen the chassis. The CRS kit does something similar but on the outside of the rail with smaller SHS and an even smaller RHS between the factory chassis rail and the rear lower control arm mount.

I was under the impression that the "chassis extension" was a small section that joined the end of the factory rail to the lower control arm mount. It is this type of modification that I think has little effect on chassis strength.

Edited by ls2lxhatch, 03 June 2010 - 02:16 PM.


#32 Litre8

Litre8

    Thrillseeker

  • Administrators
  • PipPipPipPipPip
  • 2,399 posts
  • Name:Howard
  • Location:Melbourne, Victoria
  • Car:1976 LX SLR8000
  • Joined: 05-February 07

Posted 03 June 2010 - 08:28 PM

Are you saying that you have run the SHS inside the Torana chassis rail up to the k-frame mount?


Yes, exactly that. And, as others have also done, the front rail's inner surfaces have been 3mm plate stitch welded.

Imho just using a 'chassis extension' would only provide some strength to the lower trailing ar pickup point.

#33 _BlownOutlaw_

_BlownOutlaw_
  • Guests

Posted 14 June 2010 - 11:02 AM

I personally dont really see the need for a chassis kit or other additions for a street based vehicle. But if you have slicks on a sticky racing surface thats a different story all together.

PS- My old yellow Torana pictured in my Avatar had a CRS Chassis kit.

Edited by BlownOutlaw, 14 June 2010 - 11:08 AM.


#34 axistr

axistr

    Forum Fixture

  • Members
  • PipPipPipPipPip
  • 1,203 posts
  • Location:North west sydney
  • Joined: 19-November 05
Garage View Garage

Posted 14 June 2010 - 05:13 PM

Just to throw my two bobs worth in, before I restored my hatch the old 327 chev with only 400hp ripped out the n/s lower contol arm mount from the body(wasn't rusty). I profiled the extensions to the floor which inserted into the end of the original chassis rail and tied them into the lower control arm mounts, I added flanges to the profiled extensions as per original design and then spot welded them to the floor every 15mm and fully welded the extensions to the original rail ends and at the control arm mount, and also spot welded all control arm mounts every 20mm to the body. I was surprised at how much better the car handled through tight corners and rough s bends. Andy is right in saying that the main reason of this design is to inprove the control arm mount strength and that was my main aim but my extensions did much more than that to my surprise it added so much more. Its funny how putting the right bit of metal in the right spot makes all the differance, I recon the engineers at Holden spend untold amount of hours changing brackts and positions ect on new cars designs to reduce twist and unwanted flex.

I isn't a good idea to fully weld seams and rails as the original design is to release some stress between the spot welds sure put in twice as many as factory but not continous as the body will crack up bad in the long term, thats why most race teams got rid of the shell in the early days after one or two seasons the body just cracks up. The trend in the last ten years in V8 super cars has been to just add more spot welds, when I spoke to one of the engineers of dick johnsons racing team he said their shell was at the time four years old and found it was due to this practice of spot welding not fully welding. I will try to add some better photos.

Axistr.

Attached File  torana 040.JPG   1.7MB   127 downloadsAttached File  torana 062.JPG   1.98MB   121 downloadsAttached File  torana 318.JPG   96.3K   138 downloadsAttached File  torana 185.JPG   357.06K   127 downloads

#35 _niterida_

_niterida_
  • Guests

Posted 14 June 2010 - 06:13 PM

Just to throw my two bobs worth in, before I restored my hatch the old 327 chev with only 400hp ripped out the n/s lower contol arm mount from the body(wasn't rusty). I profiled the extensions to the floor which inserted into the end of the original chassis rail and tied them into the lower control arm mounts, I added flanges to the profiled extensions as per original design and then spot welded them to the floor every 15mm and fully welded the extensions to the original rail ends and at the control arm mount, and also spot welded all control arm mounts every 20mm to the body. I was surprised at how much better the car handled through tight corners and rough s bends. Andy is right in saying that the main reason of this design is to inprove the control arm mount strength and that was my main aim but my extensions did much more than that to my surprise it added so much more. Its funny how putting the right bit of metal in the right spot makes all the differance, I recon the engineers at Holden spend untold amount of hours changing brackts and positions ect on new cars designs to reduce twist and unwanted flex.


That looks tops - why didn't GM spend an extra $2 and do that from the factory ?

#36 turbo76lx

turbo76lx

    Forum Fixture

  • Members
  • PipPipPipPipPip
  • 645 posts
  • Name:Glen
  • Location:Vic
  • Car:LX
  • Joined: 15-August 08

Posted 14 June 2010 - 07:25 PM

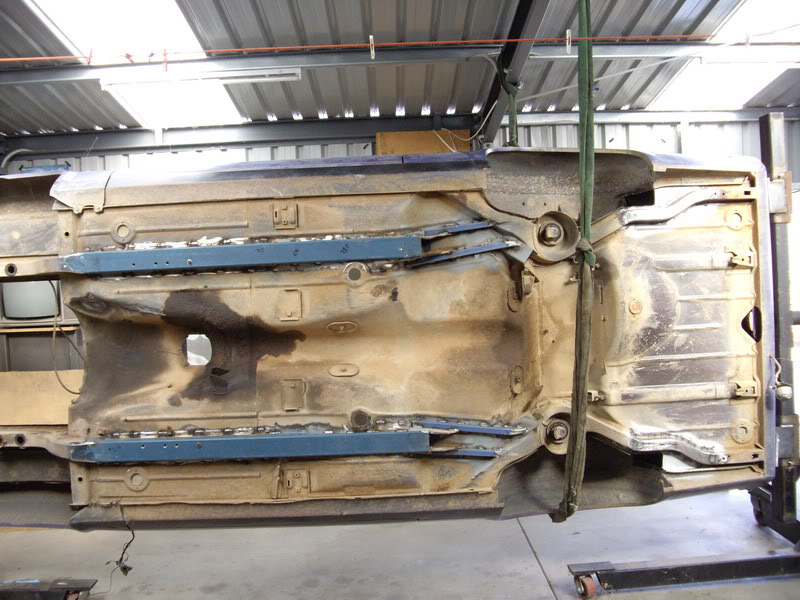
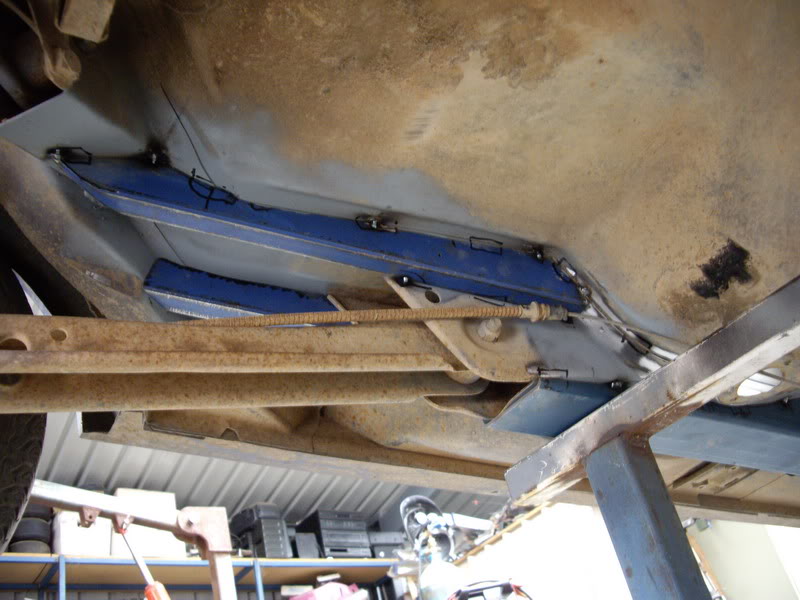
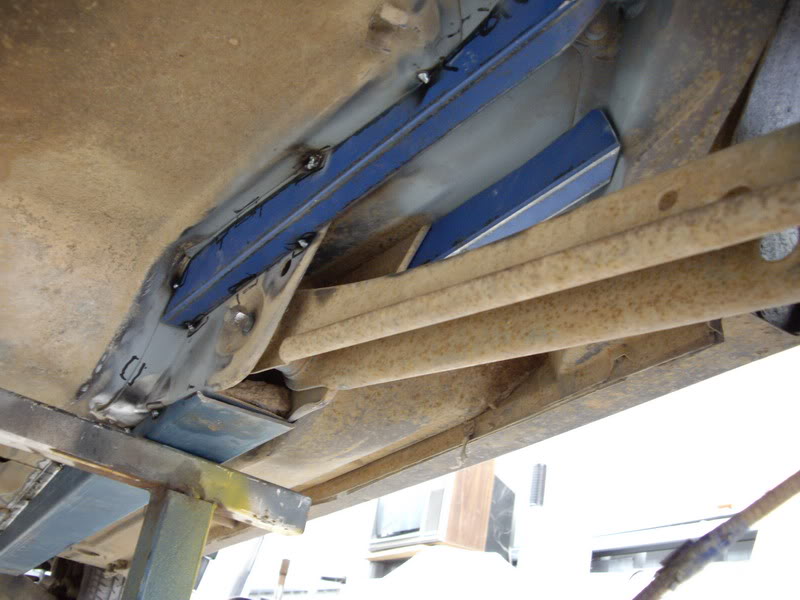
With my hatch i used 89x89x3.5 RHS fitted over the original rail all the way from the front k frame to the rear lower mount cut and shaped to

the profile of the floor. But i also added some 50x25x2 RHS each side of the lower mount to tie it into the upper mount and the sub frame, also

cut and shaped to the profile of the floor. This was all done with the ok of an engineer. Just be aware you may have to modify fuel lines, brake lines

and even hand brake cables.
Posted Image
Posted Image
Posted Image

#37 _moot_

_moot_
  • Guests

Posted 15 June 2010 - 08:09 AM

you can tell the extra stiffness in my car just by jacking the car up.the door gaps stay the same :rockon:

#38 _Kush_

_Kush_
  • Guests

Posted 15 June 2010 - 07:42 PM

Turbo76lx, that is a really neat job, buddy. I will ask my mod plate guy if he'll let me do it to my car. I'll have about 460 hp in my motor and I'll be running semi slicks so I'll have to look at some chassis work. :) are you gonna add cross bracing on it somewhere or will it be fine like it is?

Edited by Kush, 15 June 2010 - 07:49 PM.


#39 turbo76lx

turbo76lx

    Forum Fixture

  • Members
  • PipPipPipPipPip
  • 645 posts
  • Name:Glen
  • Location:Vic
  • Car:LX
  • Joined: 15-August 08

Posted 15 June 2010 - 09:16 PM

Kush, i didn't add any cross bracing but i may have to add a cage when i start running it down the 1/4.

#40 _youngy_11_

_youngy_11_
  • Guests

Posted 15 June 2010 - 10:13 PM

Yeah I agree with moot.If I jack mine up just near where the front K frame bolts to the chassi rail the rear wheel leaves the ground not long after the front wheel leaves the ground.

#41 _DomDom_

_DomDom_
  • Guests

Posted 16 June 2010 - 09:07 PM

With my hatch i used 89x89x3.5 RHS fitted over the original rail all the way from the front k frame to the rear lower mount cut and shaped to

the profile of the floor. But i also added some 50x25x2 RHS each side of the lower mount to tie it into the upper mount and the sub frame, also

cut and shaped to the profile of the floor. This was all done with the ok of an engineer. Just be aware you may have to modify fuel lines, brake lines

and even hand brake cables.

Posted Image
Posted Image
Posted Image


I Like the way this is done. Will it need a roll cage for the street? I would do it this way if I was to stiffen the rails.

I was wondering however, why you altered the rear chassis rails on this one but on the spare car you've only just made a small mod in the same section? Is the hatch different behind the axle?

#42 turbo76lx

turbo76lx

    Forum Fixture

  • Members
  • PipPipPipPipPip
  • 645 posts
  • Name:Glen
  • Location:Vic
  • Car:LX
  • Joined: 15-August 08

Posted 16 June 2010 - 10:41 PM

Dom, the cage will be for the strip, should run high 9's. What i done did stiffen up the car, one reason i ran the RHS over the old rail was to

cover up the dents and scrapes of 30 years of country driving. With the rear on the hatch i will be able to fit a wider taller tyres (slicks) than

what i done to the sedan, also the hatch wheel tubs took a few days to do where as the sedan took 1 1/2 hours.

#43 _DomDom_

_DomDom_
  • Guests

Posted 17 June 2010 - 07:46 AM

It's all clear now. Thanks.

Top work too.


Dom

#44 TerrA LX

TerrA LX

    Fulcrum Fixture

  • Members
  • PipPipPipPipPipPipPip
  • 14,241 posts
  • Location:Sid 'n' knee
  • Joined: 31-May 06

Posted 08 July 2010 - 02:01 PM

Can a mod stick this thread to the top?

#45 _UFO304_

_UFO304_
  • Guests

Posted 17 March 2014 - 05:03 PM

Hi guys,


I saw on here someone posted a drawing of the steels measurements, but I cant find it anymore,


Does anyone have detailed drawings or measurements?


Cheers


#46 _RustyLX_

_RustyLX_
  • Guests

Posted 13 March 2018 - 01:11 PM

With my hatch i used 89x89x3.5 RHS fitted over the original rail all the way from the front k frame to the rear lower mount cut and shaped to

the profile of the floor. But i also added some 50x25x2 RHS each side of the lower mount to tie it into the upper mount and the sub frame, also

cut and shaped to the profile of the floor. This was all done with the ok of an engineer. Just be aware you may have to modify fuel lines, brake lines

and even hand brake cables.

IMGP0426_resize.jpg
IMGP0375_resize.jpg
IMGP0377_resize.jpg


I'm thinking I'll have to do this to a sedan i'm looking at buying, just to give it strength. It has been sitting in a paddock for many years, needs a tonne of work, and I know it'll cost a small fortune to rebuild it, but it will be my forever car, so i'll take my time and build it with my Autistic son, and teach him how to work with his hands. The only part i won't be touching, if I can help it, will be the front rails. Every brace on the floor will be covered over with RHS, so there will be no dramas with the floor. Weld in some new floorpans front and rear, new boot floor, and that will have the bones pretty much complete. Bit of work with some sills, and possibly the bottom of the A pillar.


1 user(s) are reading this topic

0 members, 1 guests, 0 anonymous users