Retro-fitting air conditioning into LX
#1

Posted 04 March 2009 - 11:40 AM
Im not real sure on the fitting of an evaporater, Where would be best/most effective? Can I use an original torana one with the other components (commodore compressor, condensor, ect.) or an evaporater from another car which maybe smaller?
I read a few threads and looked at pics from the factory fitted air con and it looked to me like the evaporater is mounted in the air box mounted in the engine bay. Can I modify the airbox to fit the evaporator in there?
When running the lines, do they have to be of a certain length in relation to each other? Reason I ask is id like to run them out of sight to keep things clean in the bay.
Thanks in advance guys
Cheers
Les
#2
 _torana_umunga74_
Posted 04 March 2009 - 04:51 PM
#3
 _1uzbt1_
Posted 04 March 2009 - 04:58 PM
Best of probably modifiy a sanden to fit and can easily be wired to use.
The lines are free in terms of length and doesnt really matter unless its a large distance.
#4

Posted 04 March 2009 - 05:35 PM
I have the Sanden 508 fitted to my LS2 with a hotrod A/C and heater mounted under the dash replacing the factory heater. There is no external air box. It is not running yet so I can not comment on how effective it is.
#5

Posted 04 March 2009 - 06:42 PM
I picked up a brand new pump around 3 weeks for $120..polished, the guy had 100 of them they are a 5 piston, you can get 7 piston..more efficent
i replaced every single part in my air con in vk and also in the vs stato..the stato is a big bulky box setup under the dash..the vk isnt to bad...
i also can state the vk has adjustable thermostate..vs doesnt so technically i could probably get colder air out of the vk rather than the later vs..but it probably would end up freezing the lines..
#6

Posted 04 March 2009 - 06:51 PM
i found a thread that used gear from a hilux and it tucked behind the glove box nicely with a custom box instead of the card one. not sure where it was....
axistr, http://www.cardomain.../ride/2964809/3
#7

Posted 05 March 2009 - 02:06 PM
Andy - looked at your pics, some good progress there mate, just wondering where I can pick up the hotrod set-up like yours. I found a couple on ebay but they looked different to your set-up.
1uzbt1 - Thanks for the info, wasn't aware of all that either.
Cheers
Les
Edited by mrlctorana, 05 March 2009 - 02:08 PM.
#8

Posted 05 March 2009 - 10:13 PM
http://ls2lxhatch.com/engine.htm
http://ls2lxhatch.com/interior.htm
http://ls2lxhatch.com/links.htm
Edited by ls2lxhatch, 05 March 2009 - 10:15 PM.
#9

Posted 06 March 2009 - 12:33 AM
Ruts
#10
 _markbeath_
Posted 06 March 2009 - 08:39 AM
I have added a couple more pics with part numbers to the website and links to Hot Rod Air on the links page. I could have bought the evaporator in Perth but it was significantly cheaper at the time to buy it direct from Hot Rod Air.
http://ls2lxhatch.com/engine.htm
http://ls2lxhatch.com/interior.htm
http://ls2lxhatch.com/links.htm
Going off your interior photos, did you just buy the parts and adapt them yourself?
#11

Posted 06 March 2009 - 08:45 AM
I think you may run into trouble using the ve compressor.AFAIK it uses a electronic control valve and has no clutch as such, and wiring it will be a pain in the arse.It also therfore requires a extremely efficent evap (ie from the ve)to run it and is associated TX valve.
Best of probably modifiy a sanden to fit and can easily be wired to use.
The lines are free in terms of length and doesnt really matter unless its a large distance.
I thought that VE's run a variable compressor and a fixed orifice, but yeah, too much stuffing around to fit
#12
 _1uzbt1_
Posted 06 March 2009 - 09:06 AM
Orifice system run a flooded evap/accumulator and arent super accurate and run off lowerside suctions to cycle the compressor.Variable comps run a set low side pressure and dont cylce, thats the whole idea of them.
This is all AFAIK and i could be wrong,i havent seen/worked on one yet to say 100%.
Edited by 1uzbt1, 06 March 2009 - 09:14 AM.
#13

Posted 06 March 2009 - 10:08 AM
Going off your interior photos, did you just buy the parts and adapt them yourself?

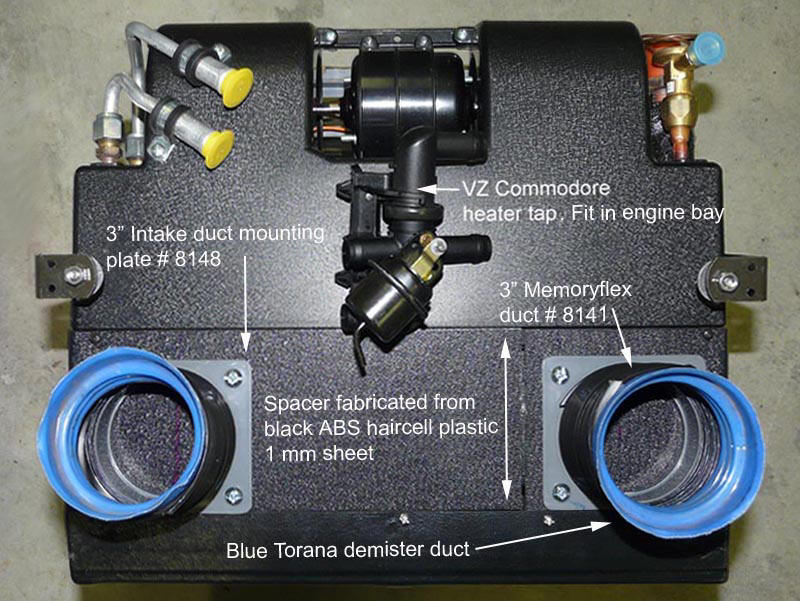
The spacer in the picture is the prototype I made from multiple pieces of ABS plastic sheet. The ABS plastic sheet can be heated with a heat gun and bent to shape. Now that I have test fitted the evaporator I will remake the spacer from a single piece of plastic. The blue tops on the memory flex air duct are the tops off the original Torana ducts.
Parts
Black ABS haircell plastic 1 mm sheet.
Spectra Performance/TFI Racing 3" intake duct mounting plate part #8148 purchased from AutoOne
Spectra Performance/TFI Racing 3" memory flex air duct part # 8141
Hot Rod Air Under Dash Evaporator 50-00007
Hot Rod Air Elite Pinnacle Control Panel 25-3103
#14

Posted 06 March 2009 - 04:15 PM
Cheers
Les
#15

Posted 06 March 2009 - 06:02 PM
The VE compressor is different again. There is no clutch, the shaft rotates whenever the engine is running & the stroke is controlled electronically. When the a/cond is switched off, there is zero stroke, but the shaft still rotates.Variable yes fixed orifice no.Variable pumps use a "low flow" tx and must be replaced with the same style.
Orifice system run a flooded evap/accumulator and arent super accurate and run off lowerside suctions to cycle the compressor.Variable comps run a set low side pressure and dont cylce, thats the whole idea of them.
This is all AFAIK and i could be wrong,i havent seen/worked on one yet to say 100%.
Dr Terry
#16
 _1uzbt1_
Posted 06 March 2009 - 07:11 PM
The VE compressor is different again. There is no clutch, the shaft rotates whenever the engine is running & the stroke is controlled electronically. When the a/cond is switched off, there is zero stroke, but the shaft still rotates.
Dr Terry
yep,mercedes use them as well and im sure many other do or will do in the future,bloody good idea i think.One thing that had me stuffed the mercedes had a a/c off button with a light.Was the light on meaning it was off or vice versa.
Getting abit OT here though.
If you get stuck just drop down to you friendly a/c place and have a word with them,im sure they will give you more than enough info on what you need etc.Winter time would be the best time to do/get some one to do it as its off season for that stuff and guys may have more time to spend with you on it.
#17

Posted 06 March 2009 - 07:20 PM
yep,mercedes use them as well and im sure many other do or will do in the future,bloody good idea i think.One thing that had me stuffed the mercedes had a a/c off button with a light.Was the light on meaning it was off or vice versa.
Getting abit OT here though.
If you get stuck just drop down to you friendly a/c place and have a word with them,im sure they will give you more than enough info on what you need etc.Winter time would be the best time to do/get some one to do it as its off season for that stuff and guys may have more time to spend with you on it.
thats the type I was meaning when I said variable and that setup is more efficient with a fixed orifice like how the new falcons run, so I took a stab and guessed that the VE would run it as well.
#18

Posted 06 March 2009 - 09:05 PM
The fan, box and heater hose holes in the engine bay are not required. This is one of the benefits of this setup as there is not much room for the factory heater hoses with the LS2.Nice work Andy, thanks heaps for the info, much appreciated. Will definitely look into doing something similar, Now once this is fitted is there any reason to have the old fan and box in the engine bay or can these holes be blanked off, just requiring the hole for the heater hoses to pass through.
Cheers
Les
My plan is to run hoses down from the water pump to the VZ heater tap. Then hoses across to the passenger side chassis rail into two 1/2" stainless tubes for the run along the chassis rail to bulkhead fittings on the firewall.
There are a couple of options for the A/C hoses.
Large A/C hose
1. Run direct from the compressor over the intake manifold to the fan wiring hole in the firewall. (This is how my last A/C system was setup).
2. Run with the small A/C hose from the compressor to a bulkhead fitting in the radiator support panel. Then across the front of the radiator support panel and under the passenger side guard to a bulkhead fitting on the firewall.
Small A/C hose
1. Run from the compressor to a bulkhead fitting in the radiator support panel. Across to a dryer mounted on the bonnet catch stay, through the bonnet catch stay and then into the passenger chassis rail entering the cabin through a rubber grommet in the firewall. (this is how I ran the small hose on my old A/C)
2. Same as above but instead of entering the chassis rail, go under the passenger side guard and enter the cabin via a bulkhead fitting.
I expect to complete the plumbing of the A/C and heater and about six weeks.
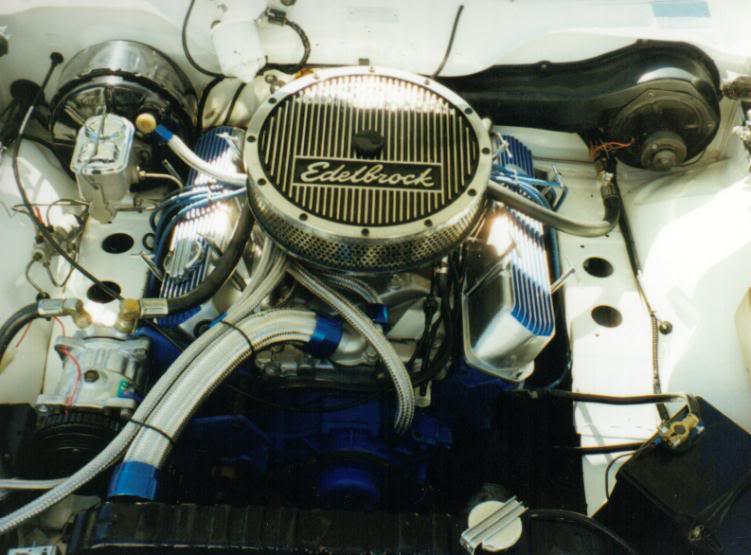
This is the setup I had from around 1992 through to 2006. My LS2 compressor position is the same as it was on my 308.

Edited by ls2lxhatch, 06 March 2009 - 09:15 PM.
1 user(s) are reading this topic
0 members, 1 guests, 0 anonymous users


