
Looks mint Hayden

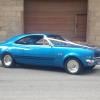
haydens supercharged 78 UC
Started by
_V6 UC_
, Dec 10 2009 08:31 PM
261 replies to this topic
#152
 _V6 UC_
_V6 UC_
-

- Guests
Posted 22 October 2012 - 10:19 PM
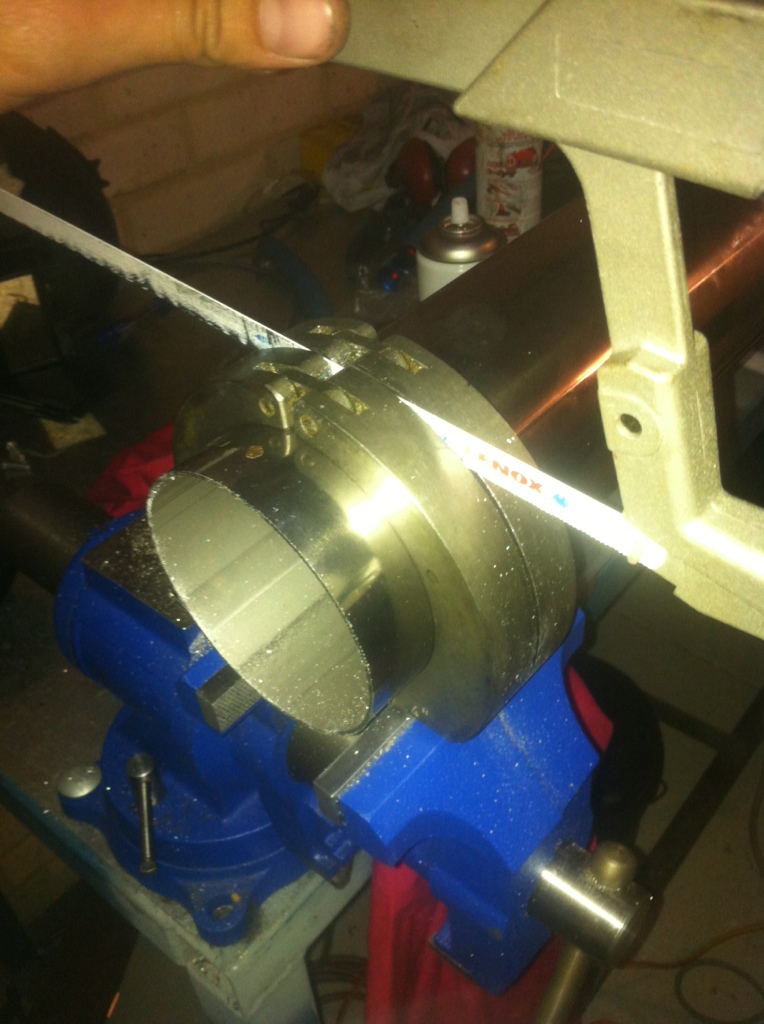
had a bit of a fail haha. The -12 fitting on my passenger side rocker cover fouled on the intake pipe. Now because i had the carbon ubend drilled to sit high because i wasnt using a cooler plate the angle from the tb to where my pod is is wrong. So i got a piece of 4" stainless mandrel bend scrap i had laying around and set about making it all work and of course look good 8.)

borrowed a 4" cutting block from work, these work mint, i wanted a perfect fit as i wanted to purge the pipe so inside will be smooth and also look like it been welded on the inside.
i dont want to bore every1 but if u want i can give a bit of a rundown on how i got to this finish, i took a few pics along the way, might help others at home who want to do/learn polishing
#153
Stinga
-

- Members
-

- 2,114 posts
.
- Name:Stinga
- Location:Wollongong, NSW
- Car:HD Holden ute, and sedan, UC torana
- Joined: 05-December 05
Posted 22 October 2012 - 10:36 PM
that cutting block is a nifty bit of gear, nice work!
#154
LXdamo
-

- Members
-
- 521 posts
Still Lurking
- Name:Damo
- Location:ADL/PER/ZNE
- Car:bits here bits there.....
- Joined: 22-December 05
Posted 23 October 2012 - 03:04 AM
Looks really nice.Chuck up the pics on how you did it,i'm sure there will be a fair few people interested,me being one!
#155
_V6 UC_
_V6 UC_
-
- Guests
Posted 23 October 2012 - 11:17 PM
polishing stainless at home can be a fair bit harder to do than ali, especially at home and if your unexperienced, mainly this is due to it being hard as shit.
Some basic tools you will need
Bench grinder with spindle attachment
4" grinder
Roloc attachment (not 100% necessary but its alot easier)
Sanding disk backing pad
120 grit sanding pads, definitely don’t go any coarser if you haven’t done much ss polishing
3" coarse and fine rolocs
3M light deburring wheel
Rope mop
Soft mop (not essential just blends the rope mope finish nicer)
Whilst the 3M deburring wheel also isn’t the only way to do it, it’s cheap and does a good job, it also lasts ages
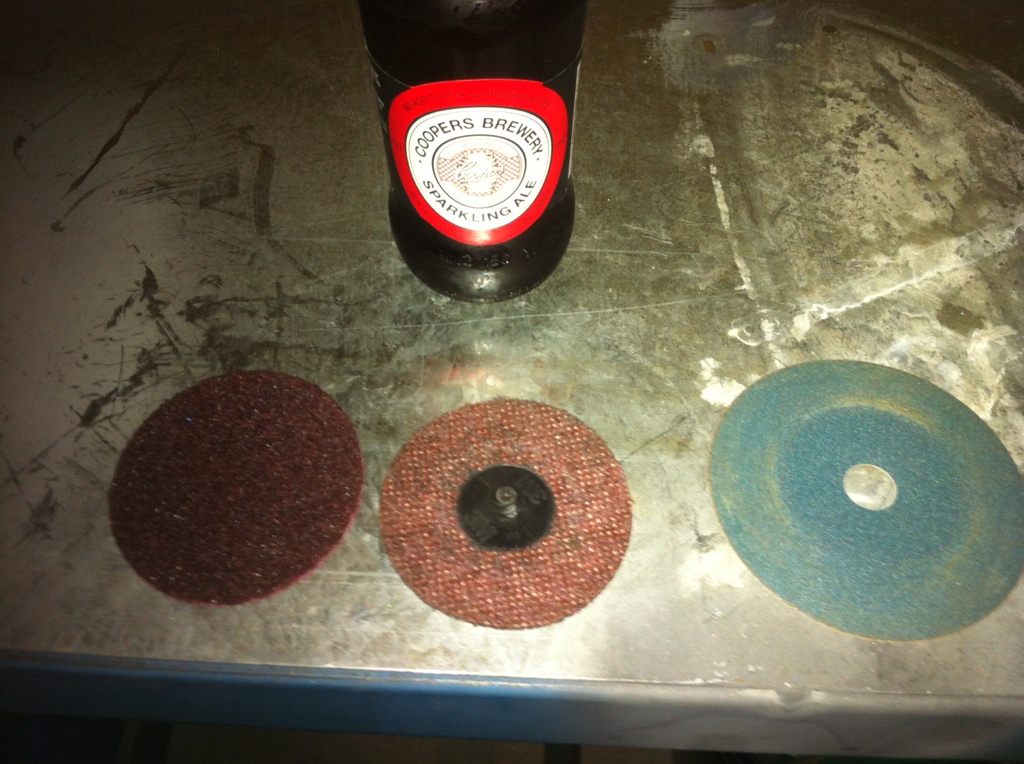
3M roloc and sanding disk red is medium, course is brown and blue very fine. These are awesome for anything round but not so good on flat surfaces.
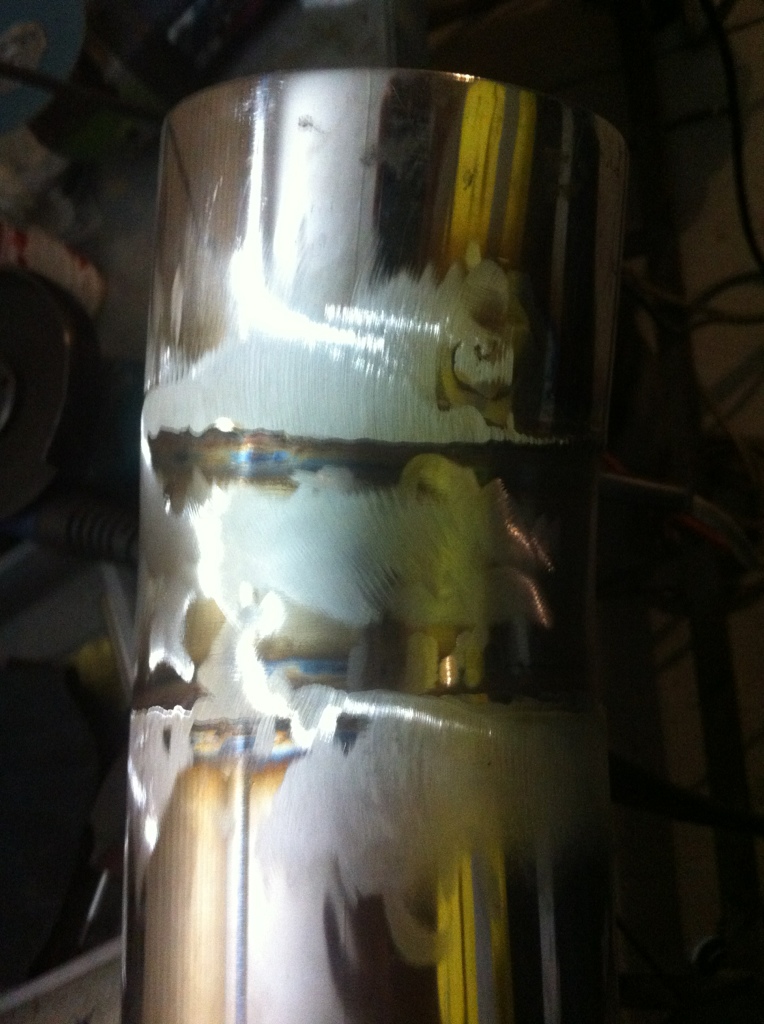
I started by getting the butt between the mandrel as close as possible, the mandrel was from an old k&N filter kit. Followed by welding it hot enough to get 100% penetration because you are going to be removing the weld.
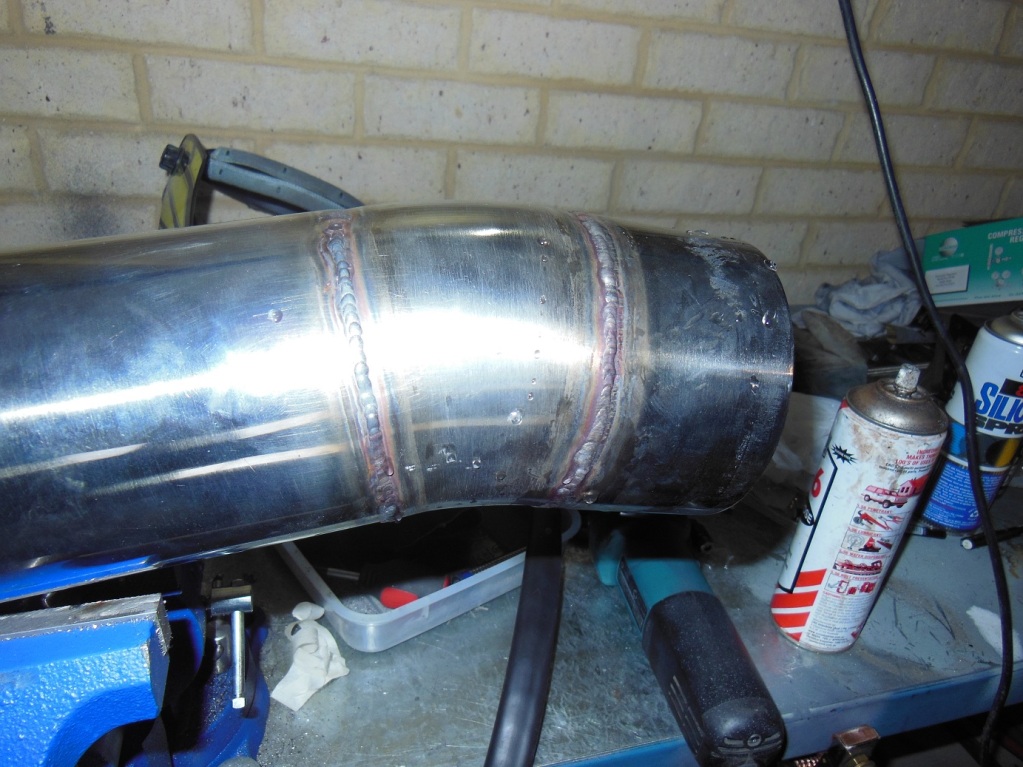
Next take sander and 120 grit skim the weld down till it is level with at least one side taking care not to dig in. Next you work it back and forth using your sander as flat as possible using the longest part of it as possible without making the nut holding it on touch the surface if that makes sense. Like this

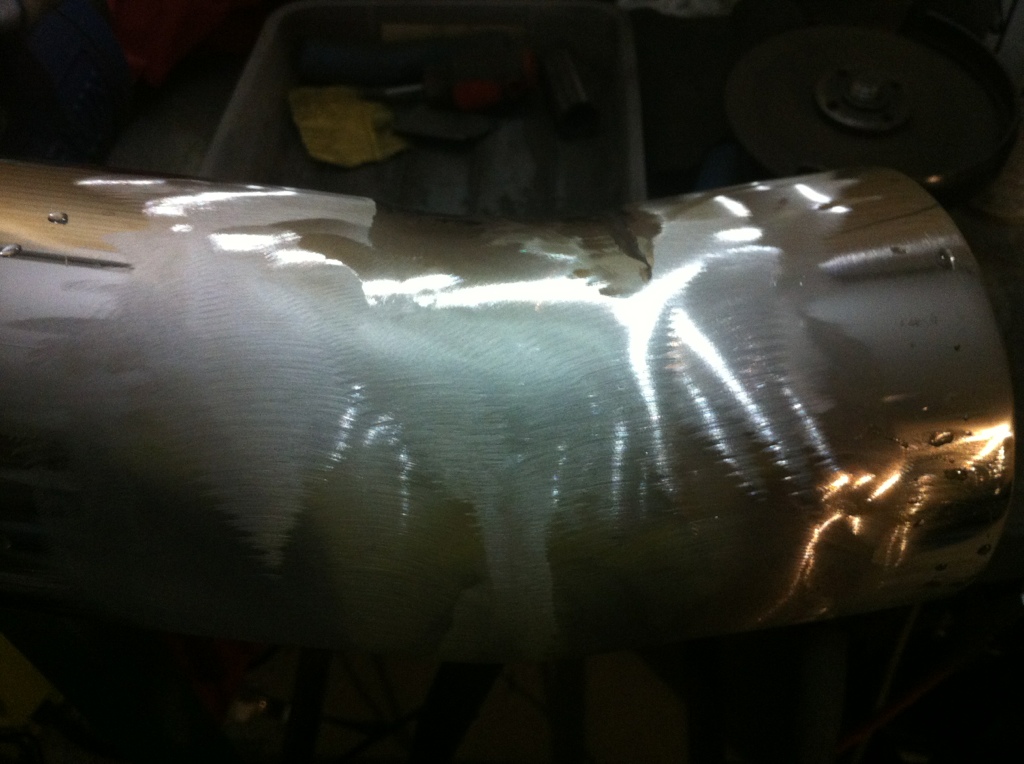
see how I have taken it about 50mm past the welds to blend it in, this is really important, as u go back and forth u will create little flat spot lines, just keep working it up and down, cooling with water as soon as it gets hot, also very important as stainless moves around ALOT with heat, unlike ali. If it gets too hot it will dip and warp creating new low spots to sand out (not as big of a deal in round tube tho)
Also as soon as your sanding pad gets a bit blunt change it, you will know this when you’re finding it hard to remove any metal and the job is heating up quickly.
Now take the sander and roll it vertically down the pipe blending all the flat spot lines around like this
After its like that all around u then go rolocs and crisscross your sander marks, this shows up the deep scratches from the 120 grit, work ALL the 120 grit scratches out, you need a good eye for this leaving any will show in your final finish, as will any knicks or flat spots so it’s important to sand it right.
I didn’t take any photos of the roloc finish but basically it’s just finer. Stainless has a grain to it so if you sand it one way it will look different to if you sanded it at 90 degrees, kind of hard to explain until you do it and so it for yourself.
Now take the fine roloc or if you don’t have them the equivalent to around 600 grit sandpaper, don’t try any of this by hand or you will be there days at each stage, stainless is just way too hard. Now the 3M light debur wheel, these are where u will really see what I mean by grain. They show it up clear as day, Il try take a photo at work to show what I mean. U just keep crisscrossing the gain, one way will show some scratches and the other way will show others so you just go back and forth till they are all completely out.
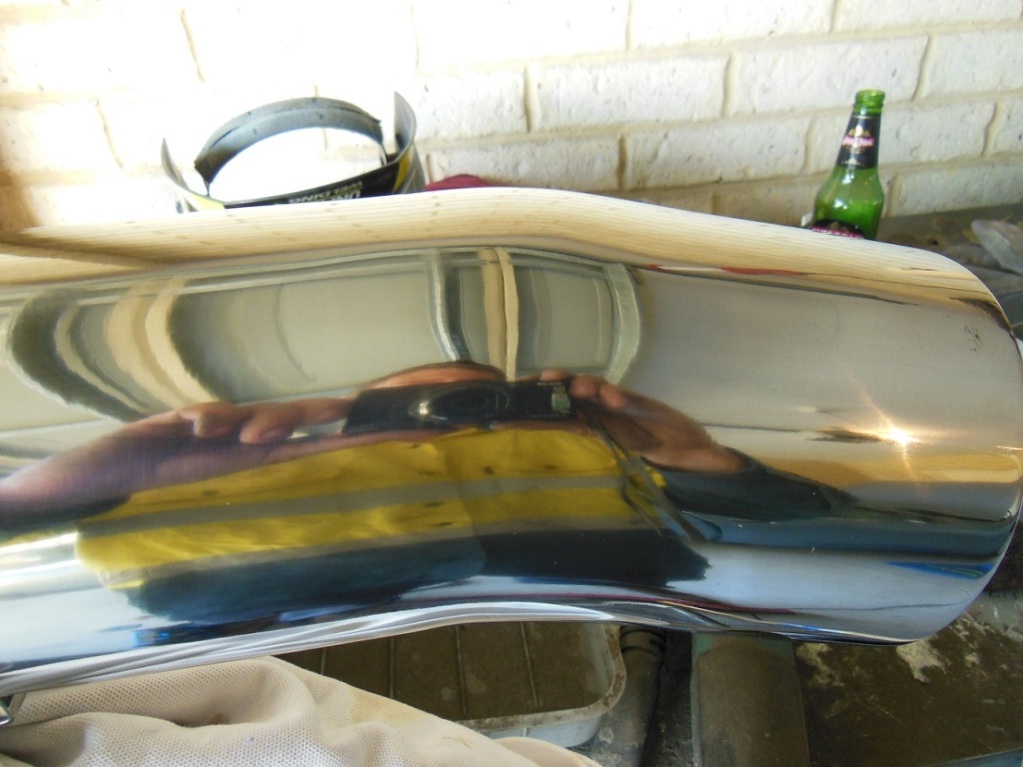
Next put the rope mop on the buff with some white stainless polish simply polish it up, it will come up perfect instantly if you have got all of your scratches out. Now unlike ali where u can sit on the buff and use the heat to remove scratches from the soft material. If any scratches are present you have to work out what part of the process they are from and go back through the steps and do it all over again on that spot.
Easy huh?
cant believe i just wrote all that
Some basic tools you will need
Bench grinder with spindle attachment
4" grinder
Roloc attachment (not 100% necessary but its alot easier)
Sanding disk backing pad
120 grit sanding pads, definitely don’t go any coarser if you haven’t done much ss polishing
3" coarse and fine rolocs
3M light deburring wheel
Rope mop
Soft mop (not essential just blends the rope mope finish nicer)
Whilst the 3M deburring wheel also isn’t the only way to do it, it’s cheap and does a good job, it also lasts ages
3M roloc and sanding disk red is medium, course is brown and blue very fine. These are awesome for anything round but not so good on flat surfaces.
I started by getting the butt between the mandrel as close as possible, the mandrel was from an old k&N filter kit. Followed by welding it hot enough to get 100% penetration because you are going to be removing the weld.
Next take sander and 120 grit skim the weld down till it is level with at least one side taking care not to dig in. Next you work it back and forth using your sander as flat as possible using the longest part of it as possible without making the nut holding it on touch the surface if that makes sense. Like this
see how I have taken it about 50mm past the welds to blend it in, this is really important, as u go back and forth u will create little flat spot lines, just keep working it up and down, cooling with water as soon as it gets hot, also very important as stainless moves around ALOT with heat, unlike ali. If it gets too hot it will dip and warp creating new low spots to sand out (not as big of a deal in round tube tho)
Also as soon as your sanding pad gets a bit blunt change it, you will know this when you’re finding it hard to remove any metal and the job is heating up quickly.
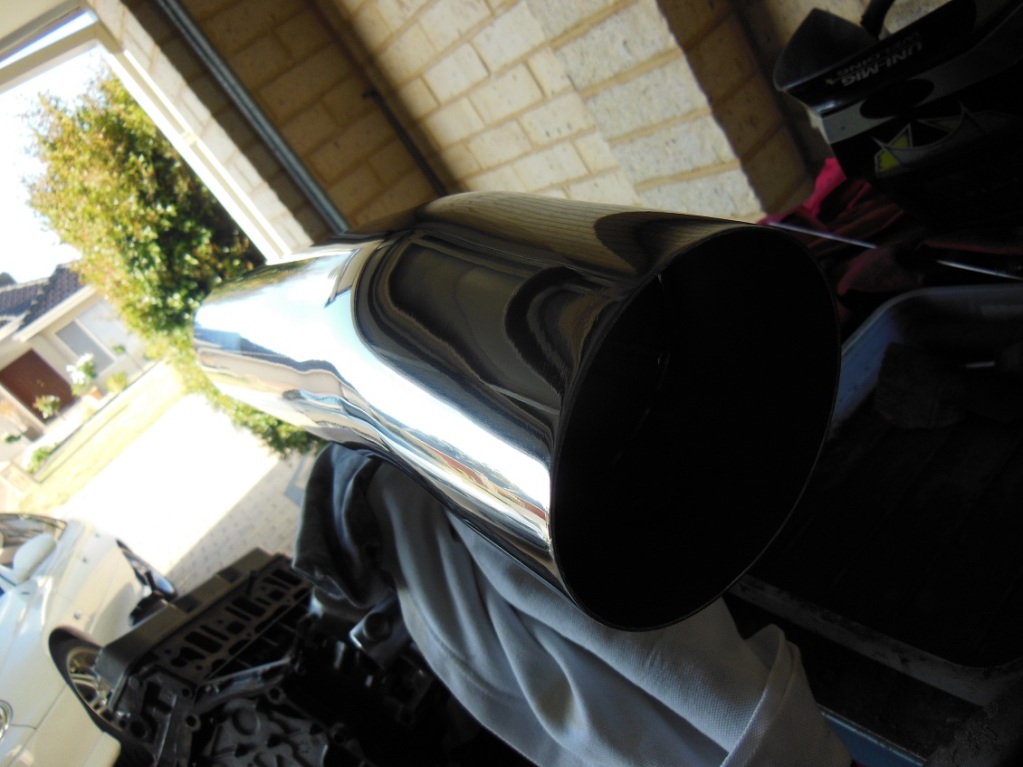
Now take the sander and roll it vertically down the pipe blending all the flat spot lines around like this
After its like that all around u then go rolocs and crisscross your sander marks, this shows up the deep scratches from the 120 grit, work ALL the 120 grit scratches out, you need a good eye for this leaving any will show in your final finish, as will any knicks or flat spots so it’s important to sand it right.
I didn’t take any photos of the roloc finish but basically it’s just finer. Stainless has a grain to it so if you sand it one way it will look different to if you sanded it at 90 degrees, kind of hard to explain until you do it and so it for yourself.
Now take the fine roloc or if you don’t have them the equivalent to around 600 grit sandpaper, don’t try any of this by hand or you will be there days at each stage, stainless is just way too hard. Now the 3M light debur wheel, these are where u will really see what I mean by grain. They show it up clear as day, Il try take a photo at work to show what I mean. U just keep crisscrossing the gain, one way will show some scratches and the other way will show others so you just go back and forth till they are all completely out.
Next put the rope mop on the buff with some white stainless polish simply polish it up, it will come up perfect instantly if you have got all of your scratches out. Now unlike ali where u can sit on the buff and use the heat to remove scratches from the soft material. If any scratches are present you have to work out what part of the process they are from and go back through the steps and do it all over again on that spot.
Easy huh?
cant believe i just wrote all that
#156
LXdamo
-
- Members
-
- 521 posts
Still Lurking
- Name:Damo
- Location:ADL/PER/ZNE
- Car:bits here bits there.....
- Joined: 22-December 05
Posted 24 October 2012 - 05:57 AM
Done well mate,cheers for that.
Good to see you were keeping your fluid intake up too....
Good to see you were keeping your fluid intake up too....
Edited by LXdamo, 24 October 2012 - 05:58 AM.
#157
_V6 UC_
_V6 UC_
-
- Guests
Posted 10 November 2012 - 10:16 AM
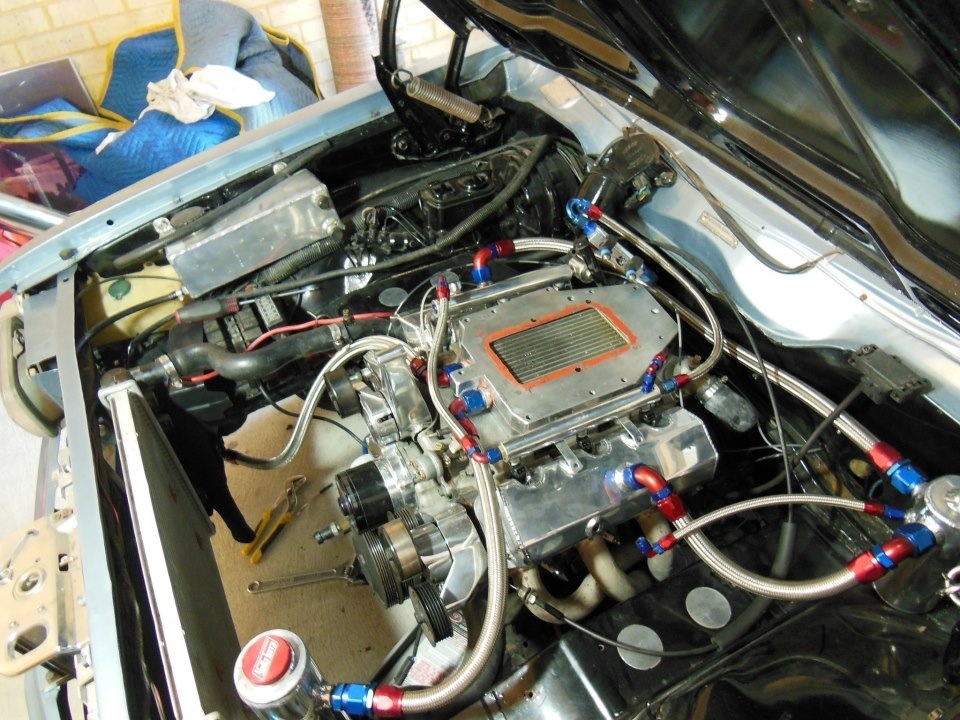
Plumbing all done just have to mount nitrous solenoids n plumb that up. Got sum ls1 coilpacks on the way now too. I'm going to have a go at wiring in the ecu with a mate, also going the move relays under the dash so there're Is minimal wiring in bay
#158
Stinga
-
- Members
-
- 2,114 posts
.
- Name:Stinga
- Location:Wollongong, NSW
- Car:HD Holden ute, and sedan, UC torana
- Joined: 05-December 05
Posted 10 November 2012 - 11:59 AM
looking good, geez there is a lot of room between the radiator and the motor!
#159
_Emu_
_Emu_
-
- Guests
Posted 10 November 2012 - 02:06 PM
looking good, geez there is a lot of room between the radiator and the motor!
Yep, some bastard stole his front two cylinders!!
Great thread and car. Have ready it through a few times now.
#160
_V6 UC_
_V6 UC_
-
- Guests
Posted 13 November 2012 - 12:03 AM
Yeah there is quite alot of room. The big single thermo fills the gap nicely tho. Still not 100% sure what I'm going to do about bonnet clearance. The snout hits. Easiest fix is to cut the bracing and weld a piece in so it looks original. I need about 15mm. I could modify the engine mounts but I might run into problems with extractors then. Also unsure if it will be deemed unroadworthy if I cut bonnet because it's part of the crumple setup in the event of a crash
#161
_V6 UC_
_V6 UC_
-
- Guests
Posted 25 November 2012 - 05:46 PM
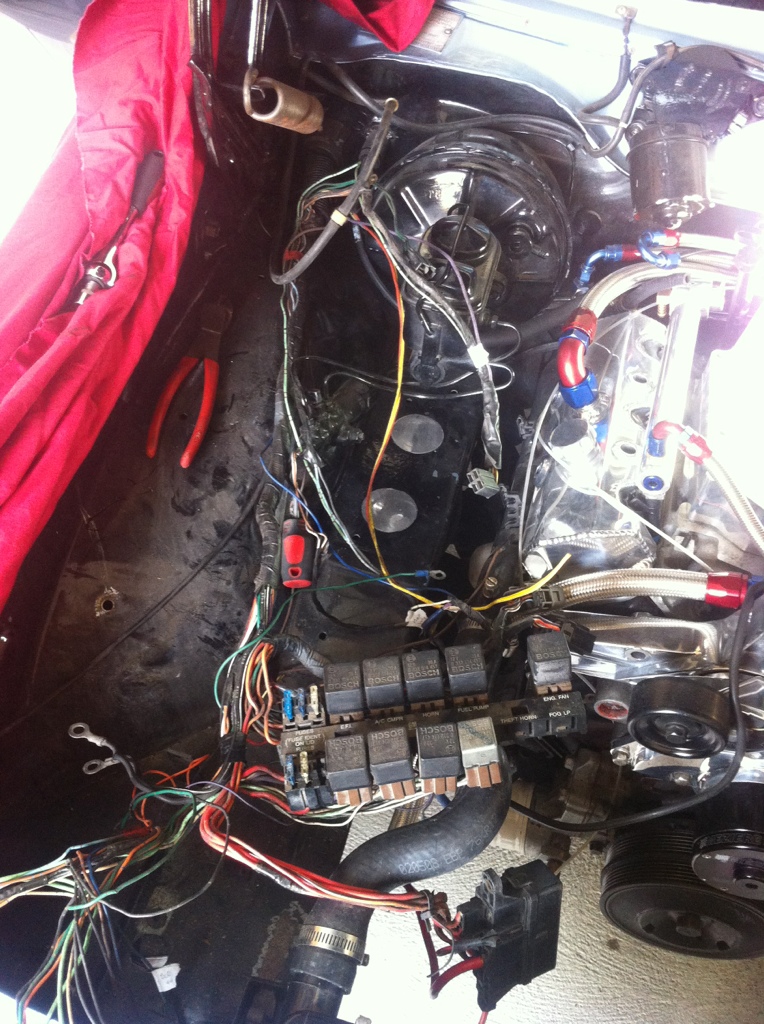
been a busy weekend, been doing some wiring with a mate, we have finished relocating the relay and fuses from the engine bay to under the dash, will start to wire in the link ecu thru the week
#162
_tyre fryer_
_tyre fryer_
-
- Guests
Posted 27 November 2012 - 06:33 PM
Lovely choice in beer mate, there's nothing better.
Very impressive work with the pipe there too!
Very impressive work with the pipe there too!
#163
_RLC355_
_RLC355_
-
- Guests
Posted 28 November 2012 - 10:09 PM
I will second both quotesTyre Fryer !!Lovely choice in beer mate, there's nothing better.
Very impressive work with the pipe there too!

#164
_V6 UC_
_V6 UC_
-
- Guests
Posted 31 December 2012 - 01:19 AM
almost ready to MANG
wiring done, coil pack brackets done, just need shorter belts, accessory belt is now going to be about 300mm shorter than blower belt, have ditched ps pump. Hopefully tune within a fortnight
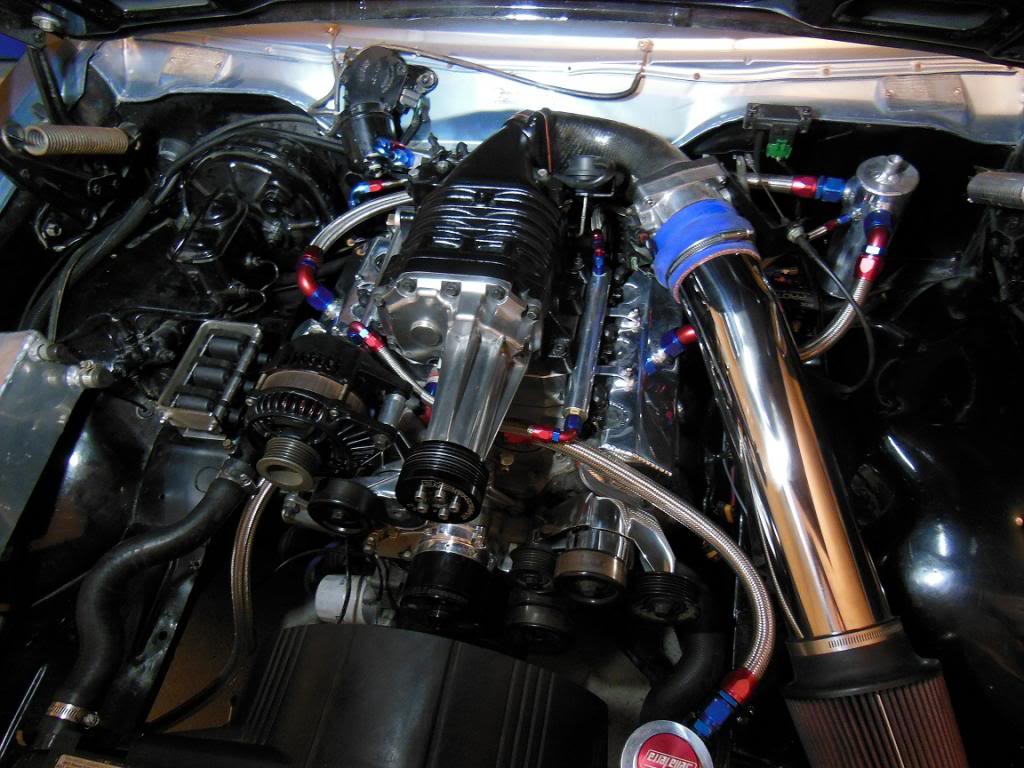
wiring done, coil pack brackets done, just need shorter belts, accessory belt is now going to be about 300mm shorter than blower belt, have ditched ps pump. Hopefully tune within a fortnight
#165
fatslr
 View Garage
-
- Members
-
- 1,247 posts
Forum Fixture
- Name:Garth
- Location:Dunsborough W.A.
- Joined: 17-July 07
View Garage
Posted 31 December 2012 - 07:57 AM
"HOLLYWOOD"
First thoughts that entered my mind looking awsome Hayden
First thoughts that entered my mind looking awsome Hayden
#166
Stinga
-
- Members
-
- 2,114 posts
.
- Name:Stinga
- Location:Wollongong, NSW
- Car:HD Holden ute, and sedan, UC torana
- Joined: 05-December 05
Posted 31 December 2012 - 10:50 AM
looks good!! the only bit i dont like is the pod. is the interior back together?
#167
_V6 UC_
_V6 UC_
-
- Guests
Posted 31 December 2012 - 12:03 PM
Not yet. Waiting on a little gear to fix the odometer in cluster then the dash can go back in. I might box the pod in.
#168
_2wild4u_
_2wild4u_
-
- Guests
Posted 02 January 2013 - 12:53 AM
looking good, would look killer if you made it twin throttle body, one on each side
#169
_V6 UC_
_V6 UC_
-
- Guests
Posted 04 January 2013 - 10:46 AM
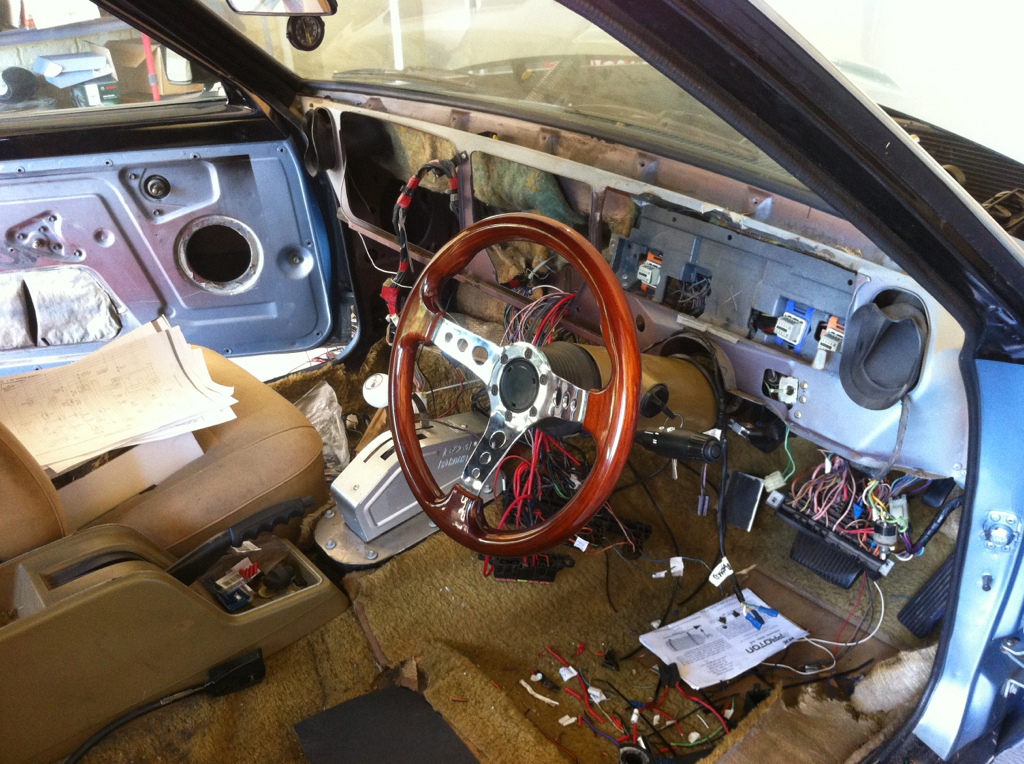
That would look pretty cool. I'm at te point now where I just want it back on the road. Got my dash cluster fixed last night so interior can go back in tonight. Going to hook up battery tomoro and test everything. Hopefully I don't need a fire extinguisher :-/
#170
_V6 UC_
_V6 UC_
-
- Guests
Posted 16 January 2013 - 01:22 PM
Cars tuned and ready for mv.
Made 321rwhp an 790nm torque on bp98. Nitrous solenoid fuked out so couldn't use the spray. Picked up 110nm of torque and 40hp at 3500rpm. On same boost.
#171
_V6 UC_
_V6 UC_
-
- Guests
Posted 16 January 2013 - 01:38 PM
Intake temps are only 77 deg so can still run more boost. With the spray I expect them to drop a fair bit more
#172
fatslr
View Garage
-
- Members
-
- 1,247 posts
Forum Fixture
- Name:Garth
- Location:Dunsborough W.A.
- Joined: 17-July 07
View Garage
Posted 16 January 2013 - 08:45 PM
Looking forward to seeing it this weekend
#173
_V6 UC_
_V6 UC_
-
- Guests
Posted 17 January 2013 - 11:05 PM
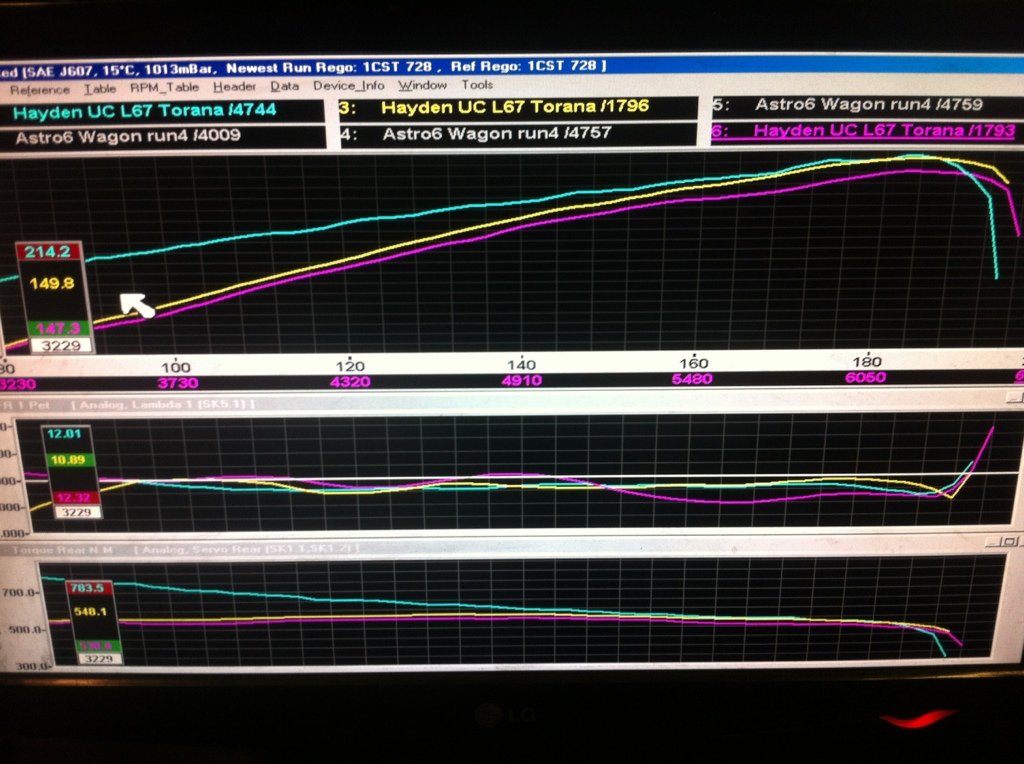
img]https://cache.gmh-to...5000B342529.jpg[/img]
This shows more clearly where the gains were made. It's valve floating from around 5800 so we expect it to go 340-350 with that sorted. I'm getting sum springs from spiro1 so can fit up next week
My previous PB 60' was 1.79. Expecting around the 1.5 mark or quicker now
This shows more clearly where the gains were made. It's valve floating from around 5800 so we expect it to go 340-350 with that sorted. I'm getting sum springs from spiro1 so can fit up next week
My previous PB 60' was 1.79. Expecting around the 1.5 mark or quicker now
#174
_V6 UC_
_V6 UC_
-
- Guests
Posted 11 February 2013 - 08:37 PM
I bought a vs statesman interior a few months back that's been sitting at my uncles since. I've also been storin the car there, he's a motor trimmer. I went around there to pick the car up on fri for a weekend flog and found him In it!
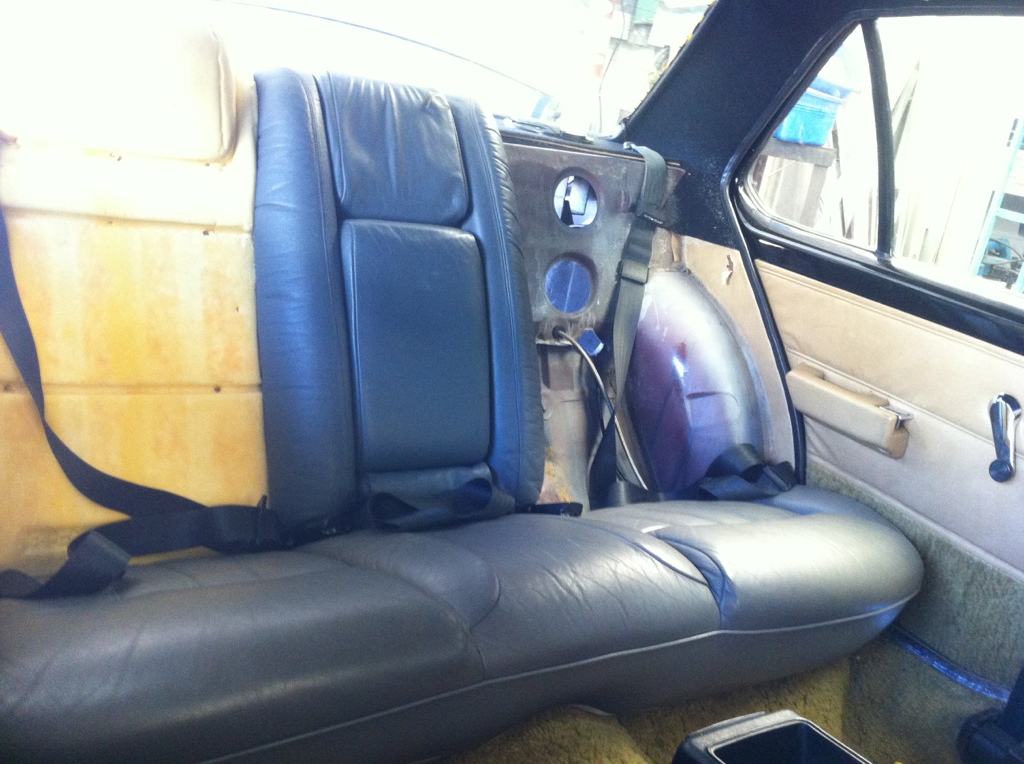
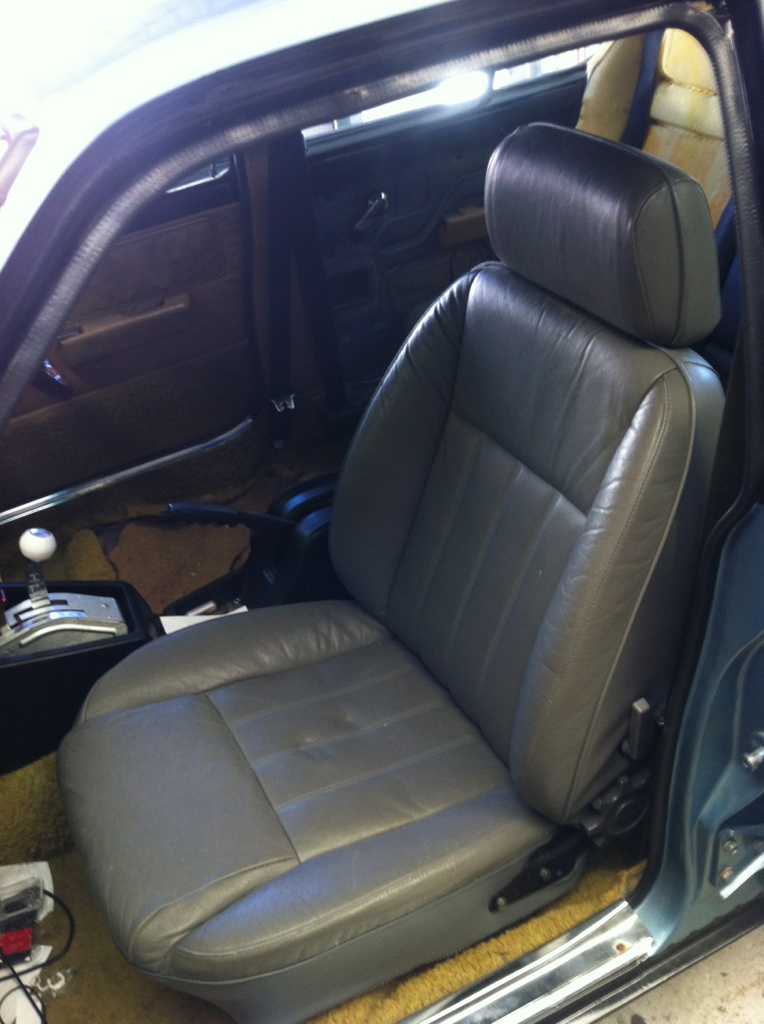
Back seat had to be cut down about 70mm either side and the front seats are my bases with the commy back grafted on. They sit about 30mm lower now as does the back seat also. Plan is to dummy it all up then rip it all out and trim it/dynamat it. Will be racing it before that tho. Really want a 10 out of this car that my goal then it will be turned into a cruiser
Back seat had to be cut down about 70mm either side and the front seats are my bases with the commy back grafted on. They sit about 30mm lower now as does the back seat also. Plan is to dummy it all up then rip it all out and trim it/dynamat it. Will be racing it before that tho. Really want a 10 out of this car that my goal then it will be turned into a cruiser
#175
_V6 UC_
_V6 UC_
-
- Guests
Posted 12 February 2013 - 07:03 PM
Submitted the latest mods list to Shannon's, it's quite a list now
ENGINE:
L67 conversion from 00 VT calais 150 000km
block stripped honed, decked
crank balanced and polished
heads skimmed reassembled with factory pistons/rods
hastings rings
king bearings all round.
ARP headstuds
BYE/ZZP modular pulley setup 2.8" pulley
XP-hot cam
double row timing chain
105lb valve springs
heavily ported blower, lim
custom hand made carbon fibre ubend
80LB injectors in rails, 2x63LB in side of blower
yella terra rails
custom ali rocker covers -12 fittings welded on, catch can setup with k&n breather
4 inch intake pipe
85mm LS1 throttle body
LINK G4 extreme ecu
yella terra tower of terra water to air intercooler kit
PWR FMHE
twin 4 wire oxygen sensors fitted for better close loop cruise tune
6x LS1 coilpacks each wired to individual cylinder and paired with individual injector to give full multi stage sequential injection, blower injectors only activate under boost)
speedflow fittings and braided lines everywhere
NX systems proton plus wet shot nitrous kit, fully removable and only fitted for track days and drags meets
325 rwhp on bp 98 790nm of torque
DRIVELINE:
T700 (S&G gearboxes race spec t700, corvette servo, needle roller kit, kevlar band, A pack shift kit, TCI rev pattern manual valvebody, 2800-3000 stall custom built by allfast convertors)
pro ratchet shifter
VN diff 3.45 gears, shortened to suit with 4wd systems lokka centre
HZ 3 inch tailshaft shortened to suit
HQ stub axles, HQ ventilated disk upgrade on front ( commodore/HQ stud pattern conversion)
MISCELLANEOUS:
Full respray in two pack original factory colour, atlantis blue metallic
full rare spares rubber kit fitted
GTS wing mirrors fitted to both sides
3 inch mandrel bent exhaust, HM headers 1 5/8
lowered all round
upgraded sway bars front and rear( specs unknown, was told this when i bought it)
VE ute pursuit rims 16x7 all round, have been machined and offsets changed to suit, with more dish on the rear, 245 on back 205 on front, work done by summerfield engineering
VS radiator and thermo fan
VN dash cluster has been grafted into the dash
battery in boot, custom aluminium box fabricated, is sealed and vented outside of vehicle
Fuel cell countersunk through boot, 044 supply pump, hi pressure fuel pump
braided lines
pro flow hi flow fuel filter
autometer guages fuel pressure fuel level, oil pressure, boost, tacho
NGK wideband display, also has been setup as an input to ECU for logging


1 user(s) are reading this topic
0 members, 1 guests, 0 anonymous users

