
Escort build thread? I love BDA escorts. Build's coming along very nicely.
 1 votes
Fixing my brothers UC hatch
Started by
_dirtbag_
, Dec 30 2009 01:19 PM
1690 replies to this topic
#351

Peter UC
-
- Members
-

- 770 posts
Forum Fixture
- Location:Emerald Vic
- Joined: 08-November 05
Posted 25 February 2010 - 09:28 PM
#352
_dirtbag_
_dirtbag_
-

- Guests
Posted 26 February 2010 - 06:29 PM
I need to make the UC wiring run the LX dash cluster. Before I get too excited in amongst the wiring, I'm having a local auto sparky test all the LX gauges and replacing the voltage regulator.

Next job is removing the lip from the front corners of the firewall to give the tyres some more room.

This is how much I'm removing. I don't want to cut too much as it will obstruct the accelerator pedal and look weird.

You can sort of see the new piece in this pic. It doesn't affect the travel of the accelerator pedal.

Here's the new piece. You can see it's taking up a lot less space than it used to.

The firewall now only sticks out about 45mm.

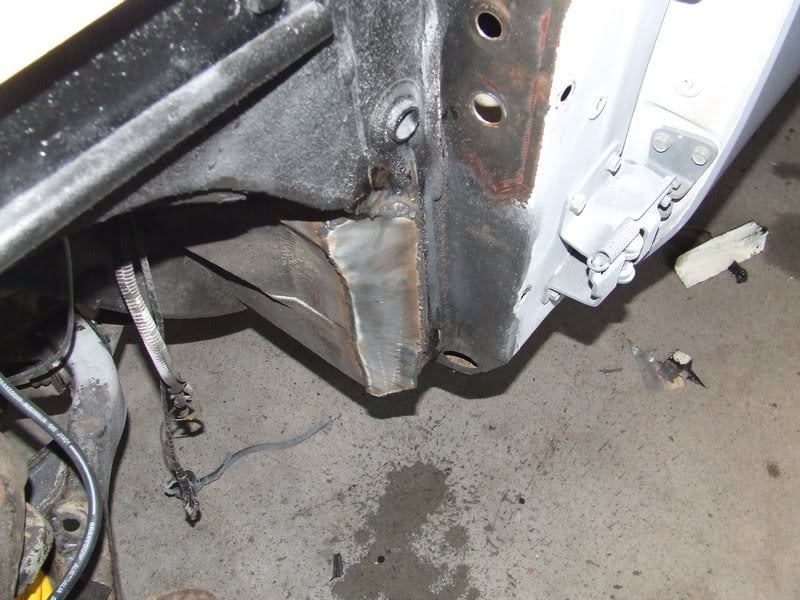
Here's the other side that hasn't been cut yet, It has though, at some stage been flogged in instead of removed,

Before the cut there was about 90mm of lip sticking out.
Another thing I wanted to do was mount a mirror so I could see how it looked and find the best place to mount it.

I like these mirrors. Not too big or too small.

Next job is removing the lip from the front corners of the firewall to give the tyres some more room.
This is how much I'm removing. I don't want to cut too much as it will obstruct the accelerator pedal and look weird.
You can sort of see the new piece in this pic. It doesn't affect the travel of the accelerator pedal.
Here's the new piece. You can see it's taking up a lot less space than it used to.
The firewall now only sticks out about 45mm.
Here's the other side that hasn't been cut yet, It has though, at some stage been flogged in instead of removed,
Before the cut there was about 90mm of lip sticking out.
Another thing I wanted to do was mount a mirror so I could see how it looked and find the best place to mount it.
I like these mirrors. Not too big or too small.
Edited by dirtbag, 26 February 2010 - 06:31 PM.
#353
rodomo
-

- Members
-
- 18,039 posts
To advertise here, call 13TORANA
- Name:R - O - B Dammit!
- Location:Way out west of Melbourne Awstraylya
- Joined: 10-December 05
Posted 26 February 2010 - 06:49 PM
You'll be needing a set of these http://cgi.ebay.com....=item2a04f10c30 to go with those mirrors.
#354
_mick74lh_
_mick74lh_
-
- Guests
Posted 28 February 2010 - 06:39 PM
This is awesome. Good to see its still progressing so fast. Can't wait to see the finished product. Yeah it makes sense to trim those lips on the edges of the firewall cos mine srub sometimes just with 14s!
Have you decided what colour to spray it yet? For what its worth I agree with those suggesting black.
Have you decided what colour to spray it yet? For what its worth I agree with those suggesting black.
#355
_dirtbag_
_dirtbag_
-
- Guests
Posted 28 February 2010 - 07:26 PM
Thanks mick74lh.
I still have my heart set on painting the whole thing black, but unfortunately it isn't my car, or call, so will have to wait and see what he decides when the time comes. At the moment there's a short list, but no definite decision. Until I can talk him into doing the whole thing black : )
Hi Joshua. I really have no experience with this dash swap so any info you can throw my way will be greatly appreciated. The gauge cluster is getting tested at the moment as it's a bit of an unknown. The voltage regulator will be replaced too. As far as the wiring goes I was hoping the wire colours wouldn't have changed too much, but was waiting for the cluster to come back before I started worrying myself about it : )
#356
TerrA LX
-

- Members
-
- 14,241 posts
Fulcrum Fixture
- Location:Sid 'n' knee
- Joined: 31-May 06
Posted 28 February 2010 - 09:15 PM
Swap the wrong wires?
#357
_dirtbag_
_dirtbag_
-
- Guests
Posted 01 March 2010 - 06:55 PM
Well today got some things sorted, but not too much actual work.
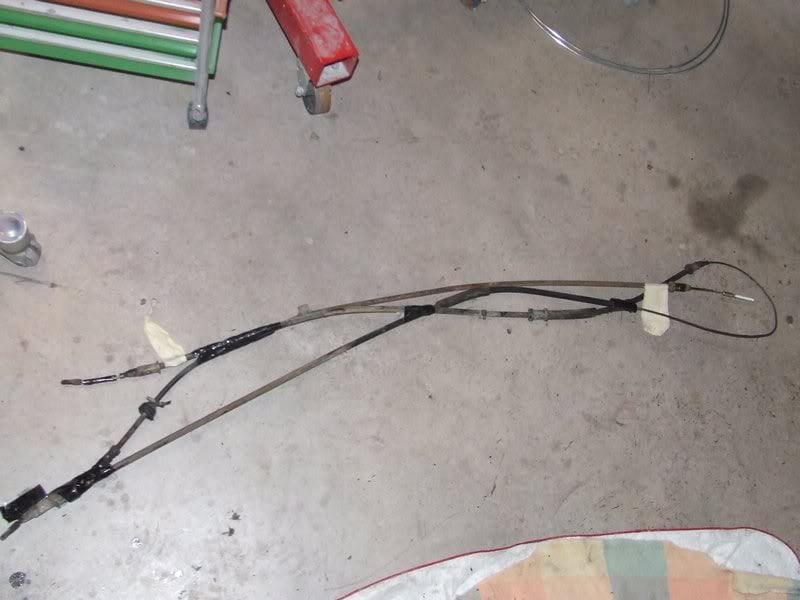
I refitted the UC hand brake cable to the lever, then mounted the commodore hand brake cable to the disc. I then positioned them as if they were one unit and taped them together at the right length.
I also sorted out the changes I wanted to make to the accelerator cable. It'll be shorter than standard and have a barrel fitting on the end instead to suit the LS1 throttle linkage.
I took these in to the cable place today. I should get them back tomorrow or wednesday.
This pic shows the UC - VP commodore hand brake mixture taped together. The ends with the white masking tape are the ends I need, so you can see how the cable will look.
The computer and loom came back from CAE today with all the changes/reprogramming done. It's now MAFless so no air flow meter. Yay.
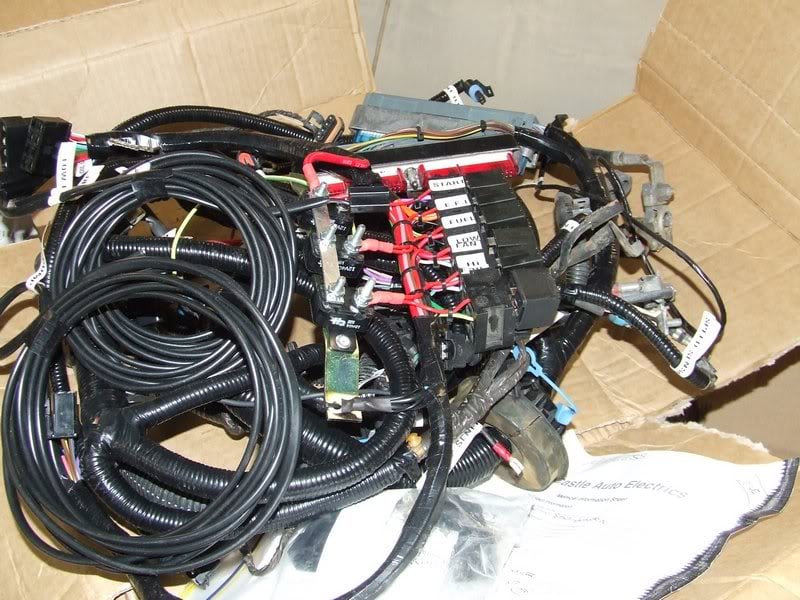
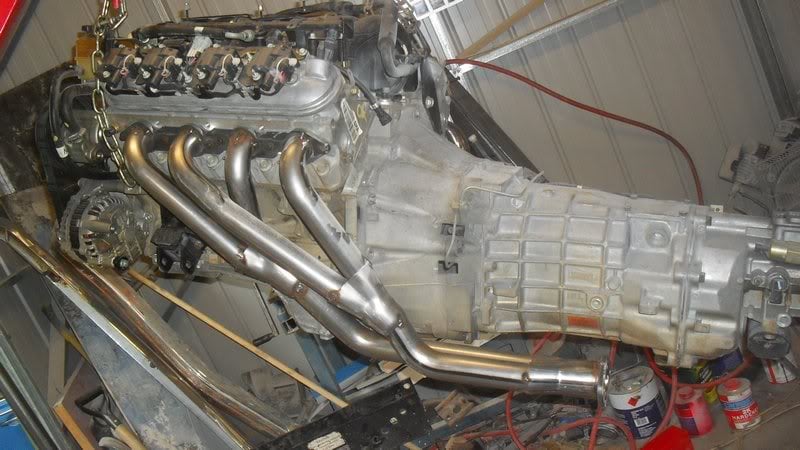
CAE also supplied an extractor kit for me to have fun with. It's not cut to size and there are no instructions so it will be a lot of fun I think nutting it out. I spent a while today going through the bends and think I have most of the left extractor figured out in my head.
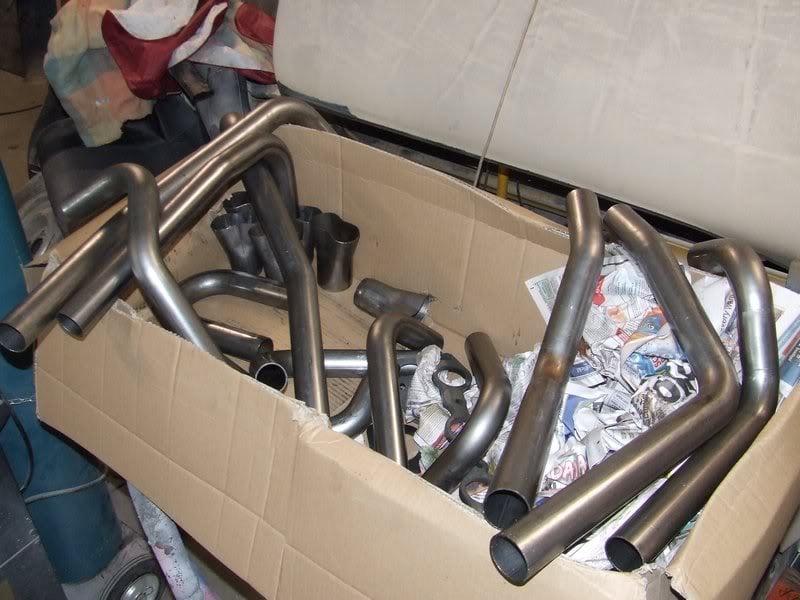
First thing I did was bolt the new flange into place to make sure it was a nice flat fit. It was of course.
I didn't get any more actual work done to the pipes today, as getting the cables sorted and trying to figure the pipes out took a while.
I did get the other side of the firewall done.
Here's the new piece welded in but not sanded down yet so it's a tad ugly.
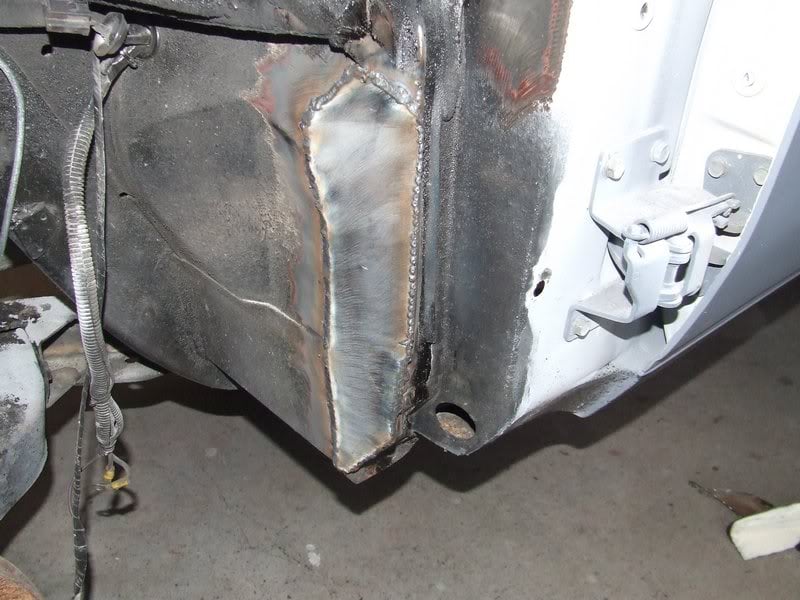
This shows how much room is gained by doing this.
You can see in the above pic that the A/C lines are gone. I removed it all just in case doing this mod damaged any of it. I guess it wasted a bit of time doing so, as I should have done this before I fitted the A/C, but I didn't think of it then. I know, I'm a dumb ass : (
Here it is back together with a bit of black.
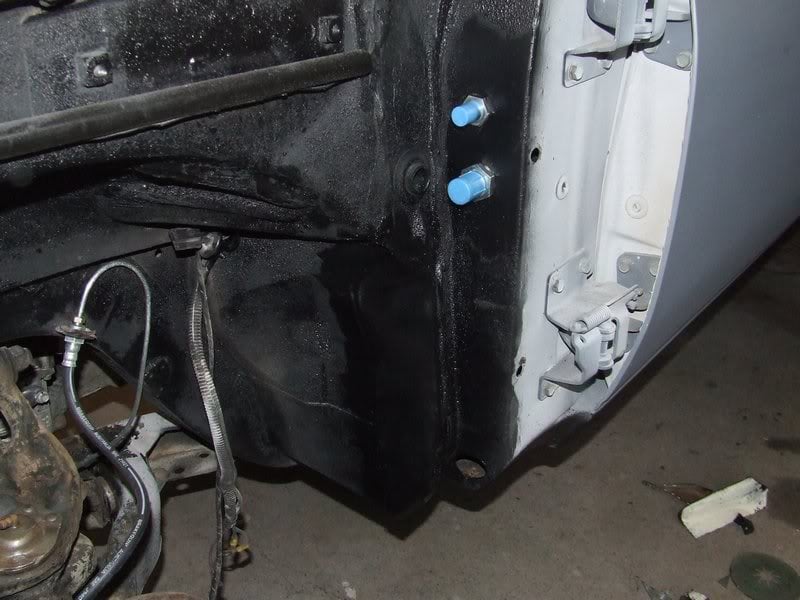
The front suspension is starting to look a little better bit by bit.
I just like this pic because I'm immature : )

That's it for today.
I refitted the UC hand brake cable to the lever, then mounted the commodore hand brake cable to the disc. I then positioned them as if they were one unit and taped them together at the right length.
I also sorted out the changes I wanted to make to the accelerator cable. It'll be shorter than standard and have a barrel fitting on the end instead to suit the LS1 throttle linkage.
I took these in to the cable place today. I should get them back tomorrow or wednesday.
This pic shows the UC - VP commodore hand brake mixture taped together. The ends with the white masking tape are the ends I need, so you can see how the cable will look.
The computer and loom came back from CAE today with all the changes/reprogramming done. It's now MAFless so no air flow meter. Yay.
CAE also supplied an extractor kit for me to have fun with. It's not cut to size and there are no instructions so it will be a lot of fun I think nutting it out. I spent a while today going through the bends and think I have most of the left extractor figured out in my head.
First thing I did was bolt the new flange into place to make sure it was a nice flat fit. It was of course.
I didn't get any more actual work done to the pipes today, as getting the cables sorted and trying to figure the pipes out took a while.
I did get the other side of the firewall done.
Here's the new piece welded in but not sanded down yet so it's a tad ugly.
This shows how much room is gained by doing this.
You can see in the above pic that the A/C lines are gone. I removed it all just in case doing this mod damaged any of it. I guess it wasted a bit of time doing so, as I should have done this before I fitted the A/C, but I didn't think of it then. I know, I'm a dumb ass : (
Here it is back together with a bit of black.
The front suspension is starting to look a little better bit by bit.
I just like this pic because I'm immature : )
That's it for today.
#358
_dirtbag_
_dirtbag_
-
- Guests
Posted 03 March 2010 - 06:07 PM
Well today was a good day. I got to pay around with the extractor kit. I kind of assumed the kit was just the same bends and everything as the CH-77 extractors that CAE sell to suit LS1 into torana. There are some pipes in there that are totally different to the picture I printed of some of their extractors completed.
I decided I'd just wing it : )
First move after bolting the flange on was sorting the pipes in some order in my head, then start cutting and tacking, making sure it fitted and that the Y pieces had enough room too.

Obviously I had to make sure there was enough room to attach the secondaries after the Y pieces.

I started on the left side as there is nothing in the way, like a steering column or starter motor, so the extra room made this side a lot easier.

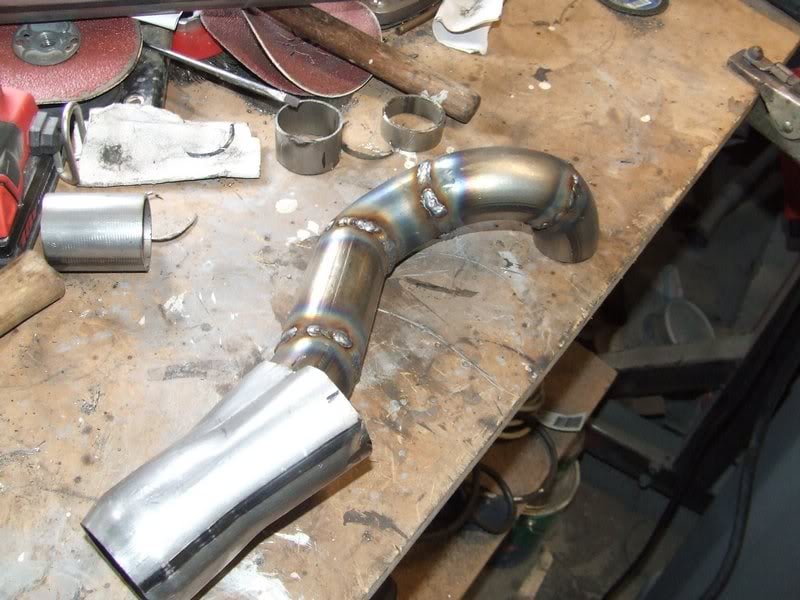
I welded he flange onto the collector from the inside and used a die grinder to clean it up. Seemed more interesting than just welding the outside : )

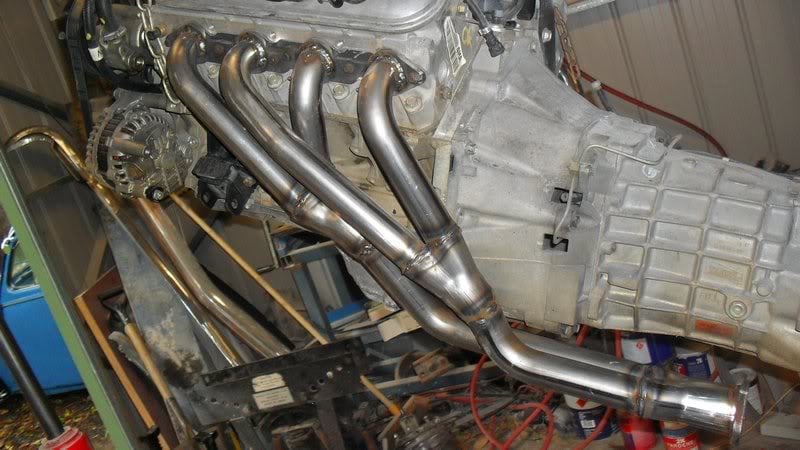
I had to use my pipe bender to shape one of the secondaries on this side, but not too much. All the bends are mandrel bends, so I didn't want to put a huge crush bend into it.
They look pretty good now though.


I also picked up the new handbrake and accelerator cables today, so I'll fit those tomorrow.
I removed the brake booster/master cylinder and lines again today to make room for building the drivers side extractors. I got as far as bolting the flange on and had to leave it at that.
I decided I'd just wing it : )
First move after bolting the flange on was sorting the pipes in some order in my head, then start cutting and tacking, making sure it fitted and that the Y pieces had enough room too.
Obviously I had to make sure there was enough room to attach the secondaries after the Y pieces.
I started on the left side as there is nothing in the way, like a steering column or starter motor, so the extra room made this side a lot easier.
I welded he flange onto the collector from the inside and used a die grinder to clean it up. Seemed more interesting than just welding the outside : )
I had to use my pipe bender to shape one of the secondaries on this side, but not too much. All the bends are mandrel bends, so I didn't want to put a huge crush bend into it.
They look pretty good now though.
I also picked up the new handbrake and accelerator cables today, so I'll fit those tomorrow.
I removed the brake booster/master cylinder and lines again today to make room for building the drivers side extractors. I got as far as bolting the flange on and had to leave it at that.
#359
lxsstorana
-

- Members
-
- 2,499 posts
Forum Fixture
- Name:Mick
- Location:Eastwood, Sydney
- Car:SS Hatchback
- Joined: 23-March 06
Posted 03 March 2010 - 06:15 PM
Great work as always Tim. 
Just gotta ask one question,
"Do you wear a red cape with a big S on the front of your shirt when working on the torana?"
as this is super work and there seems like there's nothing you can't do.
Mick.
Just gotta ask one question,
"Do you wear a red cape with a big S on the front of your shirt when working on the torana?"
as this is super work and there seems like there's nothing you can't do.
Mick.
#360
_dirtbag_
_dirtbag_
-
- Guests
Posted 03 March 2010 - 06:35 PM
hahahaha....Nice one Mick.
I should have a shirt with a big"S" on it, but it would stand for "stupid" or "scumbag" : )
There's nothing I do that anyone else can't do. It's just a bit of practice. Having said that, these are my first extractors, so it'll be interesting to see if I can pull this off
I should have a shirt with a big"S" on it, but it would stand for "stupid" or "scumbag" : )
There's nothing I do that anyone else can't do. It's just a bit of practice. Having said that, these are my first extractors, so it'll be interesting to see if I can pull this off
#361
_dirtbag_
_dirtbag_
-
- Guests
Posted 04 March 2010 - 06:11 PM
Well, aren't I a knob head : )
When I first fitted the extractor flange, I saw the middle 2 bolt holes were offset, and looked like they only went on one way. I put the flange on, it fitted, so I guessed that was the right way. ls2lxhatch tells me to flip the flange and it will still fit, that way the slotted hole at the end will have the slot at the bottom, not the top like I had it. Derrrrr!!!!! Sometimes I surprise myself how dumb I am : )
Anyway, I cut the flange off and flipped it, and it looks a lot neater now. Thanks Andy, what the hell would I do without you buddy???
There's still a bit of room around the extractors, so hopefully the paint will be OK heat-wise once it's painted.
Even though there's not a lot of the extractor that's visible, I'm going to get these HPC coated to make them look pretty and so they don't rust.
Here's the cables I had made for the hand brake and accelerator pedal.
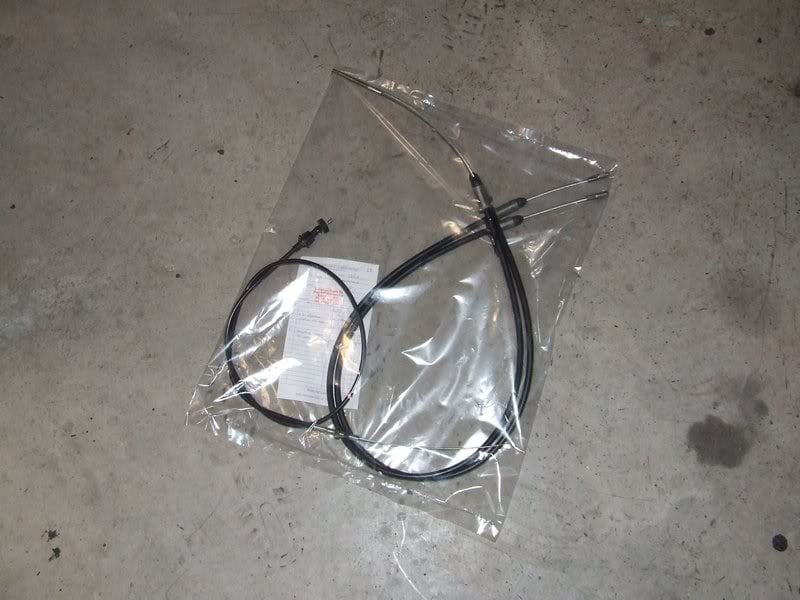
The hand brake outer casings fitted perfectly, but for some reason they made the inner cable too long. I'll have to go back to Beerwah and get them changed. Such a pain in the bum as it's a bit over an hour round trip and a boring drive to boot.
If you go back and look at the cable I used as the template, that was half UC and half commodore cables all taped together, you can see there isn't much inner cable sticking out each end, but then you look at the new ones in the plastic bag and there's about 4 inches too much inner cable. I'm a whinging bugger I know, but I was charged top dollar so expected a bit better.
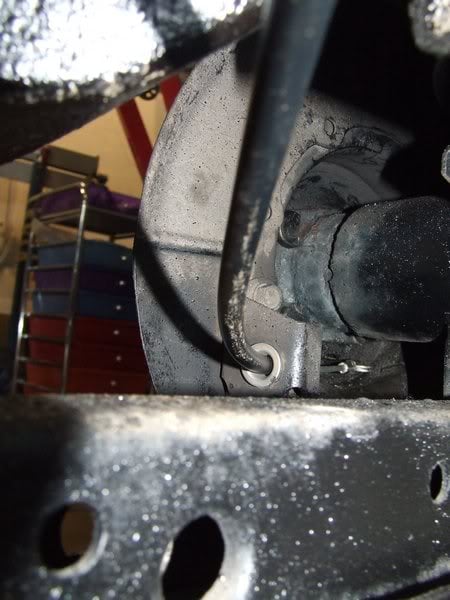
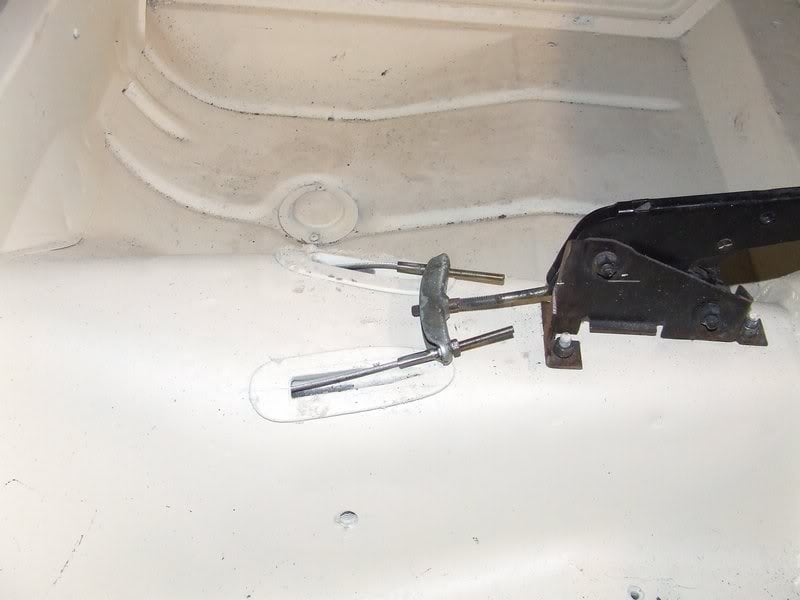
Here's one of the cables mounted to the floor and rear brake.
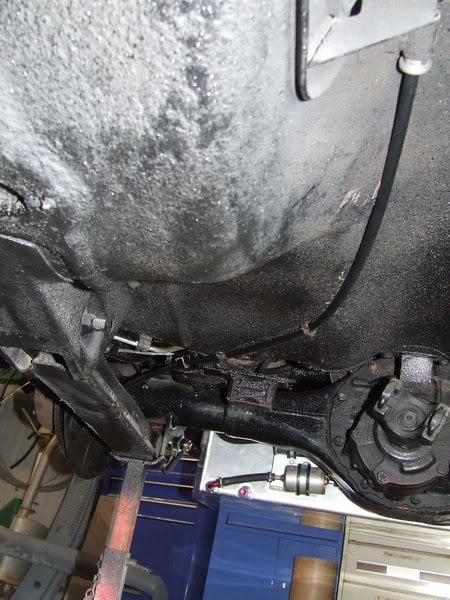
The accelerator cable seems to be good though. It now has a barrel fitting on the end so fits perfectly into the linkage on the throttle body.
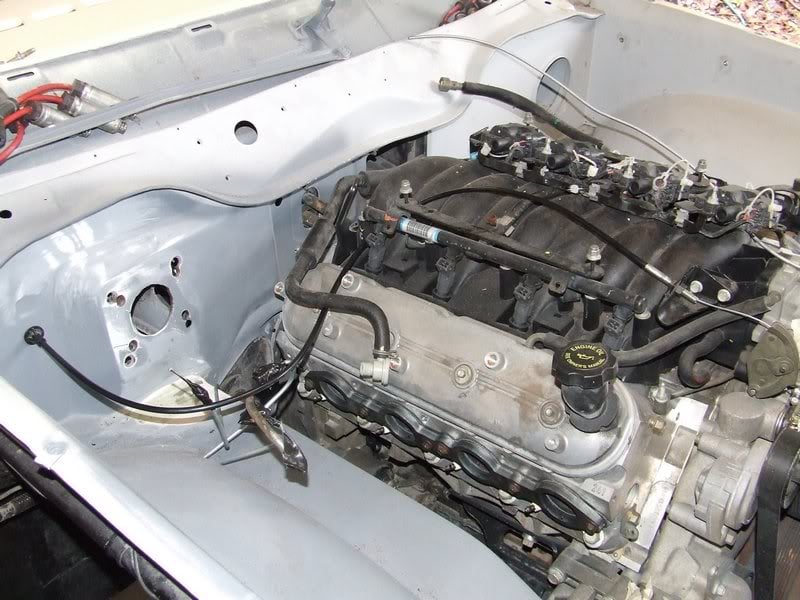
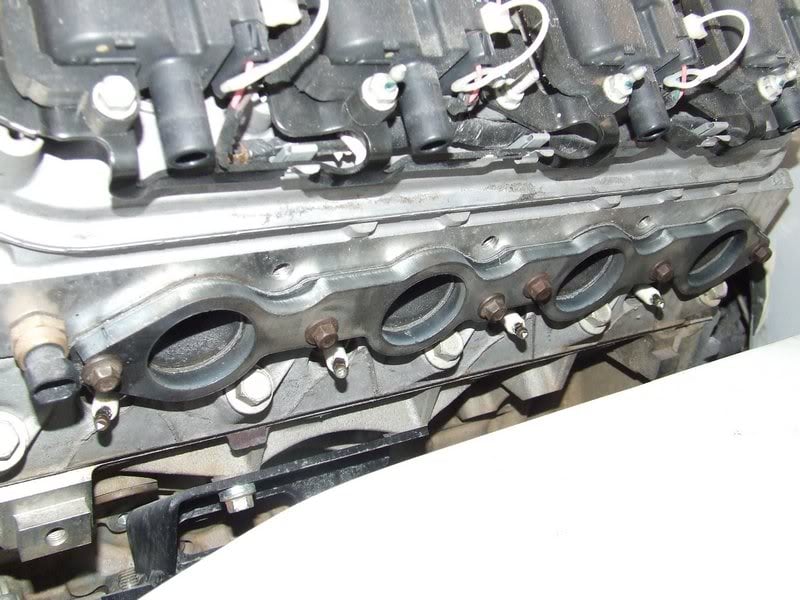
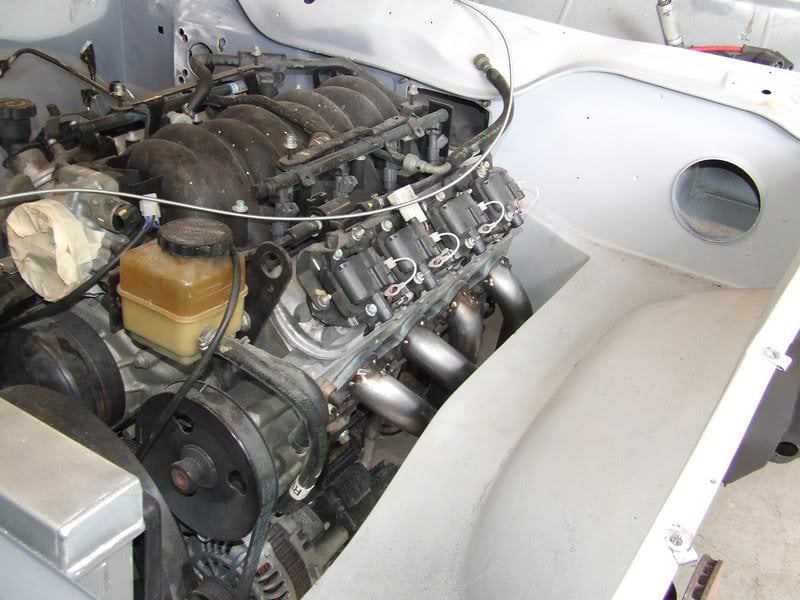
Next fun step is the drivers side extractor. I removed the brake booster/master cylinder and the coil packs to give me a bit more room.
Not a lot of room in there.
Unfortunately I spent a while this morning trying to make both the rear pipes go down and inside the steering column like the CAE one seem to do. The bends I have just weren't tight enough to get it to fit and the Y piece was too big, so I went a totally different way.
It was a shame to waste the time on the earlier design, but as long as it works in the end I'll be happy.
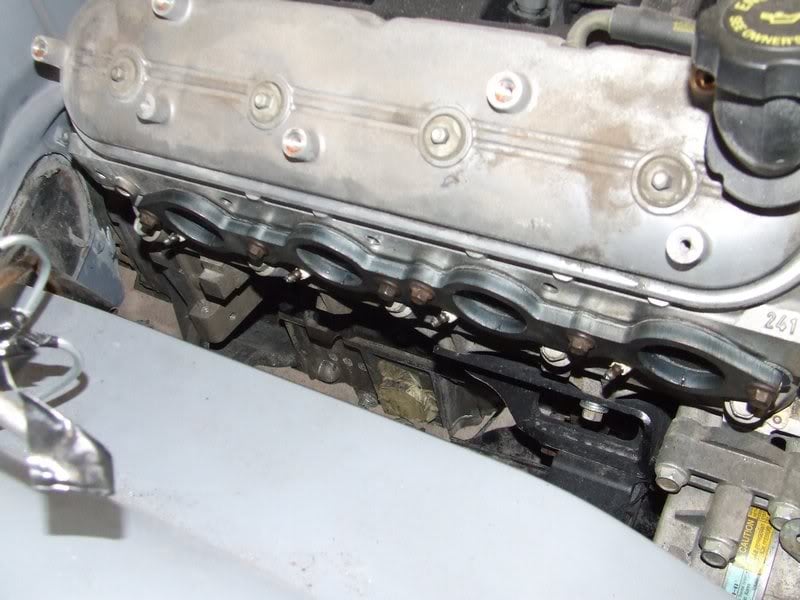
I ended up running the rear most pipe backwards beside the column then down behind the head.
You can see there's a few bends here. The welding is a bit ugly, but that's what grinders with sanding discs are for
After a bit of sanding.

Here's the piece tacked in place.
You can see where the Y piece is. I should be able to get the next pipe into there OK I hope. It is very tight beside the steering column though.
The next pipe isn't ready to get welded in yet, but it's taking shape. The front two pipes will be able to join into one straight away hopefully as there is a bit more room at the front for the Y piece. That way I only have to run a single pipe through the maze.

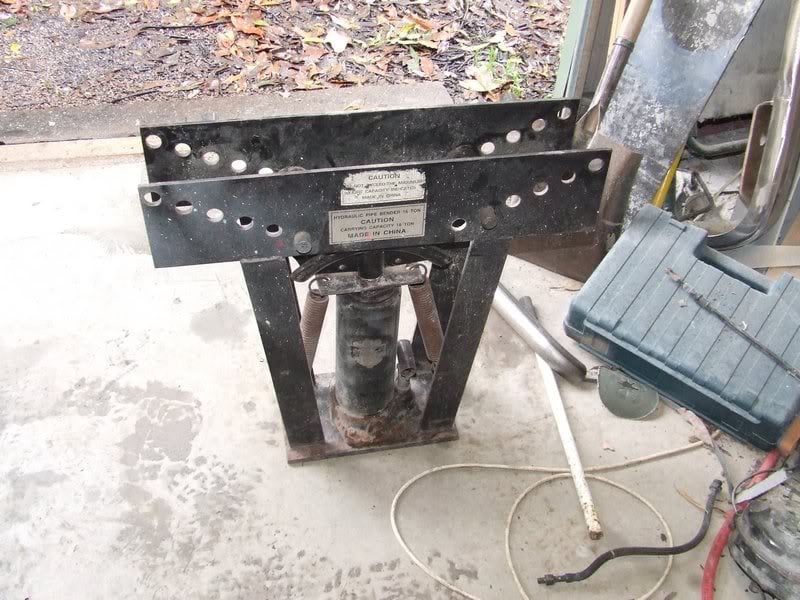
Here's the old monster. My cheapy pipe bender. It's not great for exhausts, as it tends to crush the pipe a bit, but it's better than nothing, and so far has been worth it's weight in gold. It's good with thick wall tube, so will be good for when I build a roll cage for the excort : )
Well tomorrow I'll have to take the cables back and then get back into the pipes. I have to admit, in some sick way, I'm having a lot of fun with these extractors.
Beat's the hell out of sanding, that's for sure : )
When I first fitted the extractor flange, I saw the middle 2 bolt holes were offset, and looked like they only went on one way. I put the flange on, it fitted, so I guessed that was the right way. ls2lxhatch tells me to flip the flange and it will still fit, that way the slotted hole at the end will have the slot at the bottom, not the top like I had it. Derrrrr!!!!! Sometimes I surprise myself how dumb I am : )
Anyway, I cut the flange off and flipped it, and it looks a lot neater now. Thanks Andy, what the hell would I do without you buddy???
There's still a bit of room around the extractors, so hopefully the paint will be OK heat-wise once it's painted.
Even though there's not a lot of the extractor that's visible, I'm going to get these HPC coated to make them look pretty and so they don't rust.
Here's the cables I had made for the hand brake and accelerator pedal.
The hand brake outer casings fitted perfectly, but for some reason they made the inner cable too long. I'll have to go back to Beerwah and get them changed. Such a pain in the bum as it's a bit over an hour round trip and a boring drive to boot.
If you go back and look at the cable I used as the template, that was half UC and half commodore cables all taped together, you can see there isn't much inner cable sticking out each end, but then you look at the new ones in the plastic bag and there's about 4 inches too much inner cable. I'm a whinging bugger I know, but I was charged top dollar so expected a bit better.
Here's one of the cables mounted to the floor and rear brake.
The accelerator cable seems to be good though. It now has a barrel fitting on the end so fits perfectly into the linkage on the throttle body.
Next fun step is the drivers side extractor. I removed the brake booster/master cylinder and the coil packs to give me a bit more room.
Not a lot of room in there.
Unfortunately I spent a while this morning trying to make both the rear pipes go down and inside the steering column like the CAE one seem to do. The bends I have just weren't tight enough to get it to fit and the Y piece was too big, so I went a totally different way.
It was a shame to waste the time on the earlier design, but as long as it works in the end I'll be happy.
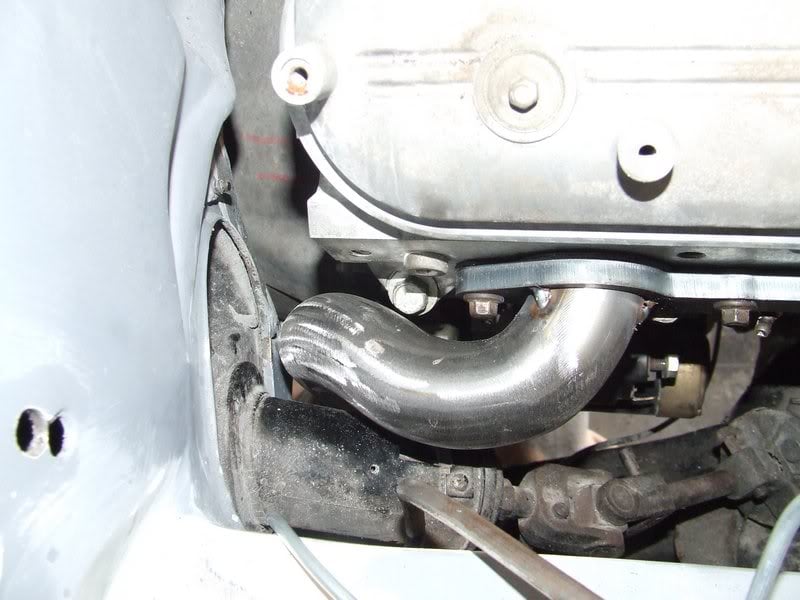
I ended up running the rear most pipe backwards beside the column then down behind the head.
You can see there's a few bends here. The welding is a bit ugly, but that's what grinders with sanding discs are for
After a bit of sanding.
Here's the piece tacked in place.
You can see where the Y piece is. I should be able to get the next pipe into there OK I hope. It is very tight beside the steering column though.
The next pipe isn't ready to get welded in yet, but it's taking shape. The front two pipes will be able to join into one straight away hopefully as there is a bit more room at the front for the Y piece. That way I only have to run a single pipe through the maze.
Here's the old monster. My cheapy pipe bender. It's not great for exhausts, as it tends to crush the pipe a bit, but it's better than nothing, and so far has been worth it's weight in gold. It's good with thick wall tube, so will be good for when I build a roll cage for the excort : )
Well tomorrow I'll have to take the cables back and then get back into the pipes. I have to admit, in some sick way, I'm having a lot of fun with these extractors.
Beat's the hell out of sanding, that's for sure : )
Edited by dirtbag, 04 March 2010 - 06:17 PM.
#362
MRLXSS
-

- Members
-
- 12,414 posts
The Render Garage
- Name:Matt
- Location:Upwey, Melbourne
- Car:355 LX Hatchback, DeLorean DMC-12, LX SS Hatch, VY Cross8 Crewman
- Joined: 09-November 05
Posted 04 March 2010 - 06:59 PM
WOW! Fuccking awesome mate!
Are you charging your brother for all this work?
Are you charging your brother for all this work?
#363
_cruiza_
_cruiza_
-
- Guests
Posted 04 March 2010 - 07:11 PM
Well done Mr Dirt, impressive work
Painted bumpers look best
Painted bumpers look best
Edited by cruiza, 04 March 2010 - 07:11 PM.
#364
_AD_75_
_AD_75_
-
- Guests
Posted 04 March 2010 - 07:57 PM
Ooh..that pipe looks so close to the steering rack you might end up with a heated steering wheel for winter! have to charge him extra for this feature..  seriously though its looking the goods, one thing though Tim did you end up shaving the rails in the engine bay before you did the smoothing job?? i cant remember?? and am too lazy to search through the thread..
seriously though its looking the goods, one thing though Tim did you end up shaving the rails in the engine bay before you did the smoothing job?? i cant remember?? and am too lazy to search through the thread..
Edited by AD_75, 04 March 2010 - 07:58 PM.
#365
ls2lxhatch
-

- Members
-
- 5,332 posts
- Location:Perth
- Car:LX Hatch
- Joined: 29-May 06
Posted 04 March 2010 - 09:36 PM
If you need more clearance you can trim the steering column.
#366
_dirtbag_
_dirtbag_
-
- Guests
Posted 05 March 2010 - 01:50 AM
Hi guys.
Matt, yes I'm charging him, I'm not that good a brother : )
Aido, yes, trimming the rails was the first thing I did in regards to smoothing out the engine bay. Once the lip was gone I then reskinned the top of the rails to get them smooth.
Andy, that's what I was planning to do. Only because you mentioned it to me in an earlier post. I couldn't be bothered pulling the column yesterday to do trim it, as it has to come out later anyway so can get done then. Thanks again for mentioning that mod, I wouldn't have thought of it.
Have I mentioned how good this site is? Thanks for all the comments, ideas and suggestions. I look forward to the comments on how crap my work is or how silly my brother is for not wanting his car painted all black : )
#367

 View Garage
Posted 05 March 2010 - 05:52 AM
Looking good!
Swapping the donut for a second steel uni on the steering shaft gives another whisker of extra space and firms up the steering feel
Swapping the donut for a second steel uni on the steering shaft gives another whisker of extra space and firms up the steering feel
#368
_dirtbag_
_dirtbag_
-
- Guests
Posted 05 March 2010 - 04:44 PM
Well, today saw a job get done that I was not exactly looking forward to, but enjoyed the challenge none the less.
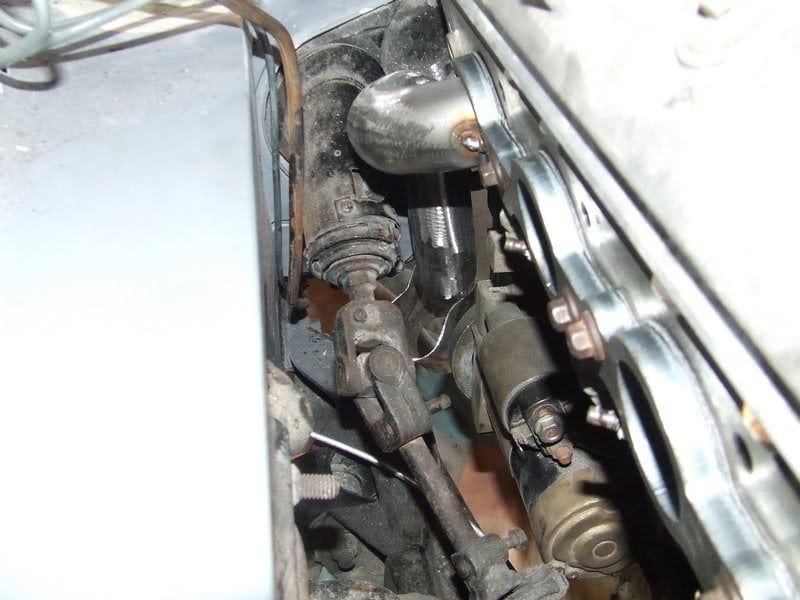
I got the drivers side extractor all tacked together even with the standard starter motor in place. Apparently it's a bit of a problem with LS1 conversions. I can see why now : )
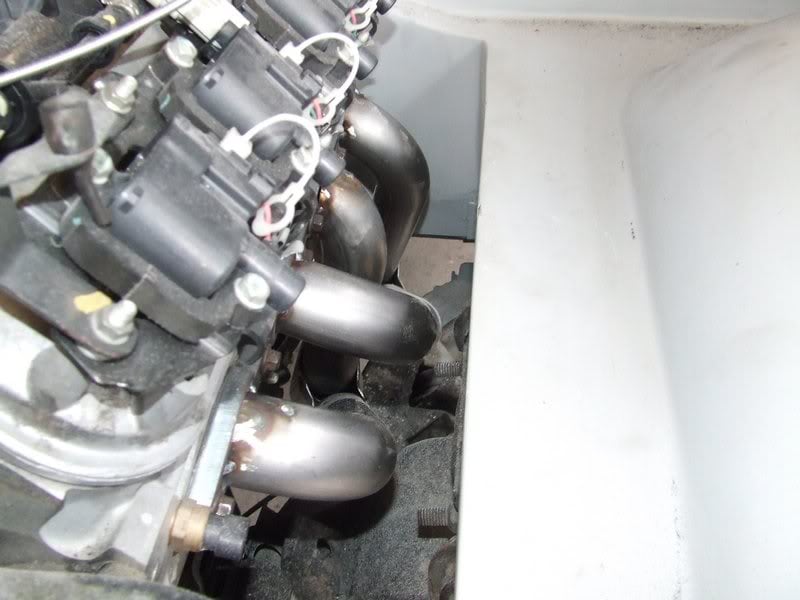
The second pipe was just as much a pain as the first. I had to tighten the bends a fair bit to get the pipe in there, but seems to be quite happy where it is now.


The Y piece for the two rear pipes is down next to the bellhousing, but the Y piece for the front two pipes will be closer to the head, as there isn't enough room to run the two front pipes around the outside of the steering column.

It's amazing how much trouble I had trying to hold three things at once to get things tacked together : ) This is my first set of extractors I've ever made, so some teething problems are normal I guess : )
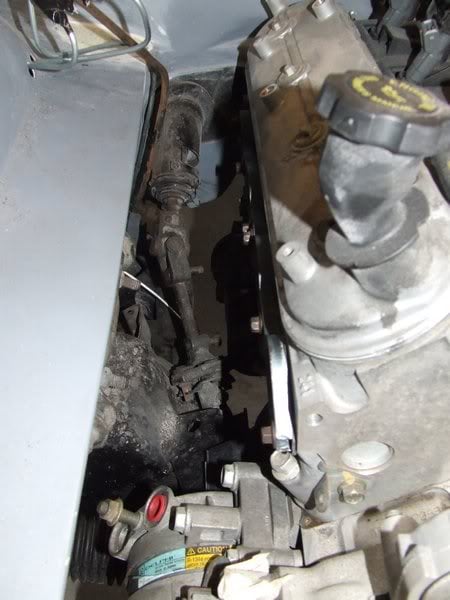
It was a fine line getting the pipe through here without hitting everything.

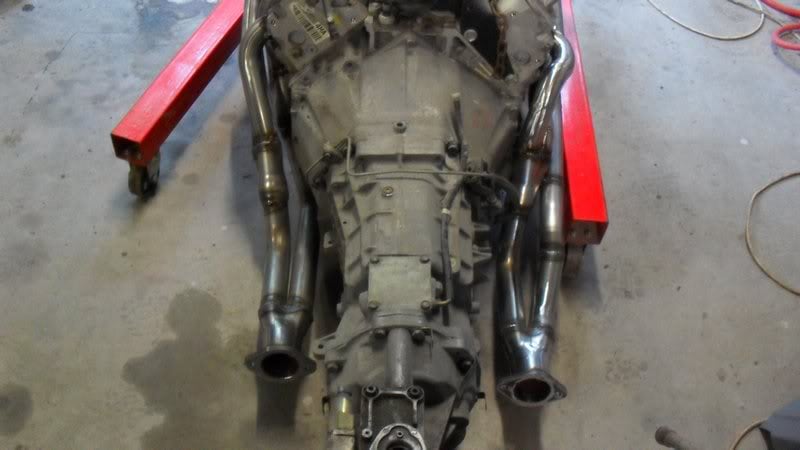
I have to admit it was a very nice feeling to have to be under the car to finish the pipes, as it meant the top section was in place.

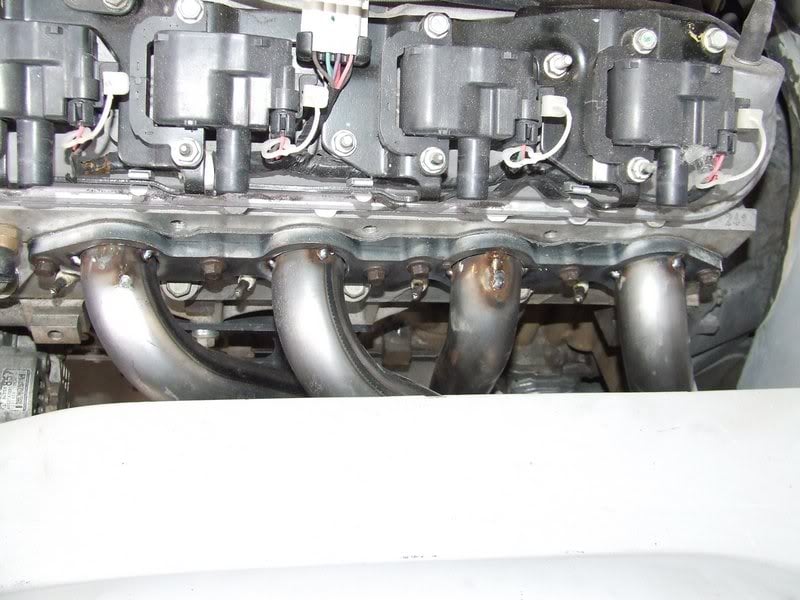
Finally the whole side is now tacked together. I'll put some more welds on them before I start pulling it all apart so they are a bit stronger. I'll then bolt them onto a piece of thick box section to fully weld them, so they don't distort too badly.

I know they're certainly not the prettiest extractors in the world, but I'd hope they're not the ugliest either : )
Getting the pipe from the front through the gap between the firewall and the K frame was a bit of fun too : ) It's funny how when it's all together it looks really easy. Maybe it is, and I'm just a dumb ass : )

Next step with these is to rip the motor and box out again and weld them up. Then the wiring. Yikes!!!!!!!

Oh, and I took the hand brake cables back to get shortened so they can go back on tomorrow.
I got the drivers side extractor all tacked together even with the standard starter motor in place. Apparently it's a bit of a problem with LS1 conversions. I can see why now : )
The second pipe was just as much a pain as the first. I had to tighten the bends a fair bit to get the pipe in there, but seems to be quite happy where it is now.
The Y piece for the two rear pipes is down next to the bellhousing, but the Y piece for the front two pipes will be closer to the head, as there isn't enough room to run the two front pipes around the outside of the steering column.
It's amazing how much trouble I had trying to hold three things at once to get things tacked together : ) This is my first set of extractors I've ever made, so some teething problems are normal I guess : )
It was a fine line getting the pipe through here without hitting everything.
I have to admit it was a very nice feeling to have to be under the car to finish the pipes, as it meant the top section was in place.
Finally the whole side is now tacked together. I'll put some more welds on them before I start pulling it all apart so they are a bit stronger. I'll then bolt them onto a piece of thick box section to fully weld them, so they don't distort too badly.
I know they're certainly not the prettiest extractors in the world, but I'd hope they're not the ugliest either : )
Getting the pipe from the front through the gap between the firewall and the K frame was a bit of fun too : ) It's funny how when it's all together it looks really easy. Maybe it is, and I'm just a dumb ass : )
Next step with these is to rip the motor and box out again and weld them up. Then the wiring. Yikes!!!!!!!
Oh, and I took the hand brake cables back to get shortened so they can go back on tomorrow.
#369
_UNVSM8_
_UNVSM8_
-
- Guests
Posted 05 March 2010 - 05:06 PM
nice work mate just wondering how you go about getting the drivers side out if they go around either side of the steering column or did i miss something?
keep up the good work! i always check this thread as you have done something new everytime!
keep up the good work! i always check this thread as you have done something new everytime!
#370
_dirtbag_
_dirtbag_
-
- Guests
Posted 05 March 2010 - 06:01 PM
Thanks Ben. Yeah, the pipes are a pain, and the only way I could see them working was to have to pull the column out to fit/remove the extractors on the drivers side. Hopefully once it's all together they wont have to come out again for a very, very, very, very, very long time : ) At least it's only a few bolts and a plug or two to get the column out.
#371
_nial8r_
_nial8r_
-
- Guests
Posted 05 March 2010 - 06:27 PM
HI Tim, this is the first time i have seen your thread and still havent been right throught it but your work has pretty much blown me away, i got a line to the thread off Andy as im going to weld up the holes in my bars but wasnt real sure if it was do-able without warping, i will have to have a read from page 1. oh and them extractors you have made well you have a hell of alot more paitents than, dont get me wrong i love a challange but that one take the cake mate, i will be watching now with eyes wide open, keep up the good work mate 
#372
to fly
-

- Members
-
- 335 posts
Forum Fan
- Joined: 08-November 05
Posted 06 March 2010 - 12:50 PM
Gday Tim, I have been reading this post for a while and I would like to thank you for taking the time to share your build with us, pics are so helpful, you are very skilled and your ideas are inspirational, keep up the good work and you make this forum the great, helpful and friendly place that it is!!!
#373
meanmachine72
-

- Members
-
- 2,036 posts
Forum Fixture
- Name:Jono
- Location:Taree Workers club
- Joined: 12-July 06
Posted 06 March 2010 - 12:56 PM
wow ..what a top job your doing dirtbag, you have talent to burn
and a dam good fabricator, whats your background..eg fitter and turner??
keep the good work up!!
cheers johnno
and a dam good fabricator, whats your background..eg fitter and turner??
keep the good work up!!
cheers johnno
#374
_dirtbag_
_dirtbag_
-
- Guests
Posted 06 March 2010 - 04:23 PM
Thanks a lot for the kind words nial8r, to fly(nice hatch man!!!) and meanmachine72.
It's been good actually, I only started posting on here so my brother could see how his car is coming along, but chatting to all of you really makes my day. I'd probably have stopped posting ages ago, as I'm pretty lazy, but I enjoy the feedback, good or bad. There's been some really good advice thrown my way too, especially ls2lxhatch, who needs to change his name from Andy to Yoda : )
As for my background, I have no formal training. I've just learnt from trial and error. I did some time in a couple of hot rod shops on the sunshine coast, doing mainly chassis work and major body changes, but there's not really a course for that. Get in and have a go!!!!! : )
Well I did a bit more today, until the power went out : (
I finally have a working handbrake. There was a bit of a mix up with the cables, but the guy who did them stepped up and fixed them no dramas, so good on him.

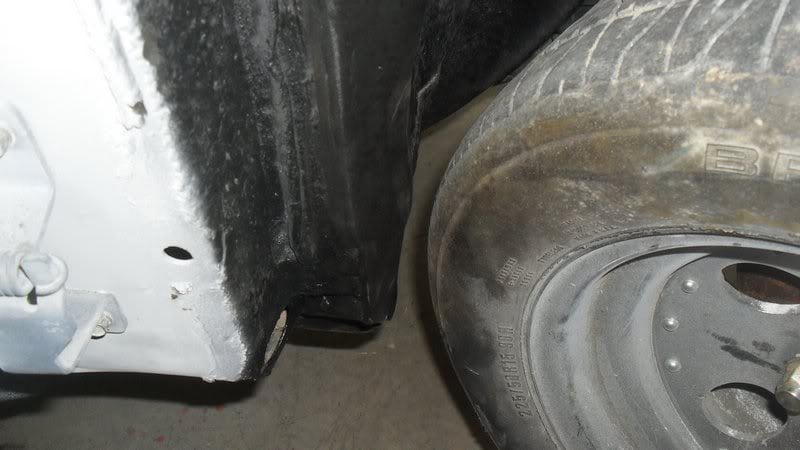
I had to put the car back on its wheels today so decided I'd take a pick of the clearance between the tyre and the firewall now the lip is removed. It might still hit when the suspension moves or if the tyres/wheels are bigger, but it's a definite improvement.
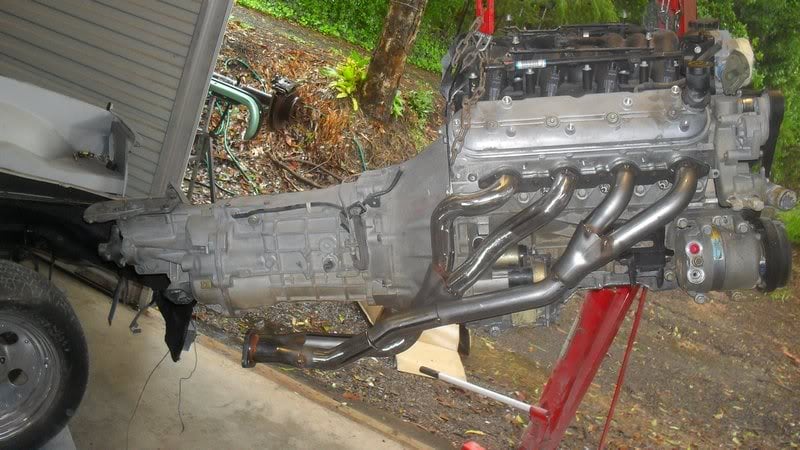
The next thing to do was rip the motor and box out again.
One thing I was actually trying for, but didn't mention while I was building the extractors in case it didn't work out, was to have them be able to stay bolted to the motor for removal and installation. As it turns out, I was able to leave them bolted on and still get the motor and box out in one easy step. A lot of this is because I kept the pipes as close to the engine as I could, and because I've made the top piece of the radiator support removable. I pulled the motor and box out by myself and it was easy, but once it's painted I think I'll get some extra hands to help me not scratch the heck out of it.
While it was up in the air I welded all the joins as much as I could while the extractors were still bolted to the motor. There's only a few areas I couldn't get to, so I'll do those when I take the pipes off.

I think for my first attempt they turned out pretty well. My opinion, anyway : )
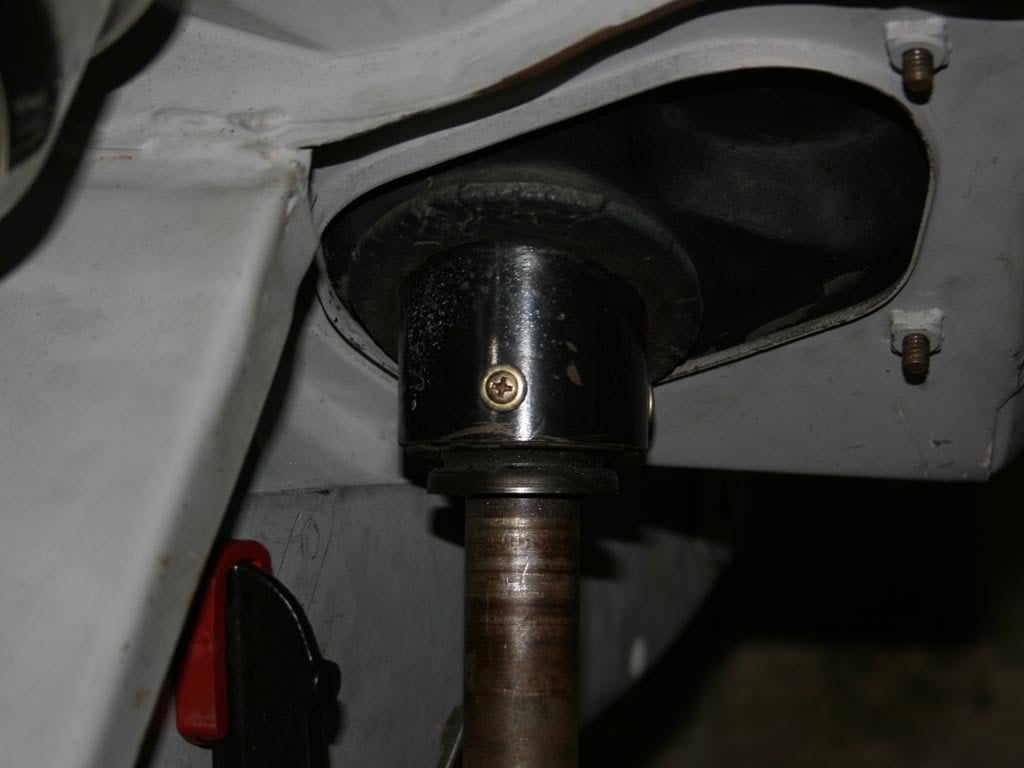
My next job was to trim the steering column. I got this idea from Andy (ls2lxhatch). It's a nice easy mod that gives some more room for no cost. I'm glad he told me about it though, as I doubt I would have thought to do it.
The idea is to move the steering shaft support and bearing closer to the firewall.
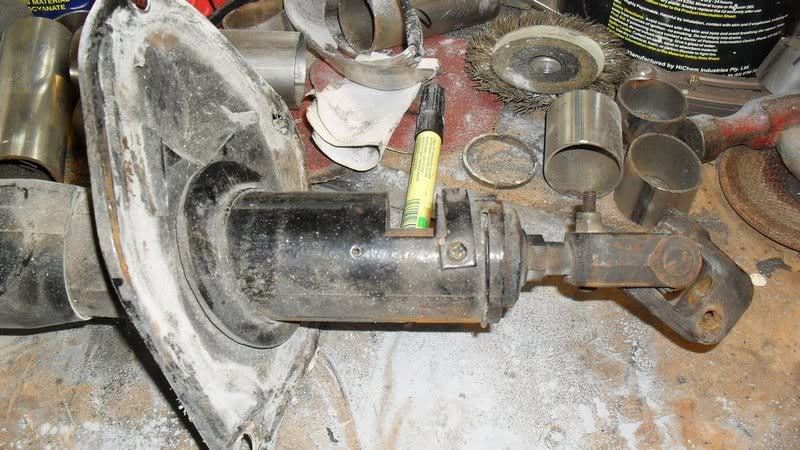
There's an easy 21/2 - 3 inches of extra space to be had by doing this. I still need to get some short screws to hold the plastic bush in place, but other than that it's done. Thanks again Yoda : )
The steering shaft had a fair bit of gunk and surface rust on it, so I sanded it as well as I could, as the cleaner and smoother the shaft is the easier it is to move the end bearing.

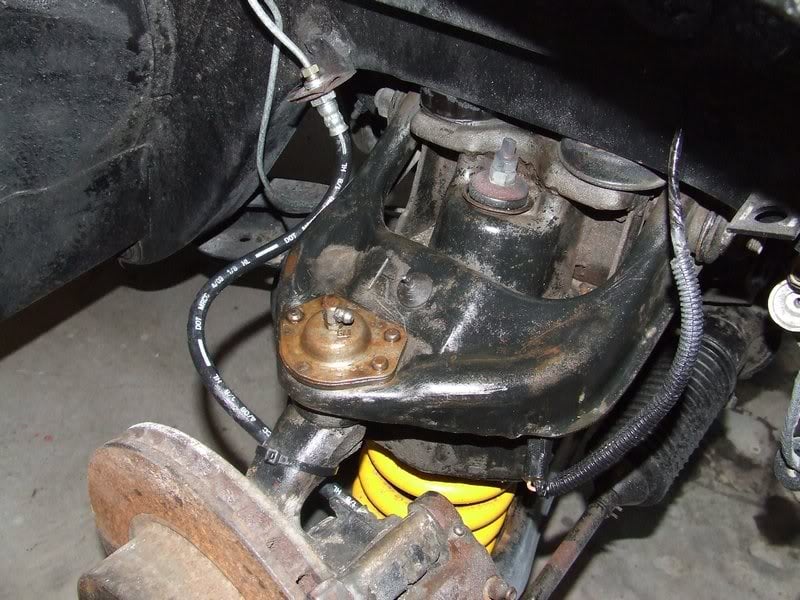
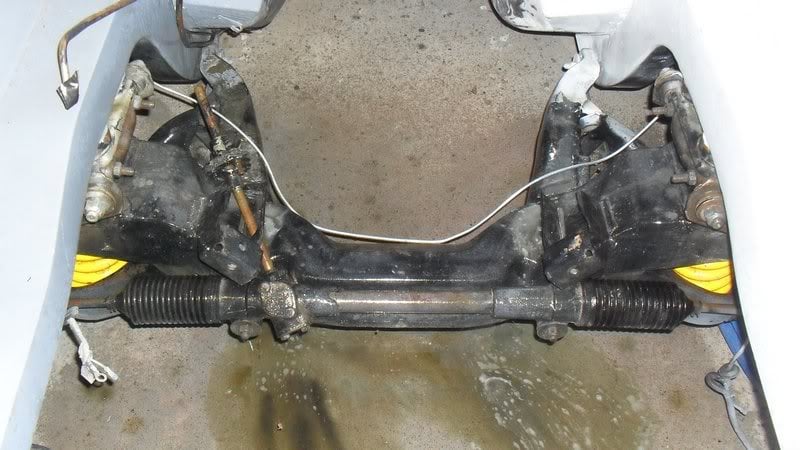
Time for a bit more cleaning. Yay. While the motor is out I thought I'd give the crossmember a bit of a clean up and paint. Then I can mount the left front brake line to the crossmember with some rubber lined "P" clamps.
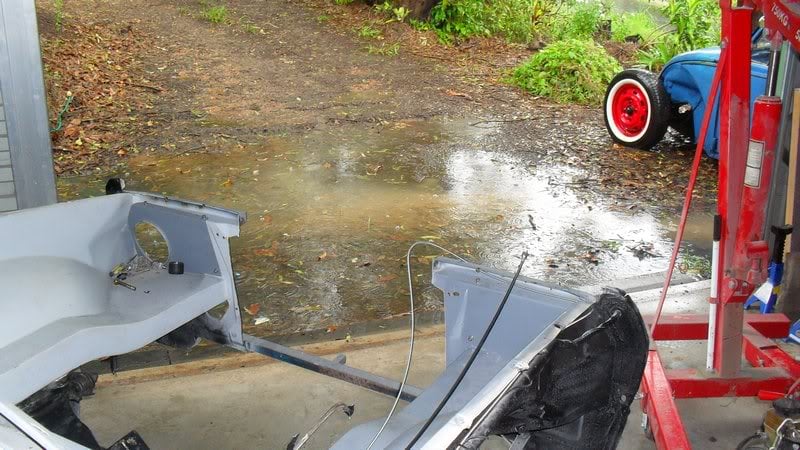
It's been bucketing down here on and off for the last week, everything is soggy and wet, and even the front of the shed is a shallow pool. It sure is nice working in Qld heat and humidity....NOT!!!!! : )
So to top it off, the power went out. Plus we're on tank water, so no pump. At least I got to have a shower on the driveway : )
That's it til next week.
Here's my little shed pool.
It's been good actually, I only started posting on here so my brother could see how his car is coming along, but chatting to all of you really makes my day. I'd probably have stopped posting ages ago, as I'm pretty lazy, but I enjoy the feedback, good or bad. There's been some really good advice thrown my way too, especially ls2lxhatch, who needs to change his name from Andy to Yoda : )
As for my background, I have no formal training. I've just learnt from trial and error. I did some time in a couple of hot rod shops on the sunshine coast, doing mainly chassis work and major body changes, but there's not really a course for that. Get in and have a go!!!!! : )
Well I did a bit more today, until the power went out : (
I finally have a working handbrake. There was a bit of a mix up with the cables, but the guy who did them stepped up and fixed them no dramas, so good on him.
I had to put the car back on its wheels today so decided I'd take a pick of the clearance between the tyre and the firewall now the lip is removed. It might still hit when the suspension moves or if the tyres/wheels are bigger, but it's a definite improvement.
The next thing to do was rip the motor and box out again.
One thing I was actually trying for, but didn't mention while I was building the extractors in case it didn't work out, was to have them be able to stay bolted to the motor for removal and installation. As it turns out, I was able to leave them bolted on and still get the motor and box out in one easy step. A lot of this is because I kept the pipes as close to the engine as I could, and because I've made the top piece of the radiator support removable. I pulled the motor and box out by myself and it was easy, but once it's painted I think I'll get some extra hands to help me not scratch the heck out of it.
While it was up in the air I welded all the joins as much as I could while the extractors were still bolted to the motor. There's only a few areas I couldn't get to, so I'll do those when I take the pipes off.
I think for my first attempt they turned out pretty well. My opinion, anyway : )
My next job was to trim the steering column. I got this idea from Andy (ls2lxhatch). It's a nice easy mod that gives some more room for no cost. I'm glad he told me about it though, as I doubt I would have thought to do it.
The idea is to move the steering shaft support and bearing closer to the firewall.
There's an easy 21/2 - 3 inches of extra space to be had by doing this. I still need to get some short screws to hold the plastic bush in place, but other than that it's done. Thanks again Yoda : )
The steering shaft had a fair bit of gunk and surface rust on it, so I sanded it as well as I could, as the cleaner and smoother the shaft is the easier it is to move the end bearing.
Time for a bit more cleaning. Yay. While the motor is out I thought I'd give the crossmember a bit of a clean up and paint. Then I can mount the left front brake line to the crossmember with some rubber lined "P" clamps.
It's been bucketing down here on and off for the last week, everything is soggy and wet, and even the front of the shed is a shallow pool. It sure is nice working in Qld heat and humidity....NOT!!!!! : )
So to top it off, the power went out. Plus we're on tank water, so no pump. At least I got to have a shower on the driveway : )
That's it til next week.
Here's my little shed pool.
#375
fenz
-

- Members
-
- 220 posts
Forum Member
- Name:Aaron
- Location:South Australia
- Car:LJ 2 door and UC V8 4door
- Joined: 26-July 09
Posted 06 March 2010 - 06:03 PM
Nice job on the pipes looks like they came up spot on.


1 user(s) are reading this topic
0 members, 1 guests, 0 anonymous users

