Fixing my brothers UC hatch
#576
 _UNVSM8_
Posted 10 April 2010 - 06:10 PM
Ben
#577

Posted 10 April 2010 - 07:41 PM
Mate, don�t change the MAF pipe it looks the shit.
If you completely blocked off the restricted side you would still have enough volume of air.
It needs to be symmetrical, imagine woman with only one tit,
Cheers.
#578
 _dirtbag_
Posted 10 April 2010 - 08:38 PM

Please
#579
 _cruiza_
Posted 10 April 2010 - 09:13 PM
#580
 _LH8VD69_
Posted 11 April 2010 - 06:15 AM
#581
 _red roar_
Posted 11 April 2010 - 04:45 PM
#582
 _dirtbag_
Posted 11 April 2010 - 04:50 PM
#583
 _red roar_
Posted 11 April 2010 - 05:43 PM
Hi Trevor. It's holds 5 litres now. It's basically the same as the old commodore sump, only backwards.
Looks are deceiving mate, it doesnt seem very deep from the pics, but whatever it is, its a great job.
#584
 _dirtbag_
Posted 11 April 2010 - 07:21 PM
#585
 _nial8r_
Posted 11 April 2010 - 08:19 PM
#586
 _@milco@_
Posted 11 April 2010 - 11:14 PM
#587
 _jabba_
Posted 12 April 2010 - 07:49 AM
#588
 _dirtbag_
Posted 12 April 2010 - 08:11 AM
I didn't realise that would happen but it's fixed now. Thanks to the people who let me know, you know who you are
#589
 _dirtbag_
Posted 12 April 2010 - 05:18 PM
Today I attacked the new engine covers.
I'm not really happy with how the recesses for the mounting nuts line up with the mounting studs, so I'm going to add more fibreglass underneath so I can die grind the hole into the right position.

I'm also going to mutilate the area next to the brake booster/master cylinder. I don't like the big gap next to the booster, plus the rear corner actually touches the booster. Plus I'm going to change the shape of the cover so it shrouds where the brake lines enter the master cylinder.

Excuse the next pic, it's a nice blurry one : )
I've reshaped the cover near the master cylinder and taped everything into place.
Plus, I'm not 100% sure this car will be getting power steering, and earlier in the thread someone mentioned filling the hole in for the power steering fluid. Well the fluid reservoir lid sits lower than the engine cover anyway, so I figure it'd be easy enough to undo two nuts to get to the power steering fluid. This means I could fill the hole in the cover. So I will.

Once the resin was dry enough I took all the tape off. It looks good in my opinion, but I'm not a fibreglasser. Thank god : )

Obviously there is some trimming and filling to do but this is how the drivers side cover looks after the tape came off and had a quick trim to fit it into place. It looks bad now, but I'm sure it will shape up OK in the end.

I also added about 6 layers of matting around each mounting hole, so I can fix where the mounting nuts go.
While the covers were off I did the last little thing to the accelerator cable. It winds around the brake booster easily enough, but then if I run it through the original bracket near the throttle body you can see the cable when the cover is on. I modified the front cable mount so it's now hidden from view when the cover is on.


I didn't realise I put this pic (above) in photo bucket, as it looks very bad. I'm too lazy to change it, but when it's all connected up the cable isn't on a big angle, it's straight. In this pic the cable isn't attached to the throttle body.
Well I made sure everything is bolted on properly, refitted the steering, adjusted the handbrake, cleaned everything out and tied all loose bits up ready for its trip to the exhaust shop tomorrow. Hopefully it's only gone for the day, then business can continue as usual on wednesday : )
Edited by dirtbag, 12 April 2010 - 05:21 PM.
#590
 _red roar_
Posted 12 April 2010 - 09:38 PM
how do you go with the fibreglass work? i repaired a ski boat years ago and still itch thinking about it.
cheers
#591
 _dirtbag_
Posted 12 April 2010 - 10:11 PM
#592

Posted 12 April 2010 - 10:28 PM
You can't run it dry either.
Looping it may overpressurise the low pressure return aswell.
either run a smaller belt or purchase a dummy idler pully.
#593

Posted 13 April 2010 - 07:09 AM
Attached Files
#594

Posted 13 April 2010 - 10:45 AM
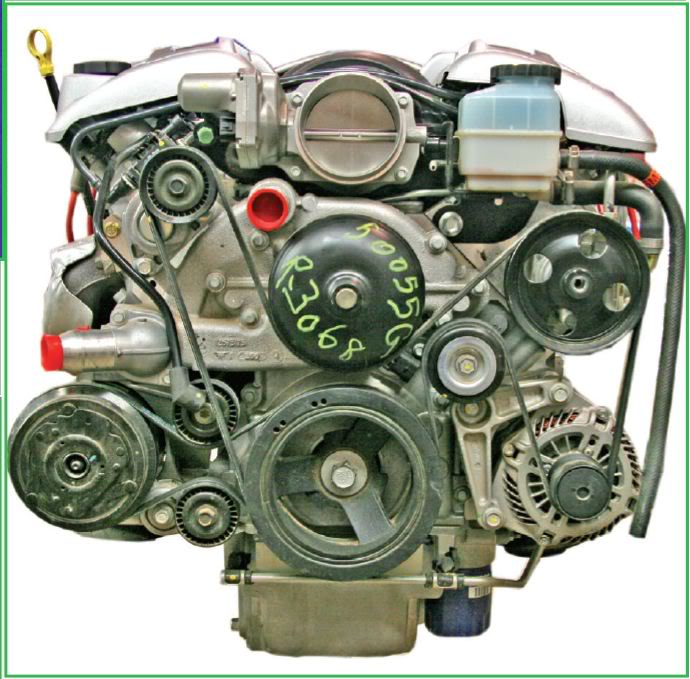
The V6 pulley looks good but the amount of belt contact with the crank and alternator is significantly reduced compared to the factory setup. It will be interesting to see if belt slippage is a problem. I think LS1LX removed the alternator idler and went straight from the crank to alternator to water pump.
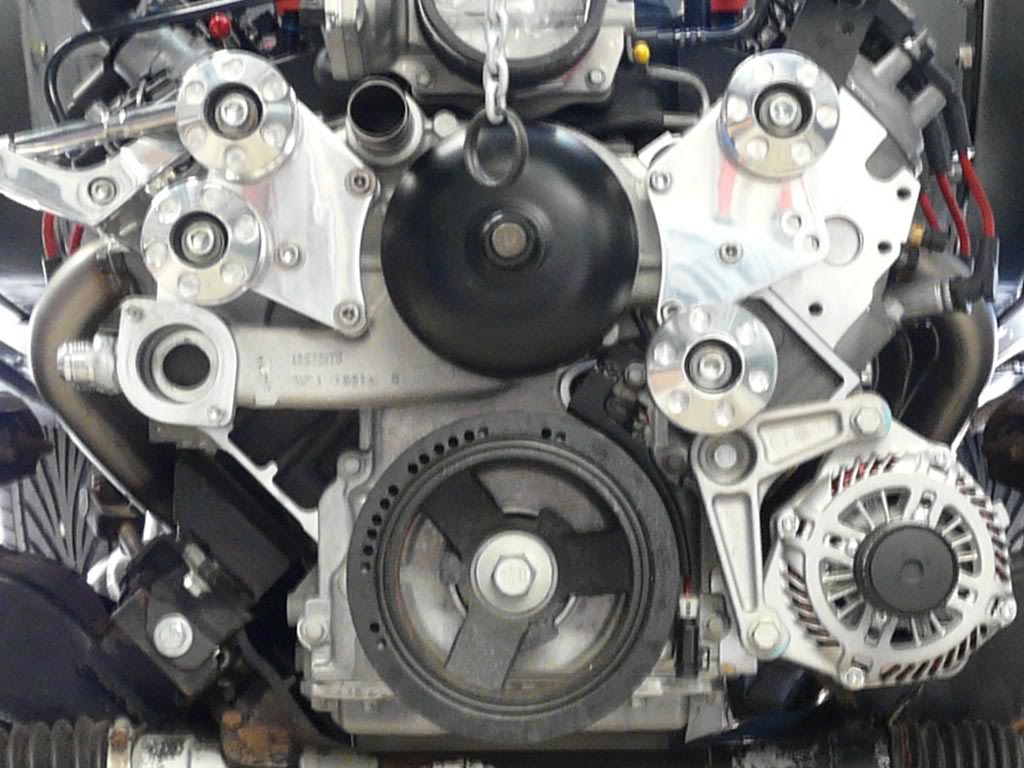
CAE make an idler for $210 that would look at home on a tractor.

I bought this idler with the A/C bracket I was going to use.
Fitting an electric water pump is another option.

Edited by ls2lxhatch, 13 April 2010 - 10:47 AM.
#595

Posted 13 April 2010 - 11:23 AM
Whats to stop you running the left hand pipe (the one that is modified to miss the radiator hose) closer to the engine covers and the same on the other side, then flicking them up and into a scoop/filter?
something like this-
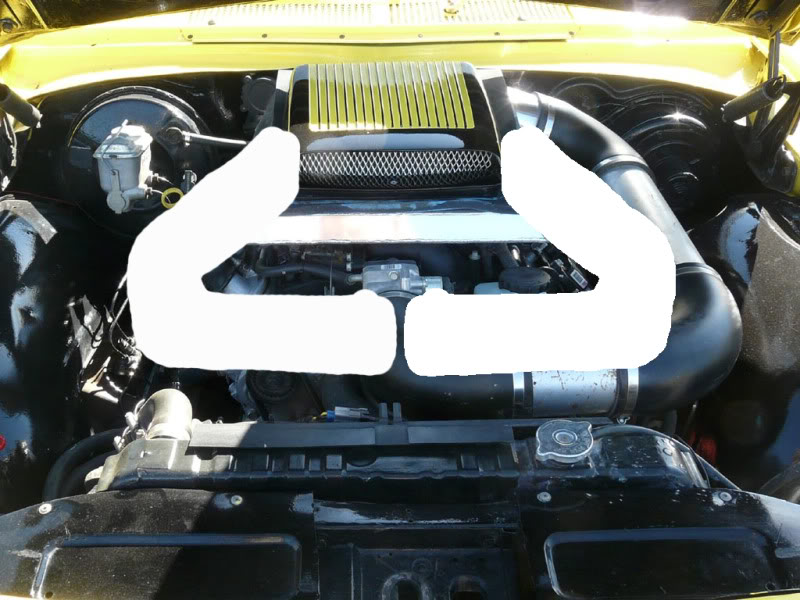
If you wanted to get tricky, you could make a two piece airbox setup so that the lid and filter would go up with the bonnet and youd be left with two big fat intake pipes and maybe a small alloy box?
And get them HPC coated
#596
 _gen3torrie_
Posted 13 April 2010 - 01:45 PM
#597

Posted 13 April 2010 - 01:52 PM
#598

Posted 13 April 2010 - 06:07 PM
There doesn't appear to be room for that in the photos previously posted, the height of the throttle body places it in front of a pulley and any sharper bend would be detrimental...Whats to stop you running the left hand pipe (the one that is modified to miss the radiator hose) closer to the engine covers
#599
 _jabba_
Posted 13 April 2010 - 07:51 PM
Intake Ideas time!
Whats to stop you running the left hand pipe (the one that is modified to miss the radiator hose) closer to the engine covers and the same on the other side, then flicking them up and into a scoop/filter?
something like this-
If you wanted to get tricky, you could make a two piece airbox setup so that the lid and filter would go up with the bonnet and youd be left with two big fat intake pipes and maybe a small alloy box?
And get them HPC coated
i love this idea too!
The engine covers will look a lot better with the holes filled, your fibreglassing looks great!
#600
 _dirtbag_
Posted 14 April 2010 - 08:04 AM
Anyways, yesterday was a good day in two ways, except for the f$%king rain!!!
One of the cars I'd been working on in the last year has been this old rusty 2 door pontiac bonneville. I've been working on the hatch so much I hadn't touched it in ages, and the cars owner just built a new shed at his place, so out it goes!!!! It's massive, and takes up half the shed.
You can see it hiding in the background on a rotisserie.

It was such a good feeling knowing this thing was leaving. Don't get me wrong, once it's finished it'll be a great car, but I need the shed space.
It's been sitting idle for so long it has about 5mm of dust on it. Seriously!
Check the photo of it when it was going down the road as you can see all the dust blowing off. Looks funny : )


OK, now the other good thing about yesterday. The car went and got an exhaust system fitted.
Luckily though, seeing as it's the first day in about a year this car has seen the outside of a shed, it rained. Stupid weather.

Another lucky, is last week my father in law bought this car trailer. How good is that!!!!
This pic isn't really showing anything, for some reason I just like it : )

And here's the system. It's a 2 1/2 inch twin with bullet cat converters, straight through glass packed mufflers, balance pipe and 3" stainless tailpipes.

There was absolutely no way the 2 1/2 inch pipe was going to fit over the diff, so under it is then.

Pretty tail pipes.


And back home where it belongs. Sorry brother, this is home. Car is mine now I've decided : )

1 user(s) are reading this topic
0 members, 1 guests, 0 anonymous users





 View Garage


