
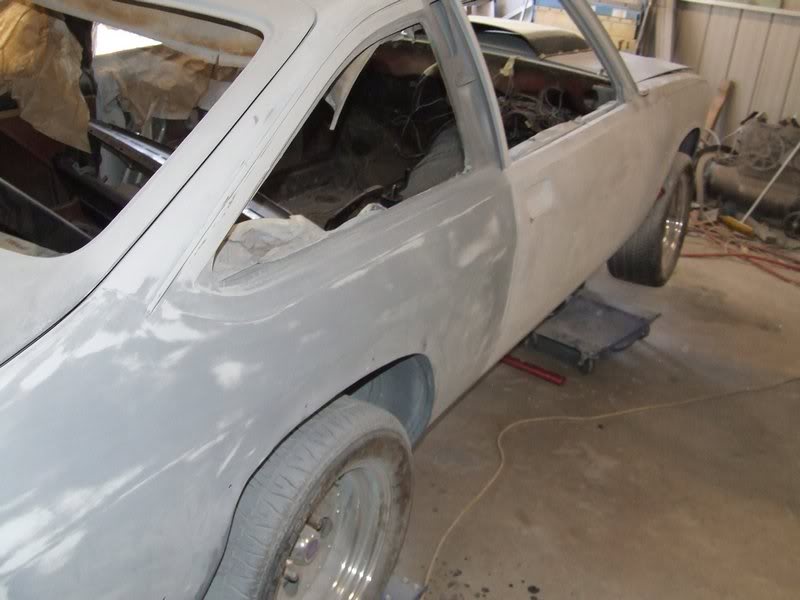
My scoop didnt look perfect when i got it brand new, but when i mounted it, i just made sure it was squeezed together to raise it in the centre. I know that my scoop was only made a few days before i picked it up though, so it was still pretty flexible, if it had been siiting on a shelf or something for a while, it could have sagged out of place then set really firm. My first scoop was like that, and it gave me the shits every time i looked at it!
 1 votes
Fixing my brothers UC hatch
Started by
_dirtbag_
, Dec 30 2009 01:19 PM
1693 replies to this topic
#201

MRLXSS
-

- Members
-

- 12,420 posts
The Render Garage
- Name:Matt
- Location:Upwey, Melbourne
- Car:355 LX Hatchback, DeLorean DMC-12, LX SS Hatch, VY Cross8 Crewman
- Joined: 09-November 05
Posted 24 January 2010 - 08:37 AM
#202
_cruiza_
_cruiza_
-

- Guests
Posted 24 January 2010 - 08:46 AM
curious,
Dirtbag or is that 'Dirt' for short sorry not trying to 'bag' you. lol ( i know lame arse humour).
love the work and the thread, there are so few who are capible of doing so much work themselves and even fewer who can and post write it up so well
I was wondering about the trans tunnel where you have removed the crossmemeber to give clearance to the rear of the gearbox, does that require re- bracing or can it be left as is
Keep up the great work
Edited by cruiza, 24 January 2010 - 08:47 AM.
#203
_dirtbag_
_dirtbag_
-
- Guests
Posted 24 January 2010 - 09:09 AM
Hey Matt. Yeah, I know what you mean about looking at something that isn't right and getting annoyed, that's why I'm trying to fix everything now, as anything that might go or look wrong later will be hard to fix, as I'm in Qld and the car will be in A.C.T. We also did a bit of a squeze job on the scoop when fitting it, but it didn't help the sagged area unfortunately.
Hi Michael. Just so you know, lame arse humour is my favourite : ) You can call me Mr Bag if you like
As for the trans tunnel, yes, it definitely needs to be reinforced after the bracing gets cut. It's a big part of the cars side impact strength. Now that the tunnel itself is shaped and fitted, I can make a new section that will fit around the back of the shifter and join onto each side where the bracing was cut. Basically a thick U-channel with a flange on either side so it can be plug welded on. I thought of doing something under he car, but there is limited tailshaft room so will be building it on top. I hope to make this piece on monday, so will post pics when it's done.
Cheers.
#204
wot179
-

- Members
-
- 6,784 posts
Green Eggs and Spam
- Name:Jesus Bloody Christ
- Location:Sunny Santa Maria
- Car:Goon
- Joined: 06-February 09


#205
_Herne_
_Herne_
-
- Guests
Posted 24 January 2010 - 10:42 AM
Well Herne, I'm actually bogging up a brand new scoop.
I'm not sure where my brother got the bodykit, but as you can see in the thread it's needed a lot of work to get right.
As for fitting the gearbox without the motor - when we had the motor in place I measured how far it was from the firewall, to see how much room there would be for bellhousing bolts. So when the box went in I set it up at the same measurement.
Fair enough, maybe the guys mold is wrong
 I didnt realise the scoop was brand new lol
Cheers
Herne
#206
_dirtbag_
_dirtbag_
-
- Guests
Posted 24 January 2010 - 01:13 PM
wot 179 - hahahahaha 
The glass in the middle looks a bit like a half poured guiness ........mmmmmmm...... guiness.......
The glass in the middle looks a bit like a half poured guiness ........mmmmmmm...... guiness.......
#207
_niterida_
_niterida_
-
- Guests
Posted 24 January 2010 - 07:50 PM
Hi Tim - I've been a bit quiet on my comments for a while so here goes to make up for lost time :
Scoop definitely needs to be on the car, especially if the bonnet is black - they don't look right with the flares and no scoop.
How could you possibly think the LX dash looks good - its just a flat piece of crap with some guages and switches thrown at it - was expecting something more from a man of your talents :-)
I guess thats one of the (many) reasons I prefer the UC over the LX - give me a UC dash anyday (puts on fireproof suit)
Can't you mount the shifter on the T56 in the forward mount position ? Isn't that what that flat panel is about 6-8inches further up the tranny ?
Looking really good though - how many people do you think will pick it as a UC once its finished ?
#208
_dirtbag_
_dirtbag_
-
- Guests
Posted 24 January 2010 - 08:07 PM
Hi Ken. It has been a while : )
I like the LX dash because it is so simple, but the bottom line is I'm not the owner, so even if I didn't like it the car would be getting that dash anyway. The UC column will be staying though.
Fireproof suit - hahaha. I like that one.
You can mount the shifter in the forward position, but it's not a straight bolt on job. All the internal shift forks etc need to be changed too. If I sent it to Mal Wood to get the conversion done it's around the $1200 - $1500 mark. Too much. The B&M shifter seems to be an easy fix I hope.
There will be a few tell tale signs for the keen observer to pick it as a UC. If they look at the rear floor, it's either a UC or an A9X : ) The proper handbrake. The column. The good front end, although I know that can be swapped into an LX anyway. The best thing about the UC though in regards to this car is the sides of the engine bay are smooth, as opposed to the LX having lumps and bumps all up the sides. That's about it though. I think I've pretty much stripped this cars original identity away for good
#209
_niterida_
_niterida_
-
- Guests
Posted 24 January 2010 - 08:11 PM
You can mount the shifter in the forward position, but it's not a straight bolt on job. All the internal shift forks etc need to be changed too. If I sent it to Mal Wood to get the conversion done it's around the $1200 - $1500 mark. Too much. The B&M shifter seems to be an easy fix I hope.
Far out - you can almost buy the whole gearbox for that much money !! I like your solution much better :-)
#210
_Herne_
_Herne_
-
- Guests
Posted 24 January 2010 - 08:16 PM
Hi Ken. It has been a while : )
I like the LX dash because it is so simple, but the bottom line is I'm not the owner, so even if I didn't like it the car would be getting that dash anyway. The UC column will be staying though.
Fireproof suit - hahaha. I like that one.
You can mount the shifter in the forward position, but it's not a straight bolt on job. All the internal shift forks etc need to be changed too. If I sent it to Mal Wood to get the conversion done it's around the $1200 - $1500 mark. Too much. The B&M shifter seems to be an easy fix I hope.
There will be a few tell tale signs for the keen observer to pick it as a UC. If they look at the rear floor, it's either a UC or an A9X : ) The proper handbrake. The column. The good front end, although I know that can be swapped into an LX anyway. The best thing about the UC though in regards to this car is the sides of the engine bay are smooth, as opposed to the LX having lumps and bumps all up the sides. That's about it though. I think I've pretty much stripped this cars original identity away for good
The smoothed out engine bay is heaps better than the lumps n bumps of an LX
 Still looking at mine and shaking my head, it looks disgusting... - one day
 Cheers
Herne
#211
_DomDom_
_DomDom_
-
- Guests
Posted 26 January 2010 - 02:21 PM
All I can say is "OMFG"!
This is an awesome build Dirtbag. I love UC's (my mate got one for $1600 years ago and put in a V8 and had it resprayed) and in about a year or two will be on the lookout for one myself.
You skills with metal are amazing. (maybe you should contact Discovery and push for your own TV show "Australian Hotrod") Is it your living?
I recently say a similar conversion for sale (not nearly as good as yours) on ebay and I like the idea myself.
I can't wait for more updates, keep up the good work.
#212
_dirtbag_
_dirtbag_
-
- Guests
Posted 27 January 2010 - 02:04 AM
Thanks Dom. TV show........$$$$$$ for me  I likey!!!
Herne, if your engine bay really bothers you I can PM you my address and just send your car to me. I don't need your address though, it's a one way ticket
Well I finally made the new section for where I cut the crossmember out to fit the shifter. It's not pretty, but then again, neither am I, so there you go.
Getting the first side done was the hardest, as I made templates that I could use on the other side. I used 1.6mm steel to give it strength. The original was only 1mm. Once the gearbox comes back out I'll weld where the old crossmember was cut to the inside of the new bit I just added to tie it all together.

Here's the same side after some grinding and sanding. I always use 36 grit sanding discs on bare steel to clean the surface and smooth welds. I use 24 grit to remove paint. Just so you know : )

Here's the whole thing made and sanded.

A look from the other side, because it is so exciting to see : )

Once all that was done I gave the whole tunnel a good coat of rust converter.

I likey!!!Herne, if your engine bay really bothers you I can PM you my address and just send your car to me. I don't need your address though, it's a one way ticket
Well I finally made the new section for where I cut the crossmember out to fit the shifter. It's not pretty, but then again, neither am I, so there you go.
Getting the first side done was the hardest, as I made templates that I could use on the other side. I used 1.6mm steel to give it strength. The original was only 1mm. Once the gearbox comes back out I'll weld where the old crossmember was cut to the inside of the new bit I just added to tie it all together.
Here's the same side after some grinding and sanding. I always use 36 grit sanding discs on bare steel to clean the surface and smooth welds. I use 24 grit to remove paint. Just so you know : )
Here's the whole thing made and sanded.
A look from the other side, because it is so exciting to see : )
Once all that was done I gave the whole tunnel a good coat of rust converter.
#213
orangeLJ
-

- Members
-
- 10,261 posts
Yes, yes I do post alot!
- Joined: 02-May 06
Posted 27 January 2010 - 06:57 AM
Top knotch job as usual dude!
Im curious as you do for a living?
Are you self taught metal wise? or ex tradey etc etc?
Im curious as you do for a living?
Are you self taught metal wise? or ex tradey etc etc?
#214
MRLXSS
-
- Members
-
- 12,420 posts
The Render Garage
- Name:Matt
- Location:Upwey, Melbourne
- Car:355 LX Hatchback, DeLorean DMC-12, LX SS Hatch, VY Cross8 Crewman
- Joined: 09-November 05
Posted 27 January 2010 - 07:32 AM
Thats fantastic! So neat and it looks factory!
#215
_dirtbag_
_dirtbag_
-
- Guests
Posted 27 January 2010 - 08:28 AM
Thanks guys, feel free to say nice things about me whenever you like hahaha
For a living I'm a restorer/modifier/hot rodder. I just work for myself doing all sorts of things to cars mainly, but have also done a bit of work on some Harleys. Lately it's been mainly big 50s/60s american cars. They take up sooo much room.
I'm self taught as far as welding and general fabrication goes. I did work at a decent hot rod shop for a while and learnt about building chassis, either modifying an original or starting from scratch. All good fun
hahahaFor a living I'm a restorer/modifier/hot rodder. I just work for myself doing all sorts of things to cars mainly, but have also done a bit of work on some Harleys. Lately it's been mainly big 50s/60s american cars. They take up sooo much room.
I'm self taught as far as welding and general fabrication goes. I did work at a decent hot rod shop for a while and learnt about building chassis, either modifying an original or starting from scratch. All good fun
#216
_AD_75_
_AD_75_
-
- Guests
Posted 27 January 2010 - 05:11 PM
Thanks guys, feel free to say nice things about me whenever you like
For a living I'm a restorer/modifier/hot rodder. I just work for myself doing all sorts of things to cars mainly, but have also done a bit of work on some Harleys. Lately it's been mainly big 50s/60s american cars. They take up sooo much room.
I'm self taught as far as welding and general fabrication goes. I did work at a decent hot rod shop for a while and learnt about building chassis, either modifying an original or starting from scratch. All good fun
Man you are so lucky! this would be my dream job. Thanks for the info on the grinding disks btw! i had been wondering about that. Wish i had somebody with your skills to teach me the biz, im actually doing a welding course this year and maybe some volunteer work in a panel shop nearby to try learn a bit more, i'd always dreamed of having my own shop where i did resto and custom work but have only really tinkered with my own cars/bikes over the years. Anyways mate thanks sharing as always! look forward to seeing more.
#217
_dirtbag_
_dirtbag_
-
- Guests
Posted 27 January 2010 - 05:43 PM
Hey AD_75. I'm glad you're getting some use out of this thread. It's good to know it might be able to help someone out.
Doing a welding course sounds like a good idea. I thought of doing one ages ago, but lazy : ) I just learn by trial and error. I only weld with mig and oxy anyway, so they're not too hard.
If there's ever anything you think I may be able to help you with, feel free to ask.
Doing a welding course sounds like a good idea. I thought of doing one ages ago, but lazy : ) I just learn by trial and error. I only weld with mig and oxy anyway, so they're not too hard.
If there's ever anything you think I may be able to help you with, feel free to ask.
#218
_dirtbag_
_dirtbag_
-
- Guests
Posted 27 January 2010 - 07:13 PM
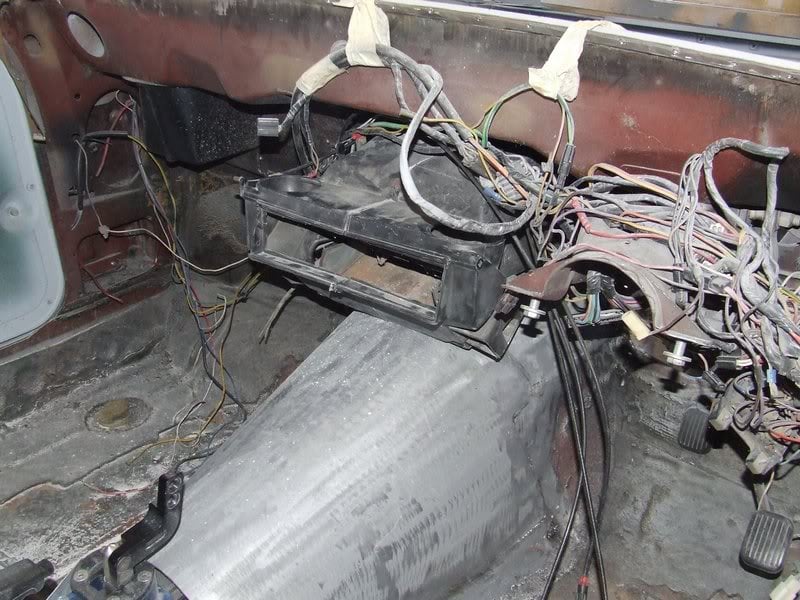
Well today was filled with hours of sanding and a bit of chasing parts. I needed to fit the heater, but only had the UC controls and cables. After some calls and going out and ripping them out of the same sedan I got the dash from, my brother tells me he;s sure he sent me them earlier on!!!! Whoops. I thought I had everything in the one pile. I might have to go looking.
Anyway, I managed to get the heater in place behind the A/C, after juggling a few bits and pieces out of the way.

The only other thing I had to change for the heater to fit properly against the firewall was cut this one lug off where it hits the new taller tunnel. You can just see it in this next pic.
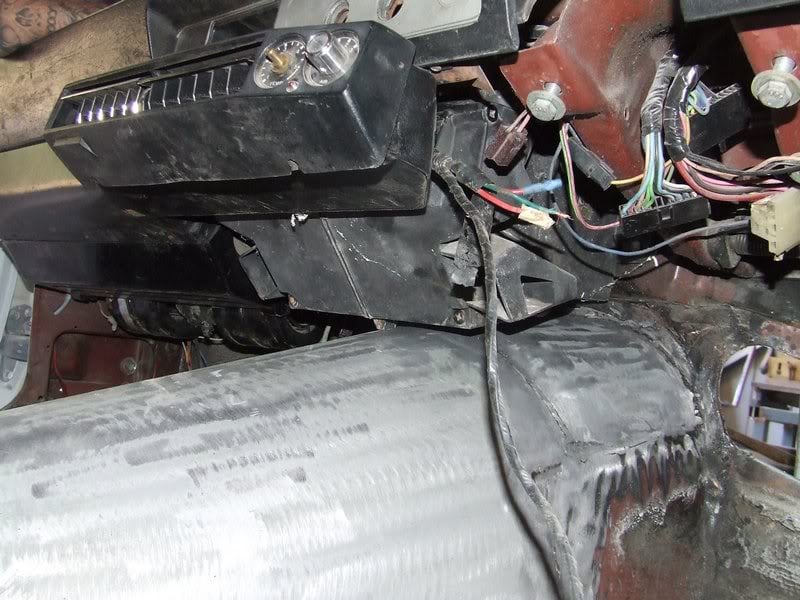
Next job was to change the controls and cables over to the LX ones. You can see here the LX ones are fitted to the heater, and the much shorter UC ones are now unattached. The actual switch panel is different too, just in case you didn't know. I didn't, but I am pretty dumb : )
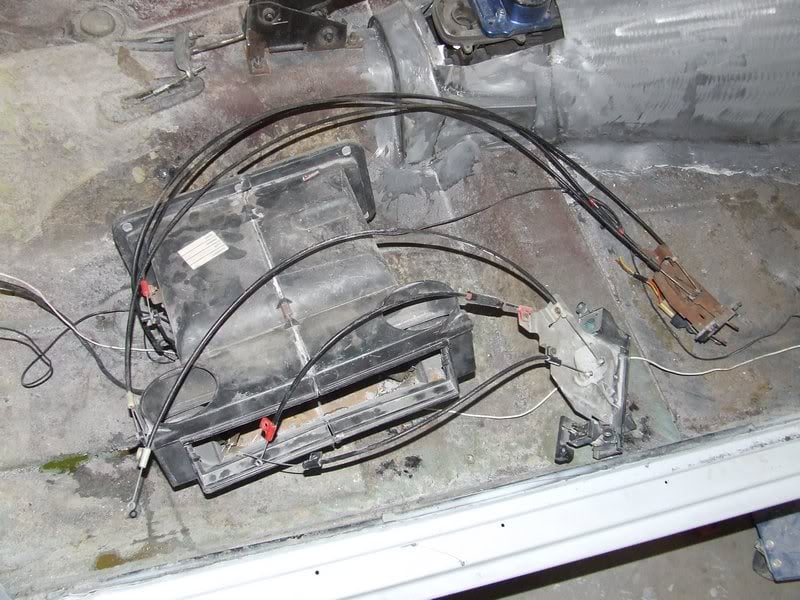
Finally it sits in place nice and neatly and has the right bits hanging off it. One more little job crossed off the imaginary list.
It was time to start dry sanding again. The little imperfections are getting really small now so I think the next batch of primer will be the last. Fingers crossed. I blocked it down this time with 120 grit dry. I could go smoother but the 120 still cuts a nice straight line, as opposed to following the shape, which is what smoother paper tends to do.
I really like the new darker grey protec primer I used last time. Much easier to see where I've sanded and low spots are really obvious with the long sanding block.
This next pic is funny as I've sanded the dark grey overspray off the lower part of the guard, and it looks like it has the blackouts painted on. I should just clear it : )
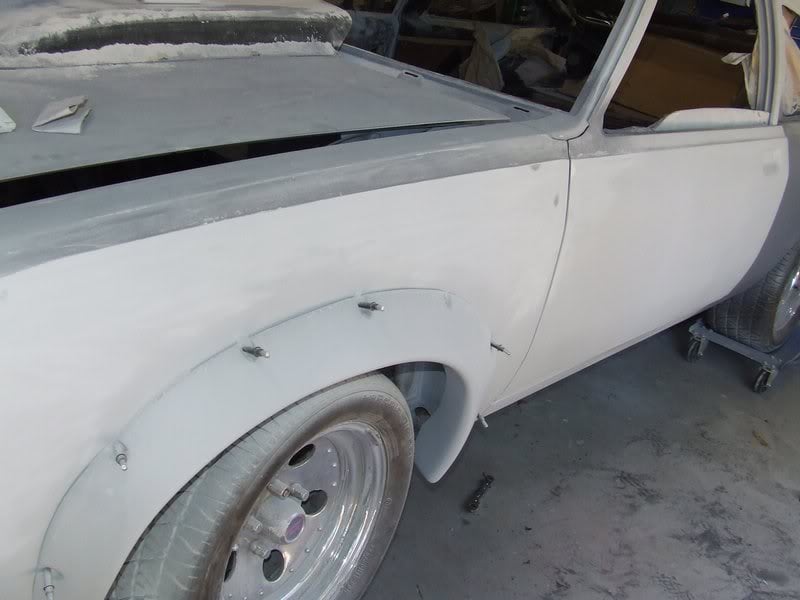
The whole right hand side except the roof got rubbed back today. It takes a little while, as I like to put as little pressure on the block as I can, so the lows don't get sanded. The whole point of this exercise is to find the lows/highs. There were a couple, but really really minor. As bad as it looks in the pics, it feels fantastic. I'm very happy with how it's coming up. The next coats of primer will get wet rubbed for topcoat. Yay!!!!!
Some people ask why I don't use guide coat all the time. I like to use it at the start of the straightening stage. I'll then rough out the shape if filler is needed with 40 grit paper, then 80 grit then prime it. I don't use guide coat again, as it's just more stuff to sand off. I'm pretty anal about what sanding block I use on certain areas, as to which will give me the best result and show up any problems.
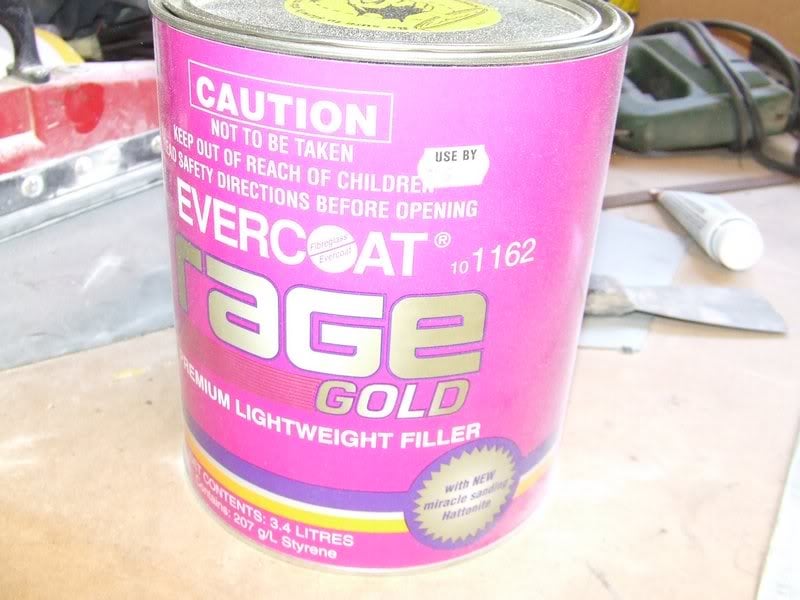
I normally use Upol Dolphin glaze on the tiny problems, as it's a finishing putty. It's really runny and easy to sand. The paint shop I went to didn't have any, but suggested I try this expensive bog. They're good guys there so I bit the $65 bullet (yikes) and went with it. It certainly is nice stuff yo use. Spreads on really smooth and had no air bubbles. Very nice.
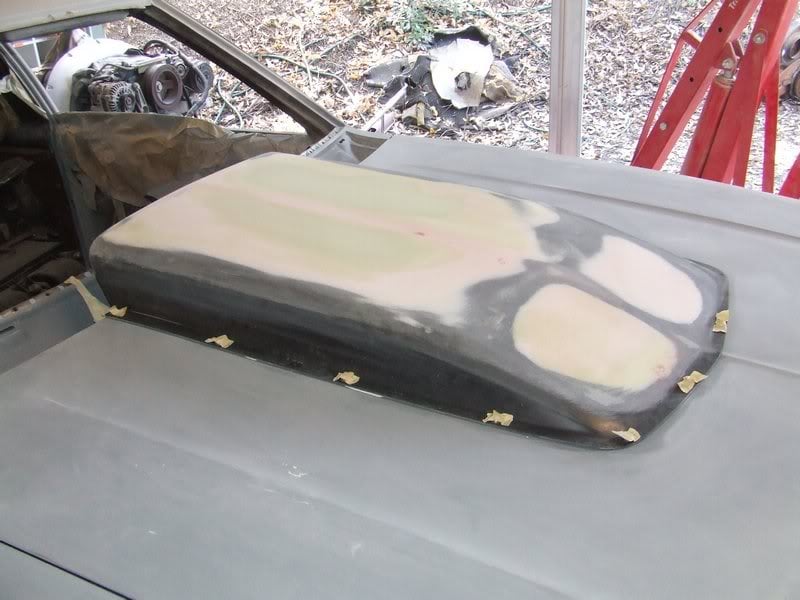
There were a few minor bits here and there, plus I used it to finish off, hopefully, the bonnet scoop. I'd like to try and get most of the car reprimed tomorrow or friday.
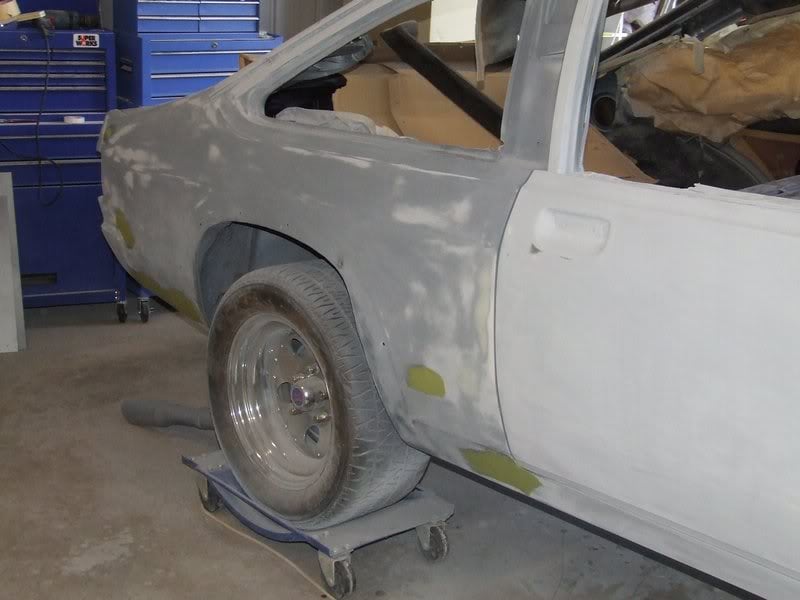
You can see in the next shot a few bits of filler on the rear guard. Once these bits are sanded they'll be see through. That's how minor the imperfections are, and how well this filler feathers out.
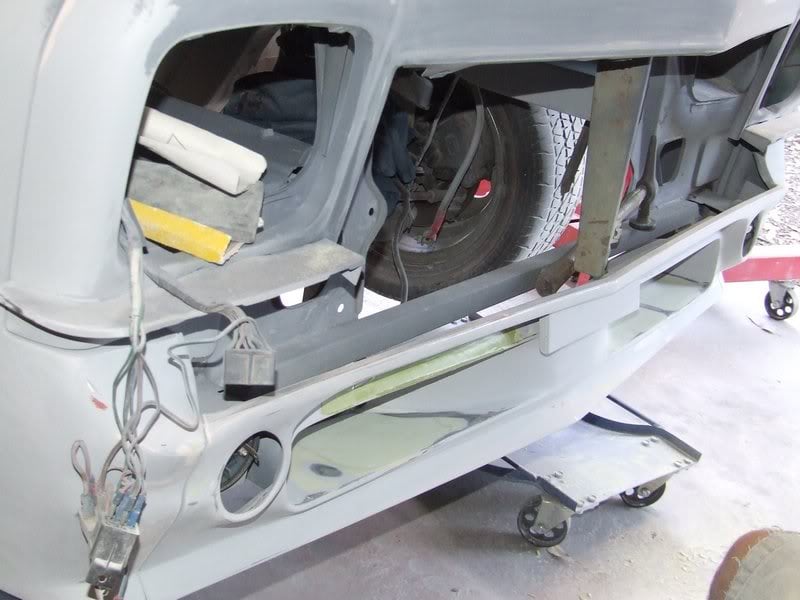
The front spoiler also got a touch up
And the saggy scoop : )
The new headlight buckets I ordered through carbitz showed up today. Those guys and gals there are really good in the nambour store.
I figured seeing as they have to have custom mounts made they didn't need to be the original buckets. Plus I didn't have all the parts.
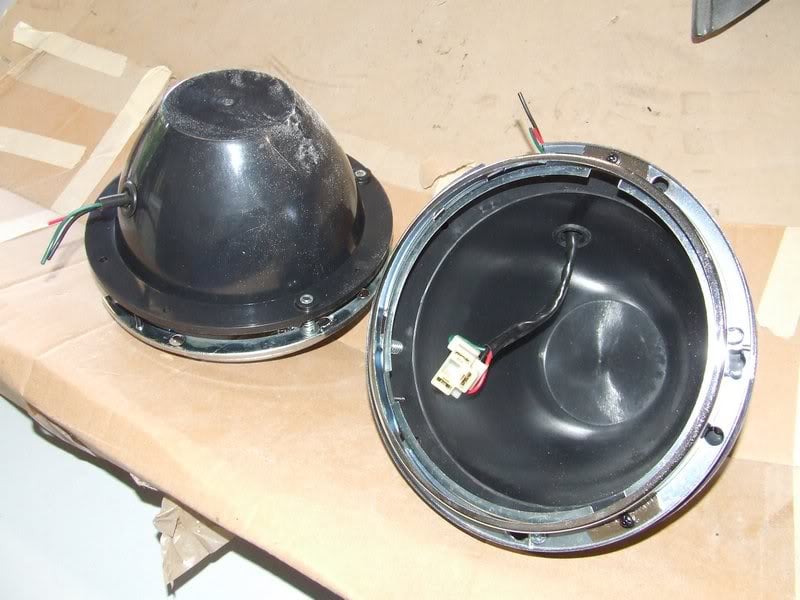
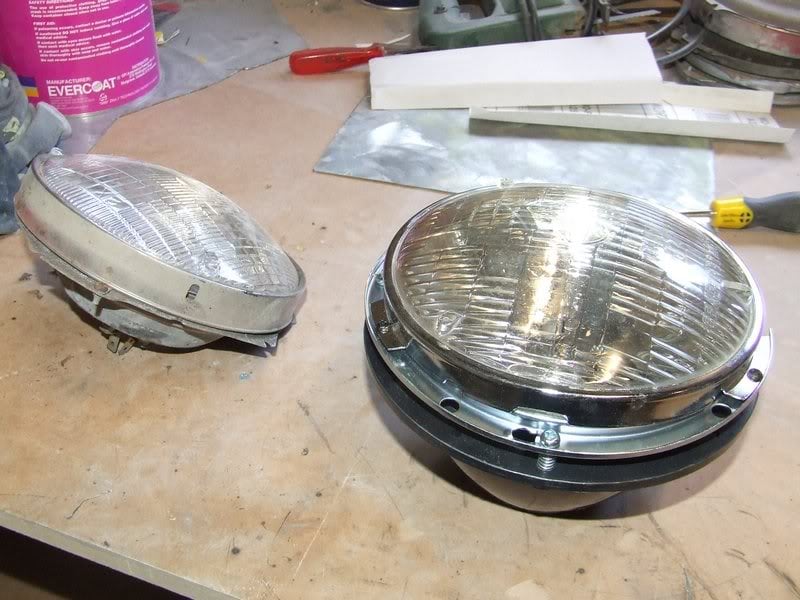
This is just a sealed beam light fitted as a trial. I assume it'll get halogen globes eventually.
Tomorrow I hope to get them mounted, among other things.
Anyway, I managed to get the heater in place behind the A/C, after juggling a few bits and pieces out of the way.
The only other thing I had to change for the heater to fit properly against the firewall was cut this one lug off where it hits the new taller tunnel. You can just see it in this next pic.
Next job was to change the controls and cables over to the LX ones. You can see here the LX ones are fitted to the heater, and the much shorter UC ones are now unattached. The actual switch panel is different too, just in case you didn't know. I didn't, but I am pretty dumb : )
Finally it sits in place nice and neatly and has the right bits hanging off it. One more little job crossed off the imaginary list.
It was time to start dry sanding again. The little imperfections are getting really small now so I think the next batch of primer will be the last. Fingers crossed. I blocked it down this time with 120 grit dry. I could go smoother but the 120 still cuts a nice straight line, as opposed to following the shape, which is what smoother paper tends to do.
I really like the new darker grey protec primer I used last time. Much easier to see where I've sanded and low spots are really obvious with the long sanding block.
This next pic is funny as I've sanded the dark grey overspray off the lower part of the guard, and it looks like it has the blackouts painted on. I should just clear it : )
The whole right hand side except the roof got rubbed back today. It takes a little while, as I like to put as little pressure on the block as I can, so the lows don't get sanded. The whole point of this exercise is to find the lows/highs. There were a couple, but really really minor. As bad as it looks in the pics, it feels fantastic. I'm very happy with how it's coming up. The next coats of primer will get wet rubbed for topcoat. Yay!!!!!
Some people ask why I don't use guide coat all the time. I like to use it at the start of the straightening stage. I'll then rough out the shape if filler is needed with 40 grit paper, then 80 grit then prime it. I don't use guide coat again, as it's just more stuff to sand off. I'm pretty anal about what sanding block I use on certain areas, as to which will give me the best result and show up any problems.
I normally use Upol Dolphin glaze on the tiny problems, as it's a finishing putty. It's really runny and easy to sand. The paint shop I went to didn't have any, but suggested I try this expensive bog. They're good guys there so I bit the $65 bullet (yikes) and went with it. It certainly is nice stuff yo use. Spreads on really smooth and had no air bubbles. Very nice.
There were a few minor bits here and there, plus I used it to finish off, hopefully, the bonnet scoop. I'd like to try and get most of the car reprimed tomorrow or friday.
You can see in the next shot a few bits of filler on the rear guard. Once these bits are sanded they'll be see through. That's how minor the imperfections are, and how well this filler feathers out.
The front spoiler also got a touch up
And the saggy scoop : )
The new headlight buckets I ordered through carbitz showed up today. Those guys and gals there are really good in the nambour store.
I figured seeing as they have to have custom mounts made they didn't need to be the original buckets. Plus I didn't have all the parts.
This is just a sealed beam light fitted as a trial. I assume it'll get halogen globes eventually.
Tomorrow I hope to get them mounted, among other things.
#219
_evil UC hatch_
_evil UC hatch_
-
- Guests
Posted 27 January 2010 - 07:34 PM
getting there real dam fast, I have to drive 3/4 of an hour to even see mine
should have colour on it by the weekend eh? cleared saturday, assembled sunday/monday?
is there a colour picked? if so what is it going to be?
should have colour on it by the weekend eh? cleared saturday, assembled sunday/monday?
is there a colour picked? if so what is it going to be?
#220
ls2lxhatch
-

- Members
-
- 5,335 posts
- Location:Perth
- Car:LX Hatch
- Joined: 29-May 06
Posted 27 January 2010 - 07:37 PM
The NARVA headlight buckets should look better in the engine bay than the original LX setup. I considered using them on my LX to tidy up the back of the headlight but I think I have a simpler solution for the original setup.
Note: This is not my car.
Note: This is not my car.
Edited by ls2lxhatch, 27 January 2010 - 07:39 PM.
#221
_dirtbag_
_dirtbag_
-
- Guests
Posted 27 January 2010 - 07:50 PM
Hey Jason, yeah, next week is RWC time hahahaha
I guess it is getting there, but sometimes it feels like a lot of work with no progress.
I'd really like to paint the whole car black, but my brother wants it to have the blackouts, so maybe orange or red.
I say BLACK DAMN IT!!!!!!!!!!
What do you guys think if it being all black, chrome bumpers and door handles, fully polished wheels. SWEEEEEEEEET!!!!!!!!
Hi again Andy. Thanks again for all your LS1 info earlier. If only we'd found you sooner I wouldn't have had to chop up a new LS3 sump : )
I too think the narva buckets should look OK once painted. They were cheap too, so can't argue with that.
Just out of interest, what extractors are you running on your LS2?
So guys, BLACK or BLACK????????
#222
_evil UC hatch_
_evil UC hatch_
-
- Guests
Posted 27 January 2010 - 08:07 PM
that "Black Dice" one thats on here looked like pure porn
http://www.gmh-toran...=1
black is yummmmm
http://www.gmh-toran...=1
black is yummmmm
#223
ls2lxhatch
-
- Members
-
- 5,335 posts
- Location:Perth
- Car:LX Hatch
- Joined: 29-May 06
Posted 27 January 2010 - 08:35 PM
My extractors and were custom made and I have a modified CSR100U starter motor from a SBC. LS1LX made his extractors using the factory starter motor. A friend of mine made his extractors with 1 3/4" primaries using the MSD 121-5096 starter. All three use the CRS HQ-WB engine mount position. Room on the drivers side is extremely limited due to the starter motor and steering column.
The only off the shelf extractors I am aware off for the LSX in an LX Torana are made by Castle Auto Electric (CAE). The CAE extractors are made to fit with the CAE engine mounts, starter motor and oil pan. The engine sits about 7 mm higher on the CAE engine mounts than it does on the CRS HQ-WB mounts. This provides the clearance required for the CAE starter. The oil filter on the CAE oil pan is about 20 mm further in than the oil filter on the Camaro oil pan. The CAE extractors foul on the Camaro oil pan filter and would most likely foul on your oil filter.
If you don't what to make extractors from scratch or pay someone else then modifying the CAE extractors may be an option. It would not be difficult to fix the oil filter clearance issues. The drivers side however would be more difficult.
#224
Heath
 View Garage
-

- Administrators
-
- 18,403 posts
I like cars.
- Name:Heath
- Location:Eastern Suburbs, Melbourne
- Car:Heavily Modified UC Sunbird Hatchback
- Joined: 07-November 05
View Garage
Posted 27 January 2010 - 08:44 PM
I think that's where he may have got the idea hahhaha
I would go a nice metallic colour with some depth, but that's me. If you paint it black you won't even notice most of your hard work down low etc.
I would go a nice metallic colour with some depth, but that's me. If you paint it black you won't even notice most of your hard work down low etc.
#225
_dirtbag_
_dirtbag_
-
- Guests
Posted 27 January 2010 - 09:08 PM
Thanks Andy. I spoke to Brad at CAE today about an extractor kit. I might go that way. $350 for the flanges and bends etc. Don't really want to have to buy another starer if I don't have to.
CAE do make their own extractors like you say for $880, then, like you say you'll need their starter motor, another $350. That's a lot of cash for extractors on a stock motor. I'm sure they're bloody good quality though.
Yeah Jason, I had a look at the Black Dice hatch. That is an awesome build up.
I've liked black hatches ever since seeing the black A9X hatch at summernats with "A9X" number plates, back when it had the simmons on it. I've seen it lately in an ROH ad. That car looks incredible. I liked the black centred ROH wheels he had on it for the street machine article better than what's on it in the ad though.
I'm kind of over the whole metallic pearl mica flakey candy thing : ) Black is good. Who cares if it hides some of my work. Black is good bwahahahaha:P


1 user(s) are reading this topic
0 members, 1 guests, 0 anonymous users

