
Hi steve
Email sent
Let me know how it turns out
Mike....

hawks uc sunbird
Started by
hawk
, Jan 31 2010 11:12 AM
954 replies to this topic
#627
 _A9X UC_
_A9X UC_
-

- Guests
Posted 23 August 2014 - 12:15 PM
Also posted in PDF in the electrical section for others
#628
hawk
-
- Members
-

- 2,190 posts
Forum Fixture
- Name:steve
- Location:Berwick, Melbourne
- Car:UC Torana
- Joined: 16-July 09
Posted 31 August 2014 - 06:37 PM
thanks for that
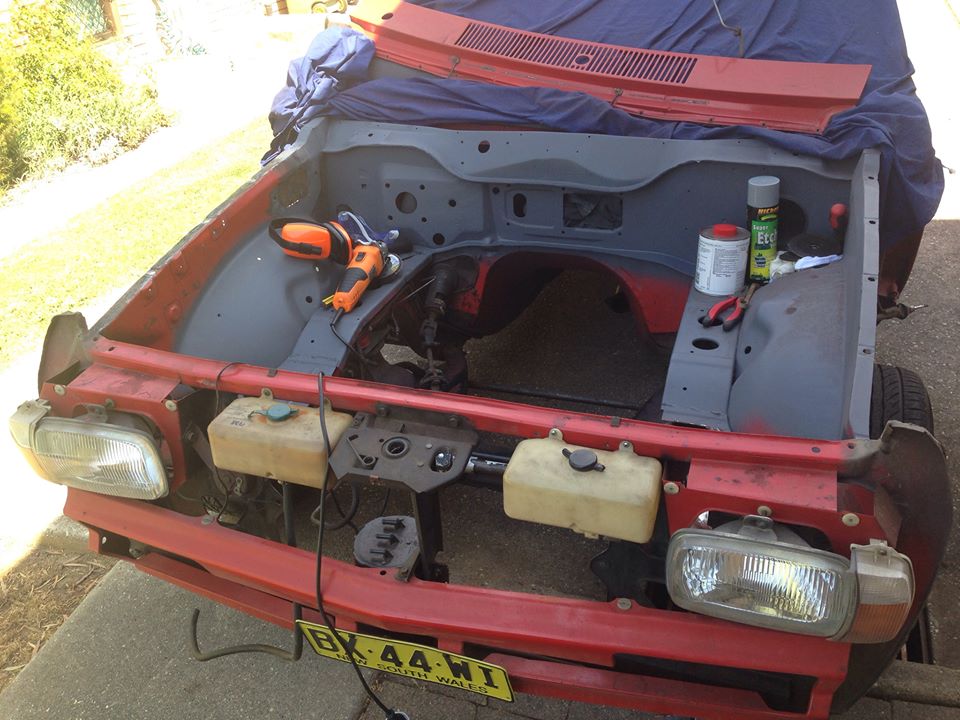
did a bit more today, got the rest of the wiring back through the firewall. then stripped it to metal and etch primed.
also mounted the carbon canister in its new spot. the bracket will be cut up more and painted.
Attached Files
-
 10418903_958233377537188_1946593321858617995_n.jpg 11.64K
2 downloads
10418903_958233377537188_1946593321858617995_n.jpg 11.64K
2 downloads
-
10603690_958233430870516_7565909815620789128_n.jpg 87.56K
5 downloads
-
10606340_958233400870519_6451791144486388303_n.jpg 48.61K
4 downloads
-
10629836_958233404203852_513375617998805015_n.jpg 77.34K
2 downloads
-
10636195_958233407537185_7108448556449540859_n.jpg 52.9K
1 downloads
#629
hawk
-
- Members
-
- 2,190 posts
Forum Fixture
- Name:steve
- Location:Berwick, Melbourne
- Car:UC Torana
- Joined: 16-July 09
Posted 06 September 2014 - 02:24 PM
well after 5 years of saying I would, I finally bought a gas/gasless/stick welder to get more work done in the bay.
its a unimig raptor 165
#630
hawk
-
- Members
-
- 2,190 posts
Forum Fixture
- Name:steve
- Location:Berwick, Melbourne
- Car:UC Torana
- Joined: 16-July 09
Posted 07 September 2014 - 02:16 PM
heres a few more pics can anyone tell me what the holley is? and is it still ok (pic down the throat of it).
Attached Files
-
1454891_963658963661296_4481376510448231819_n.jpg 72.51K
1 downloads
-
1466196_963659120327947_4850674660723673124_n.jpg 72.73K
1 downloads
-
1623571_963659126994613_7689950607593540452_n.jpg 86.79K
1 downloads
-
10350630_963658866994639_6186921916475380851_n.jpg 92.91K
3 downloads
-
10609663_963659143661278_2235296236709136654_n.jpg 82.27K
1 downloads
-
10616583_963658860327973_2008304196621251763_n.jpg 81.53K
2 downloads
-
10646845_963658896994636_7375234605271115428_n.jpg 89K
1 downloads
#631
wot179
-

- Members
-
- 6,784 posts
Green Eggs and Spam
- Name:Jesus Bloody Christ
- Location:Sunny Santa Maria
- Car:Goon
- Joined: 06-February 09
Posted 07 September 2014 - 03:04 PM
350 Holley
#632
hawk
-
- Members
-
- 2,190 posts
Forum Fixture
- Name:steve
- Location:Berwick, Melbourne
- Car:UC Torana
- Joined: 16-July 09
Posted 08 October 2014 - 09:07 PM
got some more done on the weekend still havnt tried out the welder though.
smoothed out the lower firewall lip a bit, cut out some of the battery tray and other areas that need replacing.
also degreased the motor.
with the chassis rail lips do I just cut along the edge? or try and fold it down?
Attached Files
-
15791_980510678642791_2934011097129611404_n.jpg 64.07K
1 downloads
-
1471223_980511215309404_1363840570659188837_n.jpg 116.57K
1 downloads
-
1958520_980510735309452_5987789500169718616_n.jpg 117.28K
1 downloads
-
10355001_980510961976096_3652110939473998204_n.jpg 98.49K
1 downloads
-
10367140_980511488642710_1363909072200401678_n.jpg 142.77K
1 downloads
-
10403118_980511555309370_2656231969504209063_n.jpg 99.22K
1 downloads
-
10505487_980511101976082_3610351089298364325_n.jpg 142.2K
1 downloads
#633
torana_nick
-
- Members
-
- 759 posts
Forum Fixture
- Name:Nick
- Location:victoria
- Car:LH Torana Project
- Joined: 11-December 11
Posted 08 October 2014 - 09:40 PM
Moving along nicely Steve, looking good! now comes the fun part welding in the parches 
#634
_GMH-001_
_GMH-001_
-
- Guests
Posted 08 October 2014 - 11:34 PM
personally I would cut off the lower lip and overlap the upper lip and weld it to give it the strength and then blend it with a filler. You can also peel up the upper lip and fold the lower lip under the top for a 'less filler' finish (more fkn around but better overall finish for looks and strength). Also you can cut it off completely and weld for a smooth finish but will never be as strong doing an edge weld compared to an overlap
#635
hawk
-
- Members
-
- 2,190 posts
Forum Fixture
- Name:steve
- Location:Berwick, Melbourne
- Car:UC Torana
- Joined: 16-July 09
Posted 12 October 2014 - 01:05 PM
thanks
I cut the lips back a bit but made sure I left the factory spot welds in place
Attached Files
-
1969266_984878038206055_3413543136358126311_n.jpg 100.41K
1 downloads
#636
hawk
-
- Members
-
- 2,190 posts
Forum Fixture
- Name:steve
- Location:Berwick, Melbourne
- Car:UC Torana
- Joined: 16-July 09
Posted 12 October 2014 - 01:08 PM
and more
Attached Files
-
10645048_984876821539510_5542351499368885423_n.jpg 31.67K
1 downloads
-
10613052_984877534872772_4294215229781716368_n.jpg 58.89K
1 downloads
-
10527896_984877648206094_7793559640107189644_n.jpg 50.45K
1 downloads
-
10481988_984877831539409_5184707212954944965_n.jpg 69.77K
1 downloads
-
10426689_984878474872678_1376334516724862032_n.jpg 66.12K
2 downloads
-
1977367_984877574872768_6124868819993089052_n.jpg 50.47K
2 downloads
#637
hawk
-
- Members
-
- 2,190 posts
Forum Fixture
- Name:steve
- Location:Berwick, Melbourne
- Car:UC Torana
- Joined: 16-July 09
Posted 21 October 2014 - 08:40 PM
other rail is done and some more work around the battery tray.
then the grinder died so will be a week or 2 before I get another one
Attached Files
-
10346394_988938117800047_2574778295318489883_n.jpg 75.79K
1 downloads
-
10556522_988938177800041_735692295331603622_n.jpg 125.54K
1 downloads
-
10734180_988938037800055_1260510376753212130_n.jpg 21.31K
1 downloads
-
10704019_988938107800048_7623983353790719353_n.jpg 155.88K
2 downloads
#638
Steve TPF
-

- Members
-
- 784 posts
Forum Fixture
- Name:Steve
- Location:Adelaide... city of... anyone know something good about it?
- Car:UC hatch
- Joined: 09-June 09
Posted 21 October 2014 - 09:43 PM
I have to ask: what's with the two washer bottles? And why are they mounted here?
#639
hawk
-
- Members
-
- 2,190 posts
Forum Fixture
- Name:steve
- Location:Berwick, Melbourne
- Car:UC Torana
- Joined: 16-July 09
Posted 21 October 2014 - 10:04 PM
one is the windscreen washer bottle the other is the radiator overflow. and they were mounted there to clean up the engine bay.
#640
Steve TPF
-
- Members
-
- 784 posts
Forum Fixture
- Name:Steve
- Location:Adelaide... city of... anyone know something good about it?
- Car:UC hatch
- Joined: 09-June 09
Posted 21 October 2014 - 10:28 PM
Fair enough. And you've relocated the charcoal canister too. Might as well use the space I guess!
#641
_LS1 Taxi_
_LS1 Taxi_
-
- Guests
Posted 21 October 2014 - 11:01 PM
Good stuff Steve - keep up the updates
#642
_mick74lh_
_mick74lh_
-
- Guests
Posted 22 October 2014 - 09:39 AM
Good to see you getting stuck into it Steve.
#643
hawk
-
- Members
-
- 2,190 posts
Forum Fixture
- Name:steve
- Location:Berwick, Melbourne
- Car:UC Torana
- Joined: 16-July 09
Posted 09 November 2014 - 04:39 PM
chipping away slowly
.
.
Attached Files
-
1610848_1002540409773151_4293534562387669479_n.jpg 84.22K
1 downloads
-
10322750_1002540246439834_5238701353109969907_n.jpg 162.29K
1 downloads
-
10357179_1002540186439840_5392352760415561336_n.jpg 76.97K
1 downloads
#644
hawk
-
- Members
-
- 2,190 posts
Forum Fixture
- Name:steve
- Location:Berwick, Melbourne
- Car:UC Torana
- Joined: 16-July 09
Posted 09 November 2014 - 04:44 PM
.
.
.
Attached Files
-
10410105_1002540076439851_1056290316216694028_n.jpg 88.68K
2 downloads
-
10678812_1002540473106478_9044634062521438363_n.jpg 136.91K
1 downloads
#645
hawk
-
- Members
-
- 2,190 posts
Forum Fixture
- Name:steve
- Location:Berwick, Melbourne
- Car:UC Torana
- Joined: 16-July 09
Posted 14 December 2014 - 03:07 PM
still chipping away at it, nearly the whole radiator support panel is in black etch.
tried to use the welder the other day but I don't have a 15 amp plug at home so will have to get the adaptor.
..
..
Attached Files
-
10347546_1024303307596861_7201798725327681157_n.jpg 122.75K
1 downloads
-
10845914_1024303280930197_2063062916758103503_n.jpg 95.71K
1 downloads
-
10868035_1024303314263527_7627583453981684188_n.jpg 142.06K
1 downloads
#646
Mort
 View Garage
-

- Members
-
- 2,760 posts
Lotsa Posts!
- Name:Mort
- Location:Moranbah, QLD.
- Car:74 LH SL/R 4.2, 75 LH 4 door 186
- Joined: 16-December 07
View Garage
Posted 14 December 2014 - 05:06 PM
 Looks good Steve, good to see you making some progress, is there much more to do before you can fit the motor.
#647
hawk
-
- Members
-
- 2,190 posts
Forum Fixture
- Name:steve
- Location:Berwick, Melbourne
- Car:UC Torana
- Joined: 16-July 09
Posted 14 December 2014 - 05:26 PM
thanks and the motor still needs the oil pump put on the manifold bolted on. I got the wrong gaskets for the manifold.
I want to finish the engine bay before I fit the motor so technically there is a fair bit to do.
#648
_GMH-001_
_GMH-001_
-
- Guests
Posted 14 December 2014 - 08:42 PM
not sure what welder you have but if it's under 150amp and you have clean power to the shed then you can easily file the plug to fit your power point. I have done this years ago with my arc welder and am still using it today with no issue at all. Compressors can be running while I'm using it and yet still no dramas
#649
_Macca97_
_Macca97_
-
- Guests
Posted 15 December 2014 - 10:35 AM
yer just file the plug down steve, 240 mig here at home only has a 10amp plug, never had any trouble with it, looking good aswell
#650
hawk
-
- Members
-
- 2,190 posts
Forum Fixture
- Name:steve
- Location:Berwick, Melbourne
- Car:UC Torana
- Joined: 16-July 09
Posted 15 December 2014 - 06:06 PM
filed the plug down today and had a go at a couple of screw holes.
just used the gasless setting for now and didn't do too great haha got 2 holes filled. another one is mostly done just needs a little more work and the fourth one I stuffed and put to much heat into so I had to cut the buggered section out. will keep going at it during the week if I have time


1 user(s) are reading this topic
0 members, 1 guests, 0 anonymous users

