Jump to content


Photo
- - - - -

hawks uc sunbird


  • Please log in to reply
954 replies to this topic

#676 _Lazarus_

_Lazarus_
  • Guests

Posted 20 January 2015 - 09:23 PM

Rodomo said -


"Craig is an expert on flappers."


.


Edited by Lazarus, 20 January 2015 - 09:26 PM.


#677 Bigfella237

Bigfella237

    Socially Distant

  • Members
  • PipPipPipPipPipPipPip
  • 4,396 posts
  • Name:Andrew
  • Location:Far South Coast of NSW
  • Car:(s) not as many as I'd like but more than I've got space for!
  • Joined: 31-October 14

Posted 21 January 2015 - 01:10 AM

I thought they were slappers?


Anyway, lots of good advice there Steve, I use a combination of a grinding wheel (to remove the bulky stuff) and a disc (to do the finishing work) or even a die grinder in those hard-to-reach corners. And don't neglect the good old fashioned file either, there's nothing better for finding high spots on a flat smooth surface.


The better the weld, the easier the finish-work too, if you don't get good penetration with the welder it's pointless grinding as you'll end up right back where you started.


Also good advice to not let the metal get too hot either when welding or grinding/sanding by doing small sections at a time. You can warp a panel just as easily with a grinder as with a welder.


I'd suggest the same with the patches too, just doing one section or repair at a time is much better than cutting out a dozen holes all at once, better for your moral too!


One last tip, it's not always possible but spare a quick thought for where all the fine metal filings that fly off the disc go, if you can avoid blasting them into gaps and folds and down inside panels and chassis rails then more the better, firstly they're more work to clean up and secondly, nothings starts a good panel rusting quicker than a million fine slithers of bare metal.


#678 hawk

hawk

    Forum Fixture

  • Members
  • PipPipPipPipPip
  • 2,190 posts
  • Name:steve
  • Location:Berwick, Melbourne
  • Car:UC Torana
  • Joined: 16-July 09

Posted 21 January 2015 - 12:06 PM

Thanks for all the great advice. What disc do you use after the grinding disc? And what file should i buy?

The other thing is i have no experience with bodywork. Should i try amd find the high spots as i go or after all the welding is complete?

So far on my to buy list:
Mig gas
Sander attachment for the grinder
Files of some sort

My problem is im lazy and try to rush things so im really trying to slow down and do it right

#679 Bigfella237

Bigfella237

    Socially Distant

  • Members
  • PipPipPipPipPipPipPip
  • 4,396 posts
  • Name:Andrew
  • Location:Far South Coast of NSW
  • Car:(s) not as many as I'd like but more than I've got space for!
  • Joined: 31-October 14

Posted 21 January 2015 - 02:37 PM

I think the sanding discs I have are 3M brand from memory, the ones that you just stick to the pad, but I'd have to "climb" into my shed to check?


Truth be told you won't use files all that often in this age of power tools but when you need one it's a good thing to have, mainly just for fine detail work where an angle or die grinder is a little too violent. You need a selection really but for the basics I'd suggest three, a "Flat Smooth", a "Half Round Smooth" and a "Round Smooth".


There's no use looking for high/low spots in a panel if you're gonna heat it up again with the welder later. I would suggest welding in a patch and finish-working it to about 95% then moving on to the next repair, Once all the repairs are done then go back over the whole panel and do your finish-work.


One other thing I was gonna mention earlier but forgot was to make sure whatever you're welding is clean, trying to weld over coatings like paint or gal or contaminents like oil and grease will not get you a decent weld. Same with rust, you need to cut out all the rusty metal so you're welding replacement panels to something solid.


Also it's a good idea to grab some "Self-Etching Weld-through Primer" (if you can find it) and coat each repair before moving on, this will not only stop surface rust but will provide a "guide-coat" when you come back to finish the panel later.


#680 Heath

Heath

    I like cars.

  • Administrators
  • PipPipPipPipPipPipPip
  • 18,393 posts
  • Name:Heath
  • Location:Eastern Suburbs, Melbourne
  • Car:Heavily Modified UC Sunbird Hatchback
  • Joined: 07-November 05
Garage View Garage

Posted 21 January 2015 - 08:30 PM

I'm by no means a bodywork expert, I've just persevered for a little longer than some, and less time than others. Patience is critical

What disc do you go to after the grinding disc? You can go straight to the sanding disc that wot179 recommended. This is what I do, and it's what people like dirtbag do as well - if you're gonna imitate someone, imitate someone who bloody good!

I'm using a polyurethane backed sanding disc (screw on retainer where the pad tapers in, not an adhesive or velcro pad), I'm not familiar with the harder one that Craig recommended on the last page. That sounds even better. Grind 90% of your weld down, sand the rest down, you're not going for flat steel; realistically you're hoping to take off the obvious highs, maybe beat out some of the bad lows with a hammer & dolly, give it another sand and apply a light skim of filler. One end of the spectrum is shit repairs, the other end of the spectrum is file finishing, just aim for somewhere in the middle and you'll be very satisfied.

#681 hawk

hawk

    Forum Fixture

  • Members
  • PipPipPipPipPip
  • 2,190 posts
  • Name:steve
  • Location:Berwick, Melbourne
  • Car:UC Torana
  • Joined: 16-July 09

Posted 21 January 2015 - 08:35 PM

Thanks the one ive already done cam stay as is but for the rest of the repairs ill do what was suggested. Might be a while before more progress, as im dead broke.

#682 hawk

hawk

    Forum Fixture

  • Members
  • PipPipPipPipPip
  • 2,190 posts
  • Name:steve
  • Location:Berwick, Melbourne
  • Car:UC Torana
  • Joined: 16-July 09

Posted 24 January 2015 - 11:36 AM

Ok did a little more with what i had sorry no pics as no internet on the computer.

I cut out my previous hinge repair and re did it, i put pics on Facebook and had a lot of constructive critisism which i have taken on board.

So my first go at tacking it in i didnt get great penetration so i ground back the welds and upped the amperage then, ran new welds on the back where there was bad penetration. I made sure i could see the weld on the front of the panel then ground them back again. Its not perfect but will do.

I also decided to completely lip the chassis rails in the engine bay and have made a good start at that. When i get paid i will get some small bits i need so i can finish it.

All my welds so far have been with a gasless mig. When i run out of gasless wire ill save and get a gas bottle.

#683 hawk

hawk

    Forum Fixture

  • Members
  • PipPipPipPipPip
  • 2,190 posts
  • Name:steve
  • Location:Berwick, Melbourne
  • Car:UC Torana
  • Joined: 16-July 09

Posted 27 January 2015 - 01:40 PM

Here are the rails still a little rough nut will sort that when the time comes

Attached Files


#684 hawk

hawk

    Forum Fixture

  • Members
  • PipPipPipPipPip
  • 2,190 posts
  • Name:steve
  • Location:Berwick, Melbourne
  • Car:UC Torana
  • Joined: 16-July 09

Posted 30 January 2015 - 11:33 AM

Bit more done, then ran out of gasless wire.

Attached Files


#685 hawk

hawk

    Forum Fixture

  • Members
  • PipPipPipPipPip
  • 2,190 posts
  • Name:steve
  • Location:Berwick, Melbourne
  • Car:UC Torana
  • Joined: 16-July 09

Posted 31 January 2015 - 11:30 AM

Drivers side is done other than the wiring harness hole. I wanted to go a lot further with the engine bay but i believe its beyond my skills at the current time.

Also if i tried to do more im worried i would loose interest as things wouldnt be movong fast enough.

I also did the other hinge repair but im not to happy with it not sure if i will redo it or not.

Attached Files


#686 hawk

hawk

    Forum Fixture

  • Members
  • PipPipPipPipPip
  • 2,190 posts
  • Name:steve
  • Location:Berwick, Melbourne
  • Car:UC Torana
  • Joined: 16-July 09

Posted 02 February 2015 - 06:48 PM

Bit more the main part im worries about is the inner guard where the section is cut out gotta make it from scratch as i stuffed up there previously.

Attached Files


#687 _Lazarus_

_Lazarus_
  • Guests

Posted 02 February 2015 - 07:08 PM

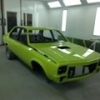
Looking good hawk. What colour will you paint the car ?


#688 hawk

hawk

    Forum Fixture

  • Members
  • PipPipPipPipPip
  • 2,190 posts
  • Name:steve
  • Location:Berwick, Melbourne
  • Car:UC Torana
  • Joined: 16-July 09

Posted 02 February 2015 - 07:18 PM

Only doing the engine bay for the time being. And will be going same colour as the car. Flamenco red

#689 hawk

hawk

    Forum Fixture

  • Members
  • PipPipPipPipPip
  • 2,190 posts
  • Name:steve
  • Location:Berwick, Melbourne
  • Car:UC Torana
  • Joined: 16-July 09

Posted 02 February 2015 - 07:21 PM

Heres a pic from a couple of years back, paint has got worse since this pic

Attached Files


#690 _Lazarus_

_Lazarus_
  • Guests

Posted 02 February 2015 - 07:55 PM

Looks fat.


GTS style mirrors would set it off.


#691 hawk

hawk

    Forum Fixture

  • Members
  • PipPipPipPipPip
  • 2,190 posts
  • Name:steve
  • Location:Berwick, Melbourne
  • Car:UC Torana
  • Joined: 16-July 09

Posted 02 February 2015 - 08:07 PM

Yeah cheers ill be after a pair when i eventually paint the whole car

#692 _Lazarus_

_Lazarus_
  • Guests

Posted 02 February 2015 - 08:33 PM

What width are the rear tyres and rims in that shot ?


#693 hawk

hawk

    Forum Fixture

  • Members
  • PipPipPipPipPip
  • 2,190 posts
  • Name:steve
  • Location:Berwick, Melbourne
  • Car:UC Torana
  • Joined: 16-July 09

Posted 02 February 2015 - 08:48 PM

There 14x8 and tyres are 215/65/14's

#694 hawk

hawk

    Forum Fixture

  • Members
  • PipPipPipPipPip
  • 2,190 posts
  • Name:steve
  • Location:Berwick, Melbourne
  • Car:UC Torana
  • Joined: 16-July 09

Posted 02 February 2015 - 08:56 PM

More pics of the rears for lazarus

Attached Files


#695 hawk

hawk

    Forum Fixture

  • Members
  • PipPipPipPipPip
  • 2,190 posts
  • Name:steve
  • Location:Berwick, Melbourne
  • Car:UC Torana
  • Joined: 16-July 09

Posted 02 February 2015 - 09:05 PM

And here are the most recent ones i can find before it came off the road.

Attached Files


#696 _Lazarus_

_Lazarus_
  • Guests

Posted 02 February 2015 - 10:57 PM

Mine came with 215 X 65 X 14 on 7" rims. The guards have been lipped so there is a bit of clearance.


I will probably go a 215 or 225 X 15 on a 7" rim.


#697 hawk

hawk

    Forum Fixture

  • Members
  • PipPipPipPipPip
  • 2,190 posts
  • Name:steve
  • Location:Berwick, Melbourne
  • Car:UC Torana
  • Joined: 16-July 09

Posted 02 February 2015 - 11:26 PM

Should fit alright. My rims need a different offset to fit under the guards a bit better. Eventually i want to run show wheels streeters on it 17x7 all round.

#698 torana_nick

torana_nick

    Forum Fixture

  • Members
  • PipPipPipPipPip
  • 759 posts
  • Name:Nick
  • Location:victoria
  • Car:LH Torana Project
  • Joined: 11-December 11

Posted 03 February 2015 - 08:55 AM

Good on you Steve keep chipping away mate. Won't be long u till the UC is back on the road with a v8 :)

#699 hawk

hawk

    Forum Fixture

  • Members
  • PipPipPipPipPip
  • 2,190 posts
  • Name:steve
  • Location:Berwick, Melbourne
  • Car:UC Torana
  • Joined: 16-July 09

Posted 03 February 2015 - 10:03 AM

Cheers nick yours is looking awesome. My aim is to have it up and running to try and make it to either the vtc maroondah dam run or tfest. But highly doubt ill make either haha

#700 hawk

hawk

    Forum Fixture

  • Members
  • PipPipPipPipPip
  • 2,190 posts
  • Name:steve
  • Location:Berwick, Melbourne
  • Car:UC Torana
  • Joined: 16-July 09

Posted 04 February 2015 - 01:03 PM

Bit more done wiring harness hole welded up and inner guard repair done. Not great but will do for now. All thats left is the battery tray and the bonnet hinge backing plates. Need to wait for funds to do those bits but might start some filler work next week.

Wont be going to full on just going to use filler where the welds are to smooth it off

Attached Files


1 user(s) are reading this topic

0 members, 1 guests, 0 anonymous users