
 and now the kitchen reno is finished i think i will be taking a break from the renos for a while and get back in to the torana, all i have to do really is one poxy pain in the arse repair then get the custom boot floor done and start on the bolt on's


PROJECT PAPAYA - A VERY FRUITY RESTO THREAD
Started by
notna
, Jul 27 2010 11:14 PM
703 replies to this topic
#226
 _nial8r_
_nial8r_
-

- Guests
Posted 01 April 2012 - 07:11 PM
yeah i know Mr Hot Property and now the kitchen reno is finished i think i will be taking a break from the renos for a while and get back in to the torana, all i have to do really is one poxy pain in the arse repair then get the custom boot floor done and start on the bolt on's
and now the kitchen reno is finished i think i will be taking a break from the renos for a while and get back in to the torana, all i have to do really is one poxy pain in the arse repair then get the custom boot floor done and start on the bolt on's
#227
notna
-
- Members
-

- 706 posts
Forum Fixture
- Name:Reverse of username
- Location:Sydney
- Car:1976 LX L32 SL/R
- Joined: 21-May 07
Posted 08 April 2012 - 12:55 PM
A little bit of Easter progress... less than I had hoped, but I'm tired and would rather be out and about for my Easter break, than sniffing welding gas and grinding dust.
I started by working on the previously hidden "band-aid" repair.
 095.JPG 84.16K
3 downloads
095.JPG 84.16K
3 downloads
A nice incision all the way around the wound, and it is removed.
100.JPG 91.52K
5 downloads
Then I took the removed section and overlaid it on a mint section of another guard, marking it out and taking my replacement piece.
122.JPG 103.27K
4 downloads
More on that repair section later.....
Next was the underside of the exact same rust repair. This one had no band-aid, and was still an open wound.
107.JPG 124.38K
5 downloads
So using the same section of mint guard, I took a repair piece the same size.
113.JPG 111.36K
2 downloads
The beauty of using this, is that it is the exact same profile as original, not a fabricated piece that will look different. You can see what I mean here... and why exactly does the inner part of the guard need that shape anyway?
114.JPG 90.96K
3 downloads
Working from the top side, I welded that one into place, and lightly dressed the weld. Over the top I will weld the outer skin piece, and after a light grind and file, it should be back to new, both sides, with no dirty band-aid slapped over the top.
120.JPG 89.45K
5 downloads
And finally,..... after spending a day sucking in welding fumes and grinding dust, nothing beats a cold beer! Sadly for me on this day.... My beer died a lonely death in the freezer :(
128.JPG 95.4K
3 downloads
I must remember to NOT get distracted after a long day in the man cave!
I started by working on the previously hidden "band-aid" repair.
095.JPG 84.16K
3 downloadsA nice incision all the way around the wound, and it is removed.
100.JPG 91.52K
5 downloadsThen I took the removed section and overlaid it on a mint section of another guard, marking it out and taking my replacement piece.
122.JPG 103.27K
4 downloadsMore on that repair section later.....
Next was the underside of the exact same rust repair. This one had no band-aid, and was still an open wound.
107.JPG 124.38K
5 downloadsSo using the same section of mint guard, I took a repair piece the same size.
113.JPG 111.36K
2 downloadsThe beauty of using this, is that it is the exact same profile as original, not a fabricated piece that will look different. You can see what I mean here... and why exactly does the inner part of the guard need that shape anyway?
114.JPG 90.96K
3 downloadsWorking from the top side, I welded that one into place, and lightly dressed the weld. Over the top I will weld the outer skin piece, and after a light grind and file, it should be back to new, both sides, with no dirty band-aid slapped over the top.
120.JPG 89.45K
5 downloadsAnd finally,..... after spending a day sucking in welding fumes and grinding dust, nothing beats a cold beer! Sadly for me on this day.... My beer died a lonely death in the freezer :(
128.JPG 95.4K
3 downloadsI must remember to NOT get distracted after a long day in the man cave!
Edited by notna, 08 April 2012 - 12:57 PM.
#228
notna
-
- Members
-
- 706 posts
Forum Fixture
- Name:Reverse of username
- Location:Sydney
- Car:1976 LX L32 SL/R
- Joined: 21-May 07
Posted 22 April 2012 - 04:17 PM
Still progressing with these 2 guards.....
Cleaned up the inside of both guards, did a little seam sealing, and gave them a good hit of stoneguard, because we all love that stuff right!!
SDC13354.JPG 197.12K
4 downloads
Then gave the outside a nice lick of epoxy primer. I tried very hard to file finish these, after removing a fair wack of bog and tapping out the little dents. The wheel arch of one was previously partly formed with bog, but I managed to reshape it with hammer and dolly. I was really pleased with the way it all turned out, but it did still need a very small skim of filler.
SDC13361.JPG 169.61K
3 downloads
SDC13365.JPG 175.62K
3 downloads
I'll guide coat these and block them back next weekend, then prime them.
Cleaned up the inside of both guards, did a little seam sealing, and gave them a good hit of stoneguard, because we all love that stuff right!!
SDC13354.JPG 197.12K
4 downloadsThen gave the outside a nice lick of epoxy primer. I tried very hard to file finish these, after removing a fair wack of bog and tapping out the little dents. The wheel arch of one was previously partly formed with bog, but I managed to reshape it with hammer and dolly. I was really pleased with the way it all turned out, but it did still need a very small skim of filler.
SDC13361.JPG 169.61K
3 downloads
SDC13365.JPG 175.62K
3 downloadsI'll guide coat these and block them back next weekend, then prime them.
#229
_nial8r_
_nial8r_
-
- Guests
Posted 22 April 2012 - 05:13 PM
they came up nice Anton, so when should they arrive at my joint
oh and how could you do that to an beer
oh and how could you do that to an beer
#230
torana_nick
-
- Members
-
- 759 posts
Forum Fixture
- Name:Nick
- Location:victoria
- Car:LH Torana Project
- Joined: 11-December 11
Posted 22 April 2012 - 05:35 PM
mate those guards look like they just come out from factory. i am wrestling with my guards atm as well.. keep up the good work mate!!!
#231
notna
-
- Members
-
- 706 posts
Forum Fixture
- Name:Reverse of username
- Location:Sydney
- Car:1976 LX L32 SL/R
- Joined: 21-May 07
Posted 22 April 2012 - 10:59 PM
I had a shit of a time with front guards. At first I was thinking of ditching both and buying decent replacements. I couldn't find ANYTHING in Sydney that was immaculate and rust free. Then I decided to repair my own, but needed other guards to cut decent bits from.
In the end, I used 1 original guard and 1 ebay replacement, plus bits from 2 MINT UC guards (why don't they rust huh?) and a third LX guard. I file finished the bare metal and repaired guards as best I could. LOTS of hours in these, but i'm really happy with them and will put them on my SL/R with pride!
Lee.... ur a dreamer!
Nick, cheers mate!

#233
LHSL
-
- Members
-
- 995 posts
Forum Fixture
- Name:Phillip
- Location:SYDNEY
- Car:1974 LH SL; 2 x 1975 LH S Toranas
- Joined: 30-March 07
Posted 24 April 2012 - 10:50 PM
Great work Anton. I had one of my guards repaired by a beater at west ryde. let me tell you your job would have been much better on the hip pocket.
If you get sick of doing panel beating work the guy I have used is a genious and reasonably priced too (and around the corner).
Phillip
If you get sick of doing panel beating work the guy I have used is a genious and reasonably priced too (and around the corner).
Phillip
#234
_A9XOSS_
_A9XOSS_
-
- Guests
Posted 25 April 2012 - 10:21 AM
going well there buddy, very nice work indeed. i love the home repairs jobs, sometimes there better than a trade job.
#235
_likatiger_
_likatiger_
-
- Guests
Posted 25 April 2012 - 10:35 AM
Loving this thread and it is making me want to get out there and attack mine. Just a question, where do you get those stands from? The ones the front guards are hanging on. I will definatly be needing some for when I start on my project.
Edited by likatiger, 25 April 2012 - 10:35 AM.
#236
hanra
-

- Members
-
- 10,973 posts
Oh My, Don't you post alot
- Name:Brad
- Location:Farrrrrr North Qld
- Car:1975 LH SL/R 5000, 1967 Morris Cooper S, E36 BMW, Toyota Corolla, Isuzu DMax
- Joined: 24-March 11
#237
_likatiger_
_likatiger_
-
- Guests
Posted 25 April 2012 - 04:10 PM
thanks hanra, will head down to the opposition and get me some
#238
notna
-
- Members
-
- 706 posts
Forum Fixture
- Name:Reverse of username
- Location:Sydney
- Car:1976 LX L32 SL/R
- Joined: 21-May 07
Posted 25 April 2012 - 07:10 PM
Yep they are the same stands, but off eBay I paid $50 for 2 An asset for all this panel work I can tell you!
Cheers for the comments guys. Today I guide coated and blocked back the hi-fill primer. I love it when you start blocking back, and all the high and low spots become visible, and then gone (if you have enough hi-fill). It's satisfying knowing that the panel is that straight!
Here is hi-filled and guide coated panel, enjoying some sunshine....
SDC13366.jpg 156.57K
2 downloads
Here is what you see when you begin to block it back. The high and low spots are well defined.
SDC13368.jpg 108.31K
2 downloads
And when it is (nearly) finished, you can see how damn flat and straight it is.
SDC13369.jpg 129.43K
3 downloads
I was explaining to a neighbor today that 99% of people will judge your car by how shinny and straight it is. So investing the time (and money) into panel work is WELL worth it.
On the weekend I will prime these again and then put them away, waiting for final colour, when I do the whole car at once.
An asset for all this panel work I can tell you!Cheers for the comments guys. Today I guide coated and blocked back the hi-fill primer. I love it when you start blocking back, and all the high and low spots become visible, and then gone (if you have enough hi-fill). It's satisfying knowing that the panel is that straight!
Here is hi-filled and guide coated panel, enjoying some sunshine....
SDC13366.jpg 156.57K
2 downloadsHere is what you see when you begin to block it back. The high and low spots are well defined.
SDC13368.jpg 108.31K
2 downloadsAnd when it is (nearly) finished, you can see how damn flat and straight it is.
SDC13369.jpg 129.43K
3 downloadsI was explaining to a neighbor today that 99% of people will judge your car by how shinny and straight it is. So investing the time (and money) into panel work is WELL worth it.
On the weekend I will prime these again and then put them away, waiting for final colour, when I do the whole car at once.
#239
_Bomber Watson_
_Bomber Watson_
-
- Guests
Posted 25 April 2012 - 07:14 PM
what selection of blocks are you using mate??
Cheers.
Cheers.
#240
notna
-
- Members
-
- 706 posts
Forum Fixture
- Name:Reverse of username
- Location:Sydney
- Car:1976 LX L32 SL/R
- Joined: 21-May 07
Posted 25 April 2012 - 07:34 PM
I just use a cork block..... been using just that for the last 10 years. Happy to be recommended something good though!
#241
hanra
-
- Members
-
- 10,973 posts
Oh My, Don't you post alot
- Name:Brad
- Location:Farrrrrr North Qld
- Car:1975 LH SL/R 5000, 1967 Morris Cooper S, E36 BMW, Toyota Corolla, Isuzu DMax
- Joined: 24-March 11
Posted 25 April 2012 - 08:12 PM
You got more patience then me!!!!
#242
notna
-
- Members
-
- 706 posts
Forum Fixture
- Name:Reverse of username
- Location:Sydney
- Car:1976 LX L32 SL/R
- Joined: 21-May 07
Posted 27 April 2012 - 01:35 PM
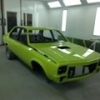
Oh and I'm still getting my jollies from this, while not getting them from the Juicy Papaya Fruit.... 
530379_10150802082367491_604512490_9557651_104676718_n.jpg 151.83K
3 downloads
530379_10150802082367491_604512490_9557651_104676718_n.jpg 151.83K
3 downloads
#243
_nial8r_
_nial8r_
-
- Guests
Posted 27 April 2012 - 02:35 PM
thanks hanra, will head down to the opposition and get me some
Hey Jason you should be able to get the panel stands through your joint.
gone are the days of hanging parts of the olds cloths line

#244
lxsstorana
-

- Members
-
- 2,499 posts
Forum Fixture
- Name:Mick
- Location:Eastwood, Sydney
- Car:SS Hatchback
- Joined: 23-March 06
Posted 27 April 2012 - 02:56 PM
Oh and I'm still getting my jollies from this, while not getting them from the Juicy Papaya Fruit....
Stop bragging (as we're getting jealous) and get back to work on the Torana.

Edited by lxsstorana, 27 April 2012 - 02:57 PM.
#245
_pborg8_
_pborg8_
-
- Guests
Posted 27 April 2012 - 10:14 PM
Hi Anton. I have just joined gmh- torana & have just been following your restoration project. Your work is amazing and you filled me with insperation. I have just atarted my rebuild of an LH l31 . and I thought I had problems But just looking at what can be achieved with time and patiens awsom. I have just about finished stripping my car down and ready to place it on a trolley and send it away for a good blast back to bar metal.. What are your thoughts on sand blasting or soda blasting. Although I plan to go over it with paint striper first to remove as much paint as posible to make the blasting less agressive on the panels. . My plan is to fist of all find my self one of those spot weld cutters sure dose a neat job. Where did you get the cover plate(one oppiste to the battery tray ) on the drivers side as mine will need replacing.
i wll post Pics of my project as I get more firmiliar with the forum. thanks for the Insperation . Paul
i wll post Pics of my project as I get more firmiliar with the forum. thanks for the Insperation . Paul
#246
notna
-
- Members
-
- 706 posts
Forum Fixture
- Name:Reverse of username
- Location:Sydney
- Car:1976 LX L32 SL/R
- Joined: 21-May 07
Posted 28 April 2012 - 05:05 PM
G'day Paul. Cheers for the feedback on my resto mate. Much appreciated.
In regard to sand or soda.... I know what I prefer, but it really comes down to your budget, your expectations and ability. Sand will rip into paint, bog and rust, which will make it easier for you in the long run, but it can also blast holes where you never expected them to be. Soda is much more gentle on panels, but leaves you with a little more work in removing bog and rust.
I honestly believe that anything is repairable. Not much scares me in regard to work and repairs. I enjoy the challenges!
Now that you have introduced yourself I will be sure to follow your progress on this forum!
EDIT: Driver side engine bay plate came from an eBay seller. It was $80. I never saw any, ever, then there were heaps on eBay about a year ago, now I don't see any again! Just keep an eye out on there and one will hopefully pop up.
Edited by notna, 28 April 2012 - 05:07 PM.
#247
_Bomber Watson_
_Bomber Watson_
-
- Guests
Posted 28 April 2012 - 05:43 PM
I just use a cork block..... been using just that for the last 10 years. Happy to be recommended something good though!
I used to be a cork man, loved my favorite cork block (got a few, but one i used mostly and had nicely worn corners etc) like a child, then i randomly pickeed up a selection of other types from the paint shop, now im a block whore and have like 10 different blocks for all different jobs.
I have "The Standard One" "The Flexi one" and "Chroma Block" from these guys
http://www.amaxi.com...ks/starters-kit
And a couple of these:
http://dura-block.co...ablockline.html
And some randoms....Rarely leave a trade show without having my name on a new block or two.....
Have my eyes on a few more atm......There addictive.....
Cheers.
Edited by Bomber Watson, 28 April 2012 - 05:48 PM.
#248
notna
-
- Members
-
- 706 posts
Forum Fixture
- Name:Reverse of username
- Location:Sydney
- Car:1976 LX L32 SL/R
- Joined: 21-May 07
Posted 29 April 2012 - 03:19 PM
Appreciate the block tips there! I have always wondered how they would go, having seen them used in resto DVD's and the like. Are they all soft, or softer than a cork block?
More progress today. I finally have these guards at a stage where I can put them back to rest and move on to another panel. I'm thinking the front apron next, but that's down the track. First, the finishing of the guards.....
After the first block back, the high and low spots became much more apparent. There weren't that many though mond you, but the few that were visible, WERE VISIBLE!
SDC13387.JPG 157.88K
5 downloads
So I had to skim fill these and then smooth over.
SDC13389.JPG 160.39K
5 downloads
Then I blocked both guards back again...
SDC13392.JPG 198.15K
3 downloads
And was VERY happy with how they came out. I could tell from studying the surface hard, that these were as good as I could ever get them. Sooooo...... they got the primer treatment. 2K Hi-Fill. Very niiiiice.
SDC13408.JPG 160.27K
4 downloads
SDC13409.JPG 166.02K
3 downloads
And now I can put them away in this state, ready for colour later on, and move onto the next mini project. That will be coming soon.....
I have always wondered how they would go, having seen them used in resto DVD's and the like. Are they all soft, or softer than a cork block?More progress today. I finally have these guards at a stage where I can put them back to rest and move on to another panel. I'm thinking the front apron next, but that's down the track. First, the finishing of the guards.....
After the first block back, the high and low spots became much more apparent. There weren't that many though mond you, but the few that were visible, WERE VISIBLE!
SDC13387.JPG 157.88K
5 downloadsSo I had to skim fill these and then smooth over.
SDC13389.JPG 160.39K
5 downloadsThen I blocked both guards back again...
SDC13392.JPG 198.15K
3 downloadsAnd was VERY happy with how they came out. I could tell from studying the surface hard, that these were as good as I could ever get them. Sooooo...... they got the primer treatment. 2K Hi-Fill. Very niiiiice.
SDC13408.JPG 160.27K
4 downloads
SDC13409.JPG 166.02K
3 downloadsAnd now I can put them away in this state, ready for colour later on, and move onto the next mini project. That will be coming soon.....
#249
_Bomber Watson_
_Bomber Watson_
-
- Guests
Posted 29 April 2012 - 03:33 PM
Pretty much all more flexible than a cork block. Some of the big stiff ones are probably comparable.
Many of them are made from various density foams, so some are quiet stiff, some are nice and flexy, chromablock is very very flexy, good for a final rub down with 800 before paint.
Cheers.
Many of them are made from various density foams, so some are quiet stiff, some are nice and flexy, chromablock is very very flexy, good for a final rub down with 800 before paint.
Cheers.
#250
notna
-
- Members
-
- 706 posts
Forum Fixture
- Name:Reverse of username
- Location:Sydney
- Car:1976 LX L32 SL/R
- Joined: 21-May 07
Posted 30 April 2012 - 07:29 PM
I will give them a go. Always wondered.....
I can see the benefit of of some flex, especially with the sometimes complex shape of some panels!
I can see the benefit of of some flex, especially with the sometimes complex shape of some panels!


2 user(s) are reading this topic
0 members, 2 guests, 0 anonymous users

