Jump to content


Photo
- - - - -

PROJECT PAPAYA - A VERY FRUITY RESTO THREAD


  • Please log in to reply
703 replies to this topic

#301 notna

notna

    Forum Fixture

  • Members
  • PipPipPipPipPip
  • 706 posts
  • Name:Reverse of username
  • Location:Sydney
  • Car:1976 LX L32 SL/R
  • Joined: 21-May 07

Posted 15 July 2012 - 08:16 PM

I've been progressing the resto slow and steady, but I have decided to hold off posting updates here until I have substantial progress to show. Sometimes the little things I do excite me, but to post on here may be a bit insignificant for others.

Anyway, hopefully this will be entertaining enough, as I am pretty damn proud! :spoton:

I have been using my father-in-law's MIG welder for what seems like forever, and lately I have had the impression that.... he wants it back! Understandable I spose, given that he is paying monthly rental on the gas bottle, and not having the pleasure of using it!

There are 2 remaining areas of bodywork that I will need the welder for. One is fixing the dodgy repair done to the passenger side rear quarter, and the other is a rust repair to the drivers side rear sill. Since the latter is the one I can get to easily with the car in its current position, it was dubbed my next mini-project to tackle.

I initially thought I would get away with wire-wheeling the area that was showing signs of rust bubbles, then welding any holes that broke through....

Attached File  002.jpg   114.62K   2 downloads

But that started to get messy and resemble swiss cheese....

Attached File  010.jpg   148.89K   1 downloads

So I cut the whole section out!

Attached File  012.jpg   132.96K   2 downloads

And it was interesting to see what was hidden inside. Big chunks of bog, none the less! After a little digging and prodding, I found where this had come from.... [note finger showing the exact place, just in case you failed to see] :D

Attached File  019.jpg   160.14K   4 downloads

So I cleaned up this area and welded in a nicely shaped repair section.

Attached File  028.jpg   164.4K   2 downloads

And that fixed this area properly.

Then I dug through my numerous spares, and found the rust repair sections that I carefully extracted from the mint UC shell I had previously acquired for this purpose. A nice rear section of sill was cut to fit, as shown here.

Attached File  005.jpg   126.61K   4 downloads

Then I carefully welded it all around. There is something about welding... the concentration needed to not blow holes in your job.... and the satisfaction of the end result. I just love it!

Attached File  007.jpg   72.85K   2 downloads

And after some paint stripping and light dressing of welds, I was left with this....

Attached File  019a.jpg   77.31K   1 downloads

Looks good in pics, but DAMN GOOD in person. I am very proud of this, and all my repairs. Almost a shame to cover them in paint and hide them!

Next will be the rear quarter repair, then I can give back the MIG and continue with paint stripping and panel finishing.

Cheers!

Edited by notna, 15 July 2012 - 08:17 PM.


#302 torana_nick

torana_nick

    Forum Fixture

  • Members
  • PipPipPipPipPip
  • 759 posts
  • Name:Nick
  • Location:victoria
  • Car:LH Torana Project
  • Joined: 11-December 11

Posted 15 July 2012 - 08:27 PM

As always mate top job!! If you where in Melbourne I'd lend you my mig welder it Dosent get much use in my shed I get no time to do nothing..


Cheers
Nick

#303 _BARRY JACKPOT_

_BARRY JACKPOT_
  • Guests

Posted 15 July 2012 - 08:57 PM

Tidy work there Anton

#304 _nial8r_

_nial8r_
  • Guests

Posted 16 July 2012 - 08:54 AM

looking good Anton, just a tip but i think your cutting wheel is on upside down :D

#305 notna

notna

    Forum Fixture

  • Members
  • PipPipPipPipPip
  • 706 posts
  • Name:Reverse of username
  • Location:Sydney
  • Car:1976 LX L32 SL/R
  • Joined: 21-May 07

Posted 16 July 2012 - 02:42 PM

Just turn your screen 180 degrees mate, or your head if that is difficult, and she'll be right! :rolleyes:

Cheers for the encouraging words guys!

#306 _nial8r_

_nial8r_
  • Guests

Posted 16 July 2012 - 06:36 PM

after a dozen brown bottles it seems to be right now :mellow:

#307 notna

notna

    Forum Fixture

  • Members
  • PipPipPipPipPip
  • 706 posts
  • Name:Reverse of username
  • Location:Sydney
  • Car:1976 LX L32 SL/R
  • Joined: 21-May 07

Posted 17 July 2012 - 12:22 AM

How crazy is it, when that cutting wheel is spinning at a billion RPM, yet it can appear still like that in a photo!

I'm glad those brown magic medicine bottles helped you out there Lee. :party: .... but what does this do for you now....? :spoton:
Attached File  post-3017-0-61657800-1342346518.jpg   99.31K   4 downloads

#308 _nial8r_

_nial8r_
  • Guests

Posted 17 July 2012 - 08:08 AM

nup no good mate it seems to be around the wrong way again :wtf: :dontknow: :unsure:

#309 torana_nick

torana_nick

    Forum Fixture

  • Members
  • PipPipPipPipPip
  • 759 posts
  • Name:Nick
  • Location:victoria
  • Car:LH Torana Project
  • Joined: 11-December 11

Posted 06 August 2012 - 07:46 PM

i never knew there was a wrong and right way for cut off wheels they cut both ways lol not like a diamond disk.
any updates yet Anton? just went trough the hole thread chasing inspiration.. loving your work!!


cheers
nick

#310 _nial8r_

_nial8r_
  • Guests

Posted 07 August 2012 - 08:21 AM

i was always told that the writing/ colured side was to face up and pretty sure on the disk it says which way it should be fitted :dontknow:

#311 notna

notna

    Forum Fixture

  • Members
  • PipPipPipPipPip
  • 706 posts
  • Name:Reverse of username
  • Location:Sydney
  • Car:1976 LX L32 SL/R
  • Joined: 21-May 07

Posted 07 August 2012 - 05:48 PM

I'm on a few weeks leave from work now, and have been busy in the back yard excavating a nice big corner for my new shed. I actually wanted to spend my 4 weeks on the Papaya, but since my garage and old shed were both bursting at the seams, I figured in the long run the shed should come first. Here is a sneak peek...

Attached File  021sml.jpg   156.61K   2 downloads

So when I'm not shifting dirt there, I am still finding Torrie time!

Got my son helping again. I like teaching him things, and he loves doing even the dirty jobs like this one....

Attached File  IMG_2580.jpg   74.73K   3 downloads

I've been cleaning up all the bolts, brackets and bits from this car and all my previous Torana's I owned in the early 90's. It's funny the things we keep over time, and the things we discard. From my very first Torana that I wrote off in 1991, I kept a bucket of bolts and the badges. The bolts are in the mix now, to be used on this SL/R, and the badges I will keep for memories sake.

Bonnet hinges, after a paint strip. They look galvanized. Standard?

Attached File  020.jpg   157.01K   2 downloads

And the badges from my very first car....

Attached File  004.jpg   71.25K   1 downloads

Interestingly.... I also have the badges from my old SL/R that I owned in 1993. Back then, debadging was cool, so removing these because they looked "uncool" was an awesome move. Yes, these will restored and take pride of place on Papaya! I think that is pretty damn cool!

Attached File  003.jpg   77.78K   1 downloads

I have also been going through the extra bits I got with the car, and noted these modified rear training arms. Is this a worthwhile mod, or a wank?

Attached File  022.jpg   174.61K   1 downloads

So the plan from here is to clean up and paint the underside of the rear end, and finish the last rust repair, the passenger rear 1/4. Pics of this you can expect soon :) Hope it all goes to plan though!

#312 _LH SLR 3300_

_LH SLR 3300_
  • Guests

Posted 07 August 2012 - 08:00 PM

I'm pretty certain those boxed arms will bind up on standard Torana "A" shaped diff mounts because the box plate doesn't allow enough clearence for suspension travel. You could cut some of the plate away to allow the arm to pivot correctly on the mounts, but i would replace the poly bushes with rubber. I used those blue poly bushes in my SL/R & within a couple of years they crumbled like dry biscuits. Just my two bobs worth.

#313 notna

notna

    Forum Fixture

  • Members
  • PipPipPipPipPip
  • 706 posts
  • Name:Reverse of username
  • Location:Sydney
  • Car:1976 LX L32 SL/R
  • Joined: 21-May 07

Posted 07 August 2012 - 08:18 PM

Point noted about clearance. Thanks Matt.

I rebuilt my front end with standard rubber bushes, so was going to do the same in the rear. Never removed a diff housing before though.... not looking forward to that!

#314 mitchg

mitchg

    The guy with the Torailer

  • Members
  • PipPipPipPipPipPip
  • 3,111 posts
  • Name:Mitch
  • Location:Ingleburn, NSW
  • Car:Was a '77 LX V6 Torana + Torailer now VX SS
  • Joined: 19-May 07

Posted 07 August 2012 - 08:53 PM

Diff housing isnt as bad as you think. I removed one when I had stubborn axles twisted in there real good with a blown centre... Its pretty heavy with a centre still in there haha.

#315 notna

notna

    Forum Fixture

  • Members
  • PipPipPipPipPip
  • 706 posts
  • Name:Reverse of username
  • Location:Sydney
  • Car:1976 LX L32 SL/R
  • Joined: 21-May 07

Posted 10 August 2012 - 09:35 PM

I've been staring at it for days now... You should come over Mitch and do it for me! :D

Took a heap of bits and pieces to the platers today for silver zinc. Getting the bonnet hinges, latch and catch, sill scuff plates front and rear, door strikers, alternator bracket, and 3 whole cars worth of bolts, brackets, screws, nuts and washers, etc.... I kid you not, all that for $120. I have used these guys before for my magazine car, and they are GOOD. Pickup next week so will show you how it turns out.

OK now for some questions....

I removed the boot spoiler. It's a fibreglass repro one. In the bootlid are some plugged up holes. Are these from an original boot spoiler?

Attached File  SML__06.jpg   181.26K   2 downloads

And on the subject of spoilers, were these dealer fitted? Did they move / remove the boot badges when the spoiler was fitted?

And what's with all these holes? From one badge?

Attached File  SML__08.jpg   169.94K   1 downloads

Are these standard exhaust brackets? Can you buy the rubbers for those?

Attached File  SML__11.jpg   200.72K   3 downloads

And is this just some bodge mod to hold an exhaust system? They are welded to the floor!

Attached File  SML__14.jpg   220.04K   3 downloads

I spent hours today scraping crud off the floor at the rear. Still hours more scraping and cleaning ahead before painting, which sux, but not a speck of rust to be seen.

Some show & tell pics next week :)

#316 hanra

hanra

    Oh My, Don't you post alot

  • Members
  • PipPipPipPipPipPipPip
  • 10,950 posts
  • Name:Brad
  • Location:Farrrrrr North Qld
  • Car:1975 LH SL/R 5000, 1967 Morris Cooper S, E36 BMW, Toyota Corolla, Isuzu DMax
  • Joined: 24-March 11

Posted 10 August 2012 - 10:12 PM

I just ordered a pair of these:

http://www.rarespare...product=2819591

#317 76lxhatch

76lxhatch

    That was easy!

  • Members
  • PipPipPipPipPipPipPip
  • 7,203 posts
  • Location:Unzud
  • Car:SS
  • Joined: 04-August 08
Garage View Garage

Posted 10 August 2012 - 10:24 PM

The brackets on the floor look like they have been set up for a centre pull hand brake cable perhaps...?

#318 notna

notna

    Forum Fixture

  • Members
  • PipPipPipPipPip
  • 706 posts
  • Name:Reverse of username
  • Location:Sydney
  • Car:1976 LX L32 SL/R
  • Joined: 21-May 07

Posted 14 August 2012 - 09:30 PM

Been busy last few days. Dropped the fuel tank... not so difficult, apart from the 10L of VERY stale fuel that I couldn't siphon out. Diff is half out, will probably finish that tomorrow. Spent 2 whole days laying under the car scraping the floor from the middle back (front already done) and then washing it with left over petrol from the tank. Putting that stale 10 year old fuel to good use! Pics tomorrow.... its quite nice to see a spotless underside of a project car. Will be painting that black over the next few days.

Picked up my plated stuff today. I needed to get this all done now so that I can reassemble the front end and get the shell rolling again. It just works better for me with limited space to have it rolling when I paint it.

Bonnet hinges:

Attached File  SML__09.jpg   262.11K   1 downloads

Sill plates:

Attached File  SML__08.jpg   242.77K   1 downloads

Stuff:

Attached File  SML__10.jpg   195.75K   4 downloads

More stuff:

Attached File  SML__01 (2).jpg   204.04K   2 downloads

All that for $120 and its a TOP JOB!

Also bought paint today. I'm starting with 2L of 2K colour, for the engine bay and underside of bonnet, boot, and backs of doors. If I can handle that without too much drama, I will do the outside of the car in 2K, otherwise if it's too dangerous I will stick with what I know and do well, and that's acrylic. Hopefully I will have the bay done within the next 2 weeks, then the front end back in.

Edited by notna, 14 August 2012 - 09:32 PM.


#319 308 Sunbird

308 Sunbird

    Forum Fixture

  • Members
  • PipPipPipPipPip
  • 973 posts
  • Name:Stuart
  • Location:Melbourne
  • Car:SS Hatch, 308 Sunbird sedan-Improved Prod racer (sold), HZ Kingy wagon
  • Joined: 20-November 10

Posted 15 August 2012 - 10:06 AM

That plated stuff does look good- pity he's in Sydney. My bloke down here charged that just for the hinges
and latches! Good to see you back into the car Anton.

#320 hanra

hanra

    Oh My, Don't you post alot

  • Members
  • PipPipPipPipPipPipPip
  • 10,950 posts
  • Name:Brad
  • Location:Farrrrrr North Qld
  • Car:1975 LH SL/R 5000, 1967 Morris Cooper S, E36 BMW, Toyota Corolla, Isuzu DMax
  • Joined: 24-March 11

Posted 15 August 2012 - 10:54 AM

Just post it away to where ever. Ive been posting parts down to Albury... where ever that is?

#321 308 Sunbird

308 Sunbird

    Forum Fixture

  • Members
  • PipPipPipPipPip
  • 973 posts
  • Name:Stuart
  • Location:Melbourne
  • Car:SS Hatch, 308 Sunbird sedan-Improved Prod racer (sold), HZ Kingy wagon
  • Joined: 20-November 10

Posted 15 August 2012 - 06:19 PM

What do you mean you dont know where Albury is Brad. Open the shed up & get the kero fumes
out before going in again. :)

#322 hanra

hanra

    Oh My, Don't you post alot

  • Members
  • PipPipPipPipPipPipPip
  • 10,950 posts
  • Name:Brad
  • Location:Farrrrrr North Qld
  • Car:1975 LH SL/R 5000, 1967 Morris Cooper S, E36 BMW, Toyota Corolla, Isuzu DMax
  • Joined: 24-March 11

Posted 15 August 2012 - 06:45 PM

I just put addresses on stuff and stick it in the post. I have no idea where the locations are... They just take my money and send it back. I'd have to google map it.

#323 308 Sunbird

308 Sunbird

    Forum Fixture

  • Members
  • PipPipPipPipPip
  • 973 posts
  • Name:Stuart
  • Location:Melbourne
  • Car:SS Hatch, 308 Sunbird sedan-Improved Prod racer (sold), HZ Kingy wagon
  • Joined: 20-November 10

Posted 15 August 2012 - 06:59 PM

I suppose us Mexicans are a lot closer to Albury than you.

#324 hanra

hanra

    Oh My, Don't you post alot

  • Members
  • PipPipPipPipPipPipPip
  • 10,950 posts
  • Name:Brad
  • Location:Farrrrrr North Qld
  • Car:1975 LH SL/R 5000, 1967 Morris Cooper S, E36 BMW, Toyota Corolla, Isuzu DMax
  • Joined: 24-March 11

Posted 15 August 2012 - 10:39 PM

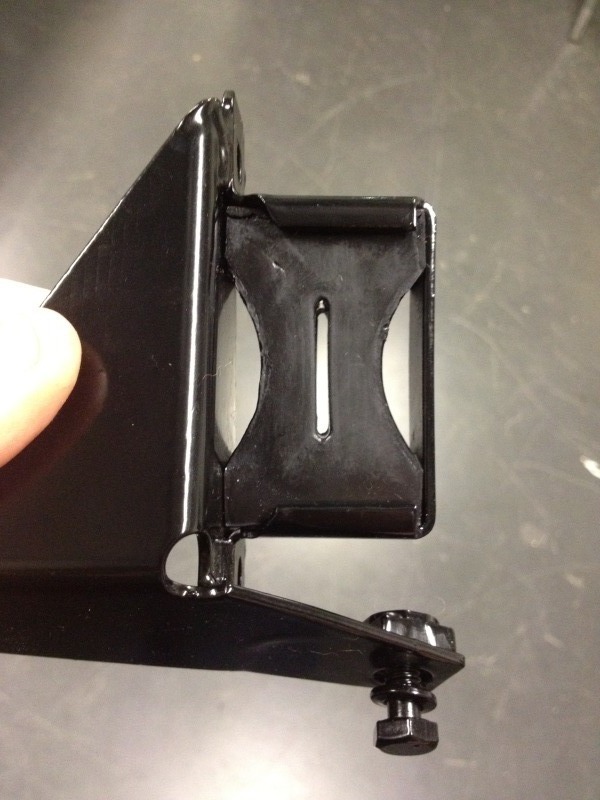
Are these standard exhaust brackets? Can you buy the rubbers for those?

Attached File  SML__11.jpg   200.72K   3 downloads


Got my replacement rubbers today.

Posted Image

#325 notna

notna

    Forum Fixture

  • Members
  • PipPipPipPipPip
  • 706 posts
  • Name:Reverse of username
  • Location:Sydney
  • Car:1976 LX L32 SL/R
  • Joined: 21-May 07

Posted 16 August 2012 - 09:21 AM

How do they fit in?


1 user(s) are reading this topic

0 members, 1 guests, 0 anonymous users