Thanks Mick. Very busy indeed!
Say, that wasn't you blowing things up in Eastwood the other day was it? 


Forum Fixture

Posted 27 July 2013 - 10:27 PM
Thanks Mick. Very busy indeed!
Say, that wasn't you blowing things up in Eastwood the other day was it?
Forum Fixture

Posted 28 July 2013 - 06:34 AM
No that wasn't me. A backhoe operator decided to remove an underground petrol tank and pierced the tank causing a spark.
Lucky he didn't kill himself. Catch up soon.
Lotsa Posts!

Posted 28 July 2013 - 09:21 AM
So there you have my progress, and a pointer about blocking back... now comes... the problem! :( I put a run in one guard. I'd classify it as, a bad one :( Fortunately it's in a good spot to fix, so... how do I? I'm an ace with removing runs from acrylic, and buffing, but I'm sure 2K isn't the same.
So... what technique would be best to remove the run, and buff the paint back to a shine? Once in the past I tried this, but couldn't buff the paint back to a decent shine. It remained dull, and looked shite. Tips, advice, is appreciated.
Fulcrum Fixture

Posted 28 July 2013 - 09:26 AM
Razor blade with extreme care.
Forum Fixture
Posted 28 July 2013 - 12:14 PM
I've seen the razor blade method and was going to give that a shot. Interested to know the correct time-frame for doing this, and also denibbing.

Posted 28 July 2013 - 02:40 PM
I've seen the razor blade method and was going to give that a shot. Interested to know the correct time-frame for doing this, and also denibbing.
Hi Anton,
The best tool for the job is this:

You can get one here: http://www.quicksale...CFWdJpgodj0MAbg
Cool

Posted 28 July 2013 - 02:45 PM
Posted 28 July 2013 - 03:01 PM
You can get one here: http://www.quicksale...CFWdJpgodj0MAbg
Even cheaper on eBay $94 plus postage .... that's cheaper than what I paid for mine years ago :-)
http://www.ebay.com....=item3a82568771
Forum Fixture
Posted 28 July 2013 - 04:52 PM
Cheers for that. Someone else recommended one of those, but I hadn't seen one until now.
Funnily enough, I had a shot at this job today before seeing this. Came out much better than I predicted. I have avoided having to respray the panel.
Here is what I did.
Bent a razor blade like so....
 IMG_20130728_134432.jpg 77.5K
3 downloads
IMG_20130728_134432.jpg 77.5K
3 downloads
Then used some cool tape that followed me home one day when I worked at Qantas in engineering. We used this stuff to mask off engine components before plasma spraying. Anyway, I used it here to avoid any slip ups with the blade....
IMG_20130728_135349.jpg 181.79K
4 downloads
Then I blocked it back lightly, working through the grades, up to 3000!
IMG_20130728_154218.jpg 53.73K
1 downloads
Then buffed it up, using a wool pad. Came out WAY better than I expected, especially since the last time I did this on a 2K car, I couldn't buff up a decent shine.
IMG_20130728_155900.jpg 73.27K
3 downloads
Very happy.
Forum Fixture
Posted 05 August 2013 - 10:25 PM
Denibbed a few spots on the weekend and gave the body a buff. Very happy with the results. Now I'm after a set of L20 / L32 SL/R body stripes, as shown:
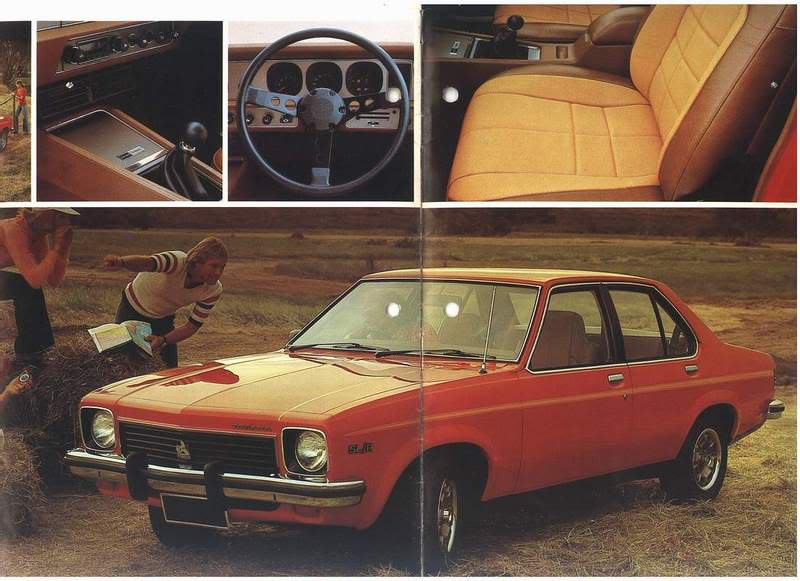
There used to be a guy here selling them, and they also popped up on eBay regularly. I knew I should have bought a set when I saw them. Now I can't find them everywhere, only SS ones. I tried to do a WANTED post on here, but I must be spaz at those.... none of my posts get approved, no idea why!!
Anyone got any leads for me?
Posted 06 August 2013 - 04:18 AM
I'm not sure where you get them, but I think the guy in the pic with the map is giving instructions of where to go, & the other guy leaning on the hay bale is yelling the instructions as well just in case the driver was deaf.....lol 
Love your car by the way Anton, it's nice to see whet my car is gonna look like in that colour when I finally get to that stage 
Posted 08 August 2013 - 10:56 PM
Try http://www.grafixunlimited.com.au/
They don't show them on there web site but they will make them
They made me a set for me for my SLR L32 manual a few years back
I took photos and dimensions of my car before I resprayed and they copied exactly
Fantastic thread
good to see an original resto project
Forum Fixture
Posted 09 August 2013 - 10:05 AM
Try http://www.grafixunlimited.com.au/
They don't show them on there web site but they will make them
They made me a set for me for my SLR L32 manual a few years back
I took photos and dimensions of my car before I resprayed and they copied exactly
Fantastic thread
good to see an original resto project
Cheers for that lead. I have fired off an email to them. I like their other stuff too!
Cheers for the comments also.  I do love an original resto.
Oh My, Don't you post alot

Posted 09 August 2013 - 10:07 AM
Ive used him for stuff in the past Anton, no dramas with it. He actually made me a custom HR decal for my wiper motor.
Forum Fixture
Posted 10 August 2013 - 02:03 PM
Stripes are sorted. Cheers for that tip. Looks very promising 
Forum Fixture

 View Garage
Posted 11 August 2013 - 07:06 PM
Try http://www.grafixunlimited.com.au/
They don't show them on there web site but they will make them
They made me a set for me for my SLR L32 manual a few years back
I took photos and dimensions of my car before I resprayed and they copied exactly
Fantastic thread
good to see an original resto project
Fulcrum Fixture
Posted 11 August 2013 - 07:07 PM
Nice work Edward scissor hands.
Posted 11 August 2013 - 07:39 PM
Thanks for the link Lee... that's neat work from Ryan! Nice idea too. Will have a think about that.
Little more progress this morning. Ran out of gasless MIG wire (thank god!), so no more progress until I get my MIG gas bottle refilled (that's my father-in-law's job, it's his MIG afterall... hehehe)
, then I can weld the nice way.
Before....008sml.JPG
After....
Might give it a lick of filler to smooth it off. This afternoon maybe
aarr man i wish i had if seen this before today that is the way to do it
Posted 12 August 2013 - 08:13 AM
wot a great job you r doing just hope i can do the great work you r doing looking good mate robbo
Forum Fixture
Posted 12 August 2013 - 09:56 PM
Cheers mate! It's an addiction I tell ya!
Forum Fixture

Posted 13 August 2013 - 03:42 AM
saw this on ebay and thought you may have an interest
cheers,
http://www.ebay.com....=item3cd48b9f1d
Forum Fixture
Posted 07 October 2013 - 03:34 PM
It's amazing how much time can pass, and be spent on a restoration, and yet there seems to be little to show for it. Frustrating in a way, but for me it's still very much fulfilling.
My SL/R stripes arrived. Totally love them, and that's before putting them on! Love that retro 70's look.
IMG_20130823_101743.jpg 186.69K
2 downloads
Cleaned up my standard rims. 2 are stock 5.5 inch. 2 are reverse 6 inch.
IMG_20130915_123546.jpg 240.66K
1 downloads
Hit them with black 2K. Came up REALLY nice!
IMG_20130915_123557.jpg 255.45K
1 downloads
Then clad them with whitewalls. I actually wanted redwalls to match the stripes, but the only ones I could find were REALLY expensive. I thought about painting the whitewall red, but after researching that one out, decided it's best to leave as is. Yea I know that aren't big fat 265's or whatever, but this is the look I am going for.
IMG_20130918_173719.jpg 121.74K
11 downloads
I like that a LOT! Can't wait to get it rolling on those.
Oh My, Don't you post alot
Posted 07 October 2013 - 03:37 PM
Forum Fixture
Posted 07 October 2013 - 03:45 PM
Working on some other smaller things too.
Had another box of bits and pieces plated. LOVE how these come out. I spend a lot of time cleaning up all these things, and the quality of the plating really is good after the extra effort that goes into them.
IMG_20130915_131500.jpg 156.73K
8 downloads
At the moment I am working on the diff. Stripped it bare and started to clean up the housing...
IMG_20131005_160620.jpg 277.52K
5 downloads
So far, so good. But unfortunately there are some simple things I need to fix, like the stripped threads for the bottom 2 long bolts...
IMG_20131005_160538.jpg 149.86K
10 downloads
Oh and the stripped threads on the housing studs
IMG_20131005_160705.jpg 184.03K
8 downloads
Does anyone know where I can buy new ones of these?
And finally, since I am reconditioning it, I want to replace the axle bearings. How do you get the bearing cups out of the housing?
IMG_20131007_134411.jpg 110.54K
8 downloads
Forum Fixture

Posted 08 October 2013 - 09:04 AM


0 members, 3 guests, 0 anonymous users

