
top shelf work mate! the original resto is coming along great
Cheers
could you give me a few tips with the spot weld cutter? did you use a 3/8 cutter?
Yes.
did you drill through both panels?
The cutter I used won't let you drill through both. A spot weld drill will. They are different. I did however drill a very small pilot hole through both panels so that the tip of the cutter would locate better and not slide off to the side.
and if you drilled through both panels were they easy to weld the holes back up?
Very easy to weld back up using the cutter, because the bottom panel layer is still solid.
i am getting a spotweld drill/cutter and can't decide which one is best, the cutter or the drill. i don't really like the idea of drilling through both panels. i'd rather drill through one so it is easier and stronger to weld the panels back up back up.
I agree with your logic there.


PROJECT PAPAYA - A VERY FRUITY RESTO THREAD
#151

-
- Members
-

- 706 posts
Forum Fixture
- Name:Reverse of username
- Location:Sydney
- Car:1976 LX L32 SL/R
- Joined: 21-May 07
Posted 06 July 2011 - 11:08 AM
#152
_toranatime_
-

- Guests
Posted 06 July 2011 - 12:20 PM
cheers, you made my decision much easier.
#153
-

- Members
-
- 2,499 posts
Forum Fixture
- Name:Mick
- Location:Eastwood, Sydney
- Car:SS Hatchback
- Joined: 23-March 06
Posted 06 July 2011 - 12:25 PM
It's a worked 351, tricked up auto, 9 inch etc etc and NSW engineered in case people are wondering.
 (here's one photo and now lets get back to toranas.)
#154
-
- Members
-
- 995 posts
Forum Fixture
- Name:Phillip
- Location:SYDNEY
- Car:1974 LH SL; 2 x 1975 LH S Toranas
- Joined: 30-March 07
Posted 06 July 2011 - 03:38 PM
So true. It is strange how different toranas rust in different places. My LH SL is a Melbourne built car, front plenums, front screen, all floor pans are brand new. Rear screen and boot floor different story. Yours on the other hand seems to have not suffered these issues but other more common LH/LX ones. BTW I may be selling mine as I have no time to restore. I can't believe you bought a car sight unseen! Very trustworthy.So true guys.... I think any 70's Torana will require rust reparis though, and also have hidden faults that you unearth in the process. I reckon this car is solid.... despite what I have had to do. The chassis repairs were unexpected.... That's what you get when buying sight unseen, from a bullshit artist!
The floors and boot are sweet. Once I finish where I'm at now, I have a minor sill repair and rear 1/4 lower repair and thats probably it.
Still.... awesome learning curve for me, and I have enjoyed it so far
Keep up the good work and keep that finger dry!
Phillip
#155
-

- Members
-
- 3,111 posts
The guy with the Torailer
- Name:Mitch
- Location:Ingleburn, NSW
- Car:Was a '77 LX V6 Torana + Torailer now VX SS
- Joined: 19-May 07
Posted 06 July 2011 - 03:43 PM
#156
_nial8r_
-
- Guests
Posted 06 July 2011 - 07:20 PM
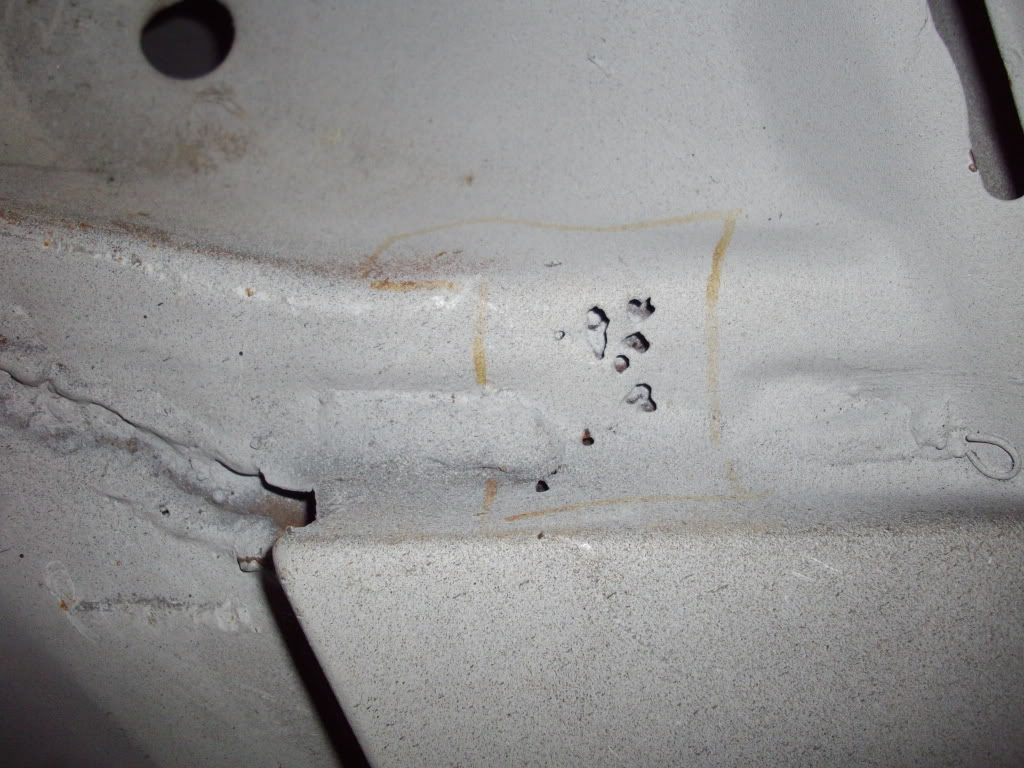
i forgot that i had these few pins hole to sort out being the last of my repairs so i did the cut and found this
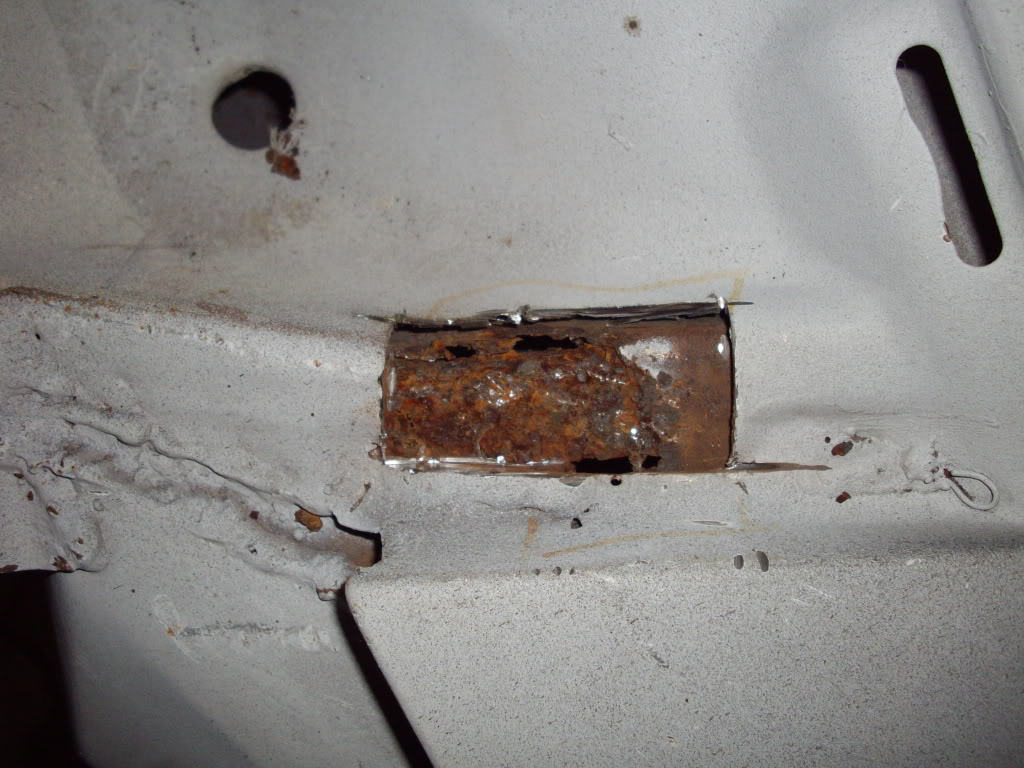
is stopped there as i have to make the cut a lot bigger as it not only goes in to the plenium but in to the cab aswell
 a few pin holes on top and a nightmare underneth
#158
_Kush_
-
- Guests
Posted 06 July 2011 - 08:02 PM
I had to make that section from scratch and it took 3 hours!
Nial8r you are a bloody crybaby! Hahahaha!!!!

#159
_Liam_
-
- Guests
Posted 06 July 2011 - 08:03 PM
Oh, man up! Both of you!
I had to make that section from scratch and it took 3 hours!
Nial8r you are a bloody crybaby! Hahahaha!!!!
They are both lucky... At least some of the original metal is there in the first place.
#160
_nial8r_
-
- Guests
Posted 06 July 2011 - 08:25 PM
 and i guess i will find out how much more worse it is when i throw the grinder at it tomorrow
#161
-
- Members
-
- 706 posts
Forum Fixture
- Name:Reverse of username
- Location:Sydney
- Car:1976 LX L32 SL/R
- Joined: 21-May 07
Posted 06 July 2011 - 11:47 PM

#162
-
- Members
-
- 706 posts
Forum Fixture
- Name:Reverse of username
- Location:Sydney
- Car:1976 LX L32 SL/R
- Joined: 21-May 07
Posted 08 July 2011 - 06:36 PM
This was what I started with today. Nasty bit of factory rust there.
 SLR_05.jpg 223.48K
2 downloads
SLR_05.jpg 223.48K
2 downloadsSo I chopped it out as best I could.....
SLR_14.jpg 223.19K
1 downloads...and figured I would leave the bottom layer there and repair that one, then plonk on top my salvaged piece from the trusty UC (aren't they great for fixing LX's
 ).
). This is the piece I cut from the said UC....
SLR_18.jpg 197.55K
2 downloadsAnd this is how I will be attaching it, to repair mu trusty LX....
SLR_22.jpg 196.17K
1 downloadsThen I sliced another piece from my good 'ol Mini door that I had stashed down the side of the house. I can't believe that a few years ago I bought a whole running Mini for $50, and I am STILL reaping the rewards from that score
SLR_23a.jpg 76.8K
3 downloadsAnd i welded that sucker in place, then ground those welds flush, ready for me to plonk the UC bit on top and weld it in.
SLR_29a.jpg 71.8K
1 downloadsThat's as far as I got. More to come.....
#163
_Leakey_
-
- Guests
Posted 08 July 2011 - 06:42 PM
#164
-
- Members
-
- 706 posts
Forum Fixture
- Name:Reverse of username
- Location:Sydney
- Car:1976 LX L32 SL/R
- Joined: 21-May 07
Posted 08 July 2011 - 06:50 PM
 How's that console btw ;-)
This was the under side from my awesome UC (that I chopped to bits)
Just the one teeny weeny hole, as opposed to one teeny weeny bit of solid metal
SLR_20.jpg 200.64K
2 downloads
#167
-
- Members
-
- 706 posts
Forum Fixture
- Name:Reverse of username
- Location:Sydney
- Car:1976 LX L32 SL/R
- Joined: 21-May 07
Posted 12 July 2011 - 06:30 PM
But in pics it can look shite. Ii'm going to finish this one off tomorrow, plus.... Mick, aka lxsstorana, has kindly supplied a LH side front guard to eith use to repair mine, or repair for use itself. I'll tackle this tomorrow too. can't wait! MASSIVE THANKS MICK.... when i put them both next to eachother this arvo, I knew I had sorted that problem in one way or another!

Next update tomorrow night
#168
-
- Members
-
- 2,499 posts
Forum Fixture
- Name:Mick
- Location:Eastwood, Sydney
- Car:SS Hatchback
- Joined: 23-March 06
Posted 12 July 2011 - 09:14 PM
Keep on welding and grinding (you're winning the war)

#169
-
- Members
-
- 706 posts
Forum Fixture
- Name:Reverse of username
- Location:Sydney
- Car:1976 LX L32 SL/R
- Joined: 21-May 07
Posted 01 August 2011 - 10:33 PM
Finished welding up the repair to the passenger side windscreen area. Came up well and I know there is no rust or holes anywhere in that area now.
SLR_06.jpg 197.41K
3 downloadsThen I got to work on my passenger side guard. First I un-rolled the lip, and took it back to original.
SLR_02.jpg 196.33K
2 downloads
SLR_04.jpg 204.84K
1 downloadsThen I chopped out the very nasty bottom corner where it had been hacked badly for a front spoiler. It isn't called a "spoiler" for nothing!
SLR_03.jpg 200.61K
1 downloads
Then, thanks to (lxsstorana) Mick and the guard he sourced for me
, I cut a decent matching piece and welded it into place.
The extra welds there were pin holes and the like, that needed repairing.
That's about as far as I have gone with that guard. The rest of it is quite alright.
Then I went back to work after my 1 month break. It was a sad day.....

Since then I have been working on getting it back on 4 wheels. I have stripped the front subframe that came from (LH SLR 3300) Matt, and given it the RANEX once over. How good is that stuff huh? I have been using it for a few years, and had a lot of trouble buying some more just recently.

Then I POR15'd it, and while it was tacky, I gave it a dust of satin black. I love the look that gives, and I love the protection of POR15.

I've got a full subframe rebuild kit coming, including bushes, joints, etc.... and a subframe mount kit. I figured that since the front end is all sorted, I can slip the finished subframe in and continue working backward on the car. The bay will be primed and painted later on with the rest of the car.

Sadly, I don't have a large shed to spread out and leave the car in. I gotta be caring and sharing with the missus, and let her have half the garage. That's why it's best I get it rolling again.
More to come, sometime soon.
Edited by notna, 01 August 2011 - 10:36 PM.
#170
-

- Members
-
- 982 posts
Forum Fixture
- Name:Craig
- Location:Canberra
- Car:Should have gone with Palais...
- Joined: 08-December 10
Posted 01 August 2011 - 11:47 PM
Indeed I was enjoying this so much that I totally forgot about the electric wok I had filled with some water to loosen up tonight's dinner remnants. I now have a house full of smoke, window wide open on a freezing Canberra night and have totaled a wok! Good thing my bride is away for a few days - I can hear the conversation we will have when she gets home; She says: "Honey, where did you put the wok?" I reply: "Umm, it just stopped working and so I threw it out. We'll have to get anew one"
Finally, please keep posting your efforts with your front suspension - I too am attempting this now and somewhat greedily I say that I would really profit from your experience with this part of the build. I have it out and mostly disassembled, the K Frame and lower wishbones arms in nice black shiny paint but I have to take apart the upper wishbones - think I need to visit a suspension shop in order to have the existing bushes pressed out and some new ones pressed in... So (like you), I have to install the suspension re-build kit and later the mounting kit when the K-frame goes back in - from what I have read here the re-fitting of the K-frame is an awful job for which one needs to retain their patience and their ha-ha! Time will tell I guess?
All the best and cheers, TB
#171
-
- Members
-
- 706 posts
Forum Fixture
- Name:Reverse of username
- Location:Sydney
- Car:1976 LX L32 SL/R
- Joined: 21-May 07
Posted 02 August 2011 - 10:22 AM
from what I have read here the re-fitting of the K-frame is an awful job for which one needs to retain their patience and their ha-ha!
LOL @ your wok! It went out in the best way possible.... while you were distracted by Toranas
When I dropped my K-frame out, I literally dropped it!
It slid off my jack while I was lowering it, and BOOM.... hit the floor. It was then I realised that it's too damn heavy to work with, in a home garage, in 1 piece. I plan on mounting the bare K-frame back into my car, and then building the entire front end "in the car". I am yet to strip my old K-frame. The control arms, sway bar, steering rack etc are all good. It was the actual K-frame that was 'ratus shitus'. I will strip the old and clean / paint everything, and refit those bits to the new one in the car. Will definitely let you know how it goes.
#172
-

- Members
-
- 10,969 posts
Oh My, Don't you post alot
- Name:Brad
- Location:Farrrrrr North Qld
- Car:1975 LH SL/R 5000, 1967 Morris Cooper S, E36 BMW, Toyota Corolla, Isuzu DMax
- Joined: 24-March 11
Posted 02 August 2011 - 12:45 PM
#173
_nial8r_
-
- Guests
Posted 02 August 2011 - 01:50 PM

#174
_mick74lh_
-
- Guests
Posted 02 August 2011 - 09:16 PM
I guess you can do the k-frame either way. I assembled mine first and then had 2 people help putting it in, but theres no reason why you couldn't assemble it attached to the car once you've got the new bushes pressed into the control arms.
#175
-
- Members
-
- 706 posts
Forum Fixture
- Name:Reverse of username
- Location:Sydney
- Car:1976 LX L32 SL/R
- Joined: 21-May 07
Posted 21 August 2011 - 05:53 PM
Started to strip down my old front end. The K frame is bent, which is why I bought the replacement.
SML_40.jpg 216.55K
1 downloadsEverything else is OK, well so I thought.....How does a coil spring snap like that??
SML_51.jpg 231.44K
1 downloadsThen I started to round up all the bots and bits. I dug out containers of Torana bolts I have had for 20 years, and then sorted those out with the ones from this SL/R. I plan on getting everything silver zinc plated. On previous restos I have used gold zinc, and meticulously wire wheeled each nut and bolt prior to sending them off for plating. This time I thought wire wheeling everything is a bit much, but you still need to clean off old paint and crud otherwise the plating looks crap. Today I I dunked these into a big tin of paint stripper, and shook them around for 30 mins. Then I added some petrol and continued shaking.
SML_47.jpg 225.91K
1 downloadsAfter a while I dumped them out in a big tray and gave them a blast with a high pressure water cleaner.
SML_55.jpg 244.86K
3 downloadsThey cleaned up really well and will only need a very light lick on the wire wheel at the most.
Will send them and lots of other bits off soon for plating. I have a place in Smithfield that does a ripper job.
More to come.....


1 user(s) are reading this topic
0 members, 1 guests, 0 anonymous users

