
great work anton,
keep at it mate,its coming along real good.
did that same disc cut through my finger once.
cheers craig.


PROJECT PAPAYA - A VERY FRUITY RESTO THREAD
Started by
notna
, Jul 27 2010 11:14 PM
703 replies to this topic
#177
 _nial8r_
_nial8r_
-

- Guests
Posted 21 August 2011 - 06:34 PM
they came up clean Anton, like you said better than sitting there hitting each of them one by one for hrs on end. i will keep this idea in mind when the time comes 
#178
notna
-
- Members
-

- 706 posts
Forum Fixture
- Name:Reverse of username
- Location:Sydney
- Car:1976 LX L32 SL/R
- Joined: 21-May 07
Posted 22 August 2011 - 08:11 AM
Safety glasses are a good idea Lee. I started doing this with none on, and when that first bit of paint stripper sloshed out of the tin, I was like 
Question..... How do you press out the lower control arm bushes? The ball joints I can understand, but the bushes...??
Also, is it correct that the upper ball joints were riveted in, and you drill out these rivets to remove them?
 049.jpg 114.32K
3 downloads
049.jpg 114.32K
3 downloads
Also, just to show you some dodgy stuff that has been done over the years on this car...... This is the bent part of the K frame. It actually cracked the metal, which some bright spark put silicone over as a way of repairing it. Damn that silicone would have to be tough stuff to hold that together!!!
043.jpg 100.59K
3 downloads
Any scrap metal merchants in Sydney want this and a few guards? I don't want it hanging around.......
Question..... How do you press out the lower control arm bushes? The ball joints I can understand, but the bushes...??
Also, is it correct that the upper ball joints were riveted in, and you drill out these rivets to remove them?
049.jpg 114.32K
3 downloadsAlso, just to show you some dodgy stuff that has been done over the years on this car...... This is the bent part of the K frame. It actually cracked the metal, which some bright spark put silicone over as a way of repairing it. Damn that silicone would have to be tough stuff to hold that together!!!
043.jpg 100.59K
3 downloadsAny scrap metal merchants in Sydney want this and a few guards? I don't want it hanging around.......
#179
_nzstato_
_nzstato_
-
- Guests
Posted 22 August 2011 - 08:22 AM
Bushes can be taken out with a hefty hammer and a bit of anger. Or can be set in a press and braced so as to not bend the A arm. You are correct with the rivets, drill them out and whack the ball joint with a hammer to remove.
Edited by nzstato, 22 August 2011 - 08:22 AM.
#180

 View Garage
Posted 22 August 2011 - 08:30 AM
Don't use a hammer to get the bushes out, you will definitely bend the arms! Dig through the scrap bin for enough pieces of steel to support everything in the press without bending, I use pieces of pipe (even exhaust pipe will do) cut to length and in half lengthways around the bushes inside the arms. To press from the inside out, use a solid piece of pipe in between the two bushes with a suitable bolt through the other end bush to act on it.
You can generally get at all of the top ball joint rivet heads with an angle grinder, quicker and easier than drilling (and its not like you need to look after the old ball joint). Again support everything nicely to punch the remains of the old rivets out so you don't bend the arm.
You can generally get at all of the top ball joint rivet heads with an angle grinder, quicker and easier than drilling (and its not like you need to look after the old ball joint). Again support everything nicely to punch the remains of the old rivets out so you don't bend the arm.
#181
_nial8r_
_nial8r_
-
- Guests
Posted 22 August 2011 - 08:50 AM
haha the old paint stripper in the eyes trick hey. copped it once and wasnt nice, it burns enough just getting it on your skin 
#182
notna
-
- Members
-
- 706 posts
Forum Fixture
- Name:Reverse of username
- Location:Sydney
- Car:1976 LX L32 SL/R
- Joined: 21-May 07
Posted 22 August 2011 - 09:52 AM
Ah yea... what about the TOP control arm bushes??? How on Earth are they removed, and fitted for that matter??
#183
_lx77slr5k_
_lx77slr5k_
-
- Guests
Posted 22 August 2011 - 12:27 PM
nice work mate coming along nicely. I just did the front end on mine i found to get the top bushes out loosen up if with a air chisel then grabbed a big set of multis and spin the tappered metal end and they sorta unscrewed they came out pretty easy to put the new ones in i got abit of 1 1/2'' pipe on the control arm side and 1 3/4'' pipe on the new tappered bit put in the vice and tightened just gotta make sure it goes in straight mine went in pretty easy. As for the other end im strugglen with as the bolts gotta be in there so if u have any ideas let me know
cheers Carl
cheers Carl
#184
Posted 22 August 2011 - 02:11 PM
Top arm bushes you just need one piece of pipe with a section out of the length of it to wrap around the pivot and avoid bending the arm. Use the pin itself to press the bushes out - first one is a bit of a pain as the rubber moves a long way (and will sometimes pop the rubber out of the bush shell), second one remove the pin and put a decent washer on it to contact the shell before pressing it out
#185
notna
-
- Members
-
- 706 posts
Forum Fixture
- Name:Reverse of username
- Location:Sydney
- Car:1976 LX L32 SL/R
- Joined: 21-May 07
Posted 22 August 2011 - 03:01 PM
Bit of heat ok?
#186
StephenSLR
-
- Members
-
- 6,717 posts
Oh My, Don't you post alot
- Name:Stephen
- Location:Sydney
- Car:1976 LX SL/R
- Joined: 12-November 05
Posted 30 August 2011 - 03:40 PM
With the lower control arms, where the stabiliser bar pin goes through, if the hole is worn to a keyhole shape, how do you fix this?
Can weld be used to get it back to circular?
s
Can weld be used to get it back to circular?
s
#187
Posted 30 August 2011 - 06:55 PM
notna I've heard of people burning out rubber bushes then collapsing the shell, I don't see how heat would damage anything other than the bushes which you are replacing - may make it a little easier to bend the steel arms if you use too much but you have to be careful either way so not really an issue.
StephenSLR welding it up would be my choice, ideally the steel pin isn't supposed to make contact, only the bushes are.
StephenSLR welding it up would be my choice, ideally the steel pin isn't supposed to make contact, only the bushes are.
#188
rodomo
-

- Members
-
- 18,063 posts
To advertise here, call 13TORANA
- Name:R - O - B Dammit!
- Location:Way out west of Melbourne Awstraylya
- Joined: 10-December 05
Posted 30 August 2011 - 10:22 PM
StephenSLR welding it up would be my choice, ideally the steel pin isn't supposed to make contact, only the bushes are.
Bits and pieces like this will wear if altered from standard, eg. lowering, as the parts are working at different angles as per originally designed. If your going to weld the hole and remanufacture it, I would look at the "new" angle of the components and alter the hole to suit.
#189
TerrA LX
-

- Members
-
- 14,241 posts
Fulcrum Fixture
- Location:Sid 'n' knee
- Joined: 31-May 06
Posted 31 August 2011 - 12:45 AM
With the lower control arms, where the stabiliser bar pin goes through, if the hole is worn to a keyhole shape, how do you fix this?
Can weld be used to get it back to circular?
s
Do ya mean the holes are flogged out on the control arms where the sway bar locates?
Weld washers and thick steel sleeves (pipe) where they will clear onto the control arm and ensure the bar stays tight.
#190
StephenSLR
-
- Members
-
- 6,717 posts
Oh My, Don't you post alot
- Name:Stephen
- Location:Sydney
- Car:1976 LX SL/R
- Joined: 12-November 05
Posted 26 September 2011 - 02:28 PM

If you haven't done so already, don't forget a drain hole for that battery tray, otherwise the plastic battery tray won't sit in right.
s
#191
notna
-
- Members
-
- 706 posts
Forum Fixture
- Name:Reverse of username
- Location:Sydney
- Car:1976 LX L32 SL/R
- Joined: 21-May 07
Posted 28 October 2011 - 05:25 PM
Seems like forever since i have done an update. Rest assured, work hasn't stopped! I've been chiseling away slowly at 2 key areas. 1 is the front end rebuild and 2 is the engine bay. The intention is to fully rebuild the front end, prep and paint the bay, install the front end so that it is back on all 4 wheels, then spin it around in my garage so that the rear is facing out. Tight space and limited room means it will be easier to do repairs to the rear in this position. I have a small sill repair to weld and 1 rear 1/4 lower section to replace.
Anyway, this is where I have been putting in my time recently....
Firstly, I did end up hammering out the old bushes. They were rooted afterall, so some swift blows with a BFH wasn't really going to make anything worse! They came out fairly easily.
Then I wire wheeled all the front end components, so they were super clean and ready for some POR chassiscoat. Here, one is prepped and the other not. You can see the difference.
SDC13005.jpg 119.47K
3 downloads
Then I sprayed them with satin black chassiscoat, and hung them out to dry.
SDC13013.jpg 135.99K
1 downloads
Once they had dried adequately, I sent them off to a mechanic to have new bushes and ball joints pressed in properly. Cost $99 for this..... but really, what is the alternative? BFH was never an option to install them all!
SDC13038.jpg 151.57K
1 downloads
They have come up really well. I'm not after concourse with all of this kind of stuff, because the type of person I am will end up never driving the car if it is more than a streetable resto. Still, they are pretty shmick.
SDC13040.jpg 139.29K
1 downloads
I have also progressed the engine bay. It was stripped back to bare metal, then etch primed. I chose to use seam sealer in the factory places, to a factory finish (ie: bloody messy). I also chose to seam seal in places where I think seams should be sealed. I used sikaflex in a caulking gun for that, and made it uber neat. You can sorta tell from the pic. After this I 2K hi-fill primed the bay. I have given it plenty, so I can wet sand it back to something very nice and flat. I want a standard appearance here.... so no smoothing, shaving, filling etc. All as it was from the factory
SDC13033.jpg 79.92K
3 downloads
Soon I will give the bay some colour and install the rebuild front end. That's what you can expect next.... I'm just not sure when
Anyway, this is where I have been putting in my time recently....
Firstly, I did end up hammering out the old bushes. They were rooted afterall, so some swift blows with a BFH wasn't really going to make anything worse! They came out fairly easily.
Then I wire wheeled all the front end components, so they were super clean and ready for some POR chassiscoat. Here, one is prepped and the other not. You can see the difference.
SDC13005.jpg 119.47K
3 downloadsThen I sprayed them with satin black chassiscoat, and hung them out to dry.
SDC13013.jpg 135.99K
1 downloadsOnce they had dried adequately, I sent them off to a mechanic to have new bushes and ball joints pressed in properly. Cost $99 for this..... but really, what is the alternative? BFH was never an option to install them all!
SDC13038.jpg 151.57K
1 downloadsThey have come up really well. I'm not after concourse with all of this kind of stuff, because the type of person I am will end up never driving the car if it is more than a streetable resto. Still, they are pretty shmick.
SDC13040.jpg 139.29K
1 downloadsI have also progressed the engine bay. It was stripped back to bare metal, then etch primed. I chose to use seam sealer in the factory places, to a factory finish (ie: bloody messy).
I also chose to seam seal in places where I think seams should be sealed. I used sikaflex in a caulking gun for that, and made it uber neat. You can sorta tell from the pic. After this I 2K hi-fill primed the bay. I have given it plenty, so I can wet sand it back to something very nice and flat. I want a standard appearance here.... so no smoothing, shaving, filling etc. All as it was from the factory
SDC13033.jpg 79.92K
3 downloadsSoon I will give the bay some colour and install the rebuild front end. That's what you can expect next.... I'm just not sure when
#192
notna
-
- Members
-
- 706 posts
Forum Fixture
- Name:Reverse of username
- Location:Sydney
- Car:1976 LX L32 SL/R
- Joined: 21-May 07
Posted 28 October 2011 - 05:30 PM
A couple more pics for you..... we all love pics after-all.
Bay in hi-fill primer.....
SDC13035.jpg 74.3K
2 downloads
More bay in primer....
SDC13036.jpg 84.99K
2 downloads
Bay in hi-fill primer.....
SDC13035.jpg 74.3K
2 downloadsMore bay in primer....
SDC13036.jpg 84.99K
2 downloads
#193
_nial8r_
_nial8r_
-
- Guests
Posted 28 October 2011 - 06:03 PM
wondered what happened to you Anton  but at least you have progressed with your build and all quality work too. looking forward to the next lot of pic's
but at least you have progressed with your build and all quality work too. looking forward to the next lot of pic's
#194
notna
-
- Members
-
- 706 posts
Forum Fixture
- Name:Reverse of username
- Location:Sydney
- Car:1976 LX L32 SL/R
- Joined: 21-May 07
Posted 29 October 2011 - 08:01 PM
Been massively busy with work. Just never get a chance to bludge and browse the forum! I'll have to make more effort! 
#195
notna
-
- Members
-
- 706 posts
Forum Fixture
- Name:Reverse of username
- Location:Sydney
- Car:1976 LX L32 SL/R
- Joined: 21-May 07
Posted 06 November 2011 - 10:18 PM
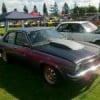
Bought this bad boy today..... figured it was going to be years before I got the Project Papaya on the road, and I was really itching to get into a V8 again ..... it's only been 18 frocking years!!!!!!
SS Commo.jpg 127.71K
1 downloads
So I'm going to put the SL/R to the side for a lil bit until motivation returns. In the meantime, the SS will keep me smiling!
SS Commo.jpg 127.71K
1 downloadsSo I'm going to put the SL/R to the side for a lil bit until motivation returns. In the meantime, the SS will keep me smiling!
#196
hanra
-

- Members
-
- 11,033 posts
Oh My, Don't you post alot
- Name:Brad
- Location:Farrrrrr North Qld
- Car:1975 LH SL/R 5000, 1967 Morris Cooper S, E36 BMW, Toyota Corolla, Isuzu DMax
- Joined: 24-March 11
Posted 06 November 2011 - 10:30 PM
I hope you dont stop for to long Anton, I dont want to overtake you!
#197
notna
-
- Members
-
- 706 posts
Forum Fixture
- Name:Reverse of username
- Location:Sydney
- Car:1976 LX L32 SL/R
- Joined: 21-May 07
Posted 15 November 2011 - 06:59 PM
Well I picked up the SS last Friday, and haven't got rid of the smile yet Why exactly, did it take me 17 years to get back into a V8?? Man they are addictive!@!
Why exactly, did it take me 17 years to get back into a V8?? Man they are addictive!@!
#198
notna
-
- Members
-
- 706 posts
Forum Fixture
- Name:Reverse of username
- Location:Sydney
- Car:1976 LX L32 SL/R
- Joined: 21-May 07
Posted 15 November 2011 - 07:05 PM
Oh and for now...... this is my SL/R..... It's definitely not a quitting action, but I had to get some priorities right or else it was OR ELSE! Already had one mate say "sell it to me".... but it definitely aint for sale. I think I shall keep it for my post divorce hobby
IMG_1160.JPG 144.29K
2 downloads
Already had one mate say "sell it to me".... but it definitely aint for sale. I think I shall keep it for my post divorce hobby
IMG_1160.JPG 144.29K
2 downloads
#199
_bully_
_bully_
-
- Guests
Posted 16 November 2011 - 08:04 AM
HI Anton
Great work, it is all worth it when your cruising around. Thats when you have a smile on your face, new cars are great but old Toranas are GREATER!!!
Thought I would ask, have you still got the K frame out of the UC?
Keep up the great work!!!
Great work, it is all worth it when your cruising around. Thats when you have a smile on your face, new cars are great but old Toranas are GREATER!!!
Thought I would ask, have you still got the K frame out of the UC?
Keep up the great work!!!
#200
_nial8r_
_nial8r_
-
- Guests
Posted 16 November 2011 - 10:54 AM
nice looking ride there mate, the newer V8's sure do move along at a nice rate  when i get the itch i jump in the VYSS Manual and it has no trouble leaving rubber on the road from the 245/35/20's :D i had a test drive in a mate VE SV6 and the power that thing put out was a bit of a suprise
when i get the itch i jump in the VYSS Manual and it has no trouble leaving rubber on the road from the 245/35/20's :D i had a test drive in a mate VE SV6 and the power that thing put out was a bit of a suprise


1 user(s) are reading this topic
0 members, 1 guests, 0 anonymous users

