
Oh man that sux.....


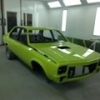
PROJECT PAPAYA - A VERY FRUITY RESTO THREAD
Started by
notna
, Jul 27 2010 11:14 PM
703 replies to this topic
#201

hanra
-

- Members
-

- 11,033 posts
Oh My, Don't you post alot
- Name:Brad
- Location:Farrrrrr North Qld
- Car:1975 LH SL/R 5000, 1967 Morris Cooper S, E36 BMW, Toyota Corolla, Isuzu DMax
- Joined: 24-March 11
Posted 16 November 2011 - 11:06 AM
#202
lxsstorana
-

- Members
-
- 2,499 posts
Forum Fixture
- Name:Mick
- Location:Eastwood, Sydney
- Car:SS Hatchback
- Joined: 23-March 06
Posted 18 November 2011 - 01:59 PM
Congratulations on the new car Anton. 
Good to see work progressing on the SLR, as the body work is a pain in the arrrsss..... (you know),
Cheers Mick.
Good to see work progressing on the SLR, as the body work is a pain in the arrrsss..... (you know),
Cheers Mick.
Edited by lxsstorana, 18 November 2011 - 01:59 PM.
#203
_2bLX_
_2bLX_
-

- Guests
Posted 25 November 2011 - 09:15 PM
Love the build, hope you can get back to it soon
#204
notna
-
- Members
-
- 706 posts
Forum Fixture
- Name:Reverse of username
- Location:Sydney
- Car:1976 LX L32 SL/R
- Joined: 21-May 07
Posted 17 March 2012 - 05:20 PM
I'm baaaaaack!!!
Amazing what a TV show can do for motivation!
Yesterday I caught an episode of Monster Garage by chance. I wouldn't normally be home or watching TV at that particular time of day, however.... I was. The episode was this one
where they seriously chopped a 54 Chevy. Those old guys know their stuff... I was very impressed.
Anyway, I whipped the cover off my SL/R and blew off the cobwebs.... broke out the paint stripper and got into it. Bloody messy and smelly stuff that paint stripper, but I can't afford blasting for this project and I definitely want it bare metal. Got one guard back to metal.... it was a killer. Someone had sprayed some wicked primer on it, and it took a few goes with the stripper to remove it.
 SDC13224.jpg 124.52K
2 downloads
SDC13224.jpg 124.52K
2 downloads
SDC13229.jpg 182.28K
1 downloads
SDC13235.jpg 114.46K
2 downloads
More to come... but you get the idea right!
Amazing what a TV show can do for motivation!
Yesterday I caught an episode of Monster Garage by chance. I wouldn't normally be home or watching TV at that particular time of day, however.... I was. The episode was this one
where they seriously chopped a 54 Chevy. Those old guys know their stuff... I was very impressed.
Anyway, I whipped the cover off my SL/R and blew off the cobwebs.... broke out the paint stripper and got into it. Bloody messy and smelly stuff that paint stripper, but I can't afford blasting for this project and I definitely want it bare metal. Got one guard back to metal.... it was a killer. Someone had sprayed some wicked primer on it, and it took a few goes with the stripper to remove it.
SDC13224.jpg 124.52K
2 downloads
SDC13229.jpg 182.28K
1 downloads
SDC13235.jpg 114.46K
2 downloadsMore to come... but you get the idea right!
Edited by notna, 17 March 2012 - 05:21 PM.
#205
hanra
-
- Members
-
- 11,033 posts
Oh My, Don't you post alot
- Name:Brad
- Location:Farrrrrr North Qld
- Car:1975 LH SL/R 5000, 1967 Morris Cooper S, E36 BMW, Toyota Corolla, Isuzu DMax
- Joined: 24-March 11
Posted 17 March 2012 - 06:37 PM
Excellent!!!!! Best news I've heard all week!!! Hook in Anton! Good to see you back at it!
#206
_toranatime_
_toranatime_
-
- Guests
Posted 17 March 2012 - 07:02 PM
one of my favourite monter garages, great for motivation  great to see your back into it
great to see your back into it
#207
notna
-
- Members
-
- 706 posts
Forum Fixture
- Name:Reverse of username
- Location:Sydney
- Car:1976 LX L32 SL/R
- Joined: 21-May 07
Posted 18 March 2012 - 06:16 PM
Inspired by yesterday's progress... the first in what, 6 months??... I took to the other front guard today for a bit of the same.
Unlike the driver side guard, which was a $50 eBay special, the passenger side guard is the original, but with a few more layers of paint.
017.JPG 203.72K
2 downloads
020.JPG 185.57K
1 downloads
Amazing what you find lurking under paint. This not so pretty repair done some time ago will need tidying up!
027.JPG 190.85K
1 downloads
And here are both guards fully stripped. Yes, I took to the driver side guard again today to make sure it was 100% right. Both came up as clean as if they were blasted. Very pleased with the result.
037.JPG 248.88K
2 downloads
I tell you what though.... paint stripper is damn nasty stuff! I didn't realise, but while I was working I must have got some on my arm. When I was cleaning up, I thought..... damn my arm hurts, and I found this nice burn....
040.JPG 86.67K
4 downloads
That's enough for now.... maybe more next weekend. The 4 doors I have all came off a donor car. They are mint, and original (thin) paint.... so should be much easier to strip!
Unlike the driver side guard, which was a $50 eBay special, the passenger side guard is the original, but with a few more layers of paint.
017.JPG 203.72K
2 downloads
020.JPG 185.57K
1 downloadsAmazing what you find lurking under paint. This not so pretty repair done some time ago will need tidying up!
027.JPG 190.85K
1 downloadsAnd here are both guards fully stripped. Yes, I took to the driver side guard again today to make sure it was 100% right. Both came up as clean as if they were blasted. Very pleased with the result.
037.JPG 248.88K
2 downloadsI tell you what though.... paint stripper is damn nasty stuff! I didn't realise, but while I was working I must have got some on my arm. When I was cleaning up, I thought..... damn my arm hurts, and I found this nice burn....
040.JPG 86.67K
4 downloadsThat's enough for now.... maybe more next weekend. The 4 doors I have all came off a donor car. They are mint, and original (thin) paint.... so should be much easier to strip!
#208
_Liam_
_Liam_
-
- Guests
Posted 18 March 2012 - 06:51 PM
Nice repair Anton... Not up to your usual standard... But I'm sure you're just rusty.
#209
notna
-
- Members
-
- 706 posts
Forum Fixture
- Name:Reverse of username
- Location:Sydney
- Car:1976 LX L32 SL/R
- Joined: 21-May 07
Posted 18 March 2012 - 06:57 PM
Oi! That's not MY repair!!! I'd never show that to anyone if I did it!!!!
#210
lxsstorana
-
- Members
-
- 2,499 posts
Forum Fixture
- Name:Mick
- Location:Eastwood, Sydney
- Car:SS Hatchback
- Joined: 23-March 06
Posted 18 March 2012 - 06:58 PM
Good to see you're back into it.
You've done more than me in the last 6 months.
You've done more than me in the last 6 months.
#211
_mick74lh_
_mick74lh_
-
- Guests
Posted 18 March 2012 - 07:12 PM
Awesome. Loved your work so far on this. I'm keen to see more progress cos you were just doing such a nice job.
#212
_sunburst73-xu1_
_sunburst73-xu1_
-
- Guests
Posted 18 March 2012 - 07:27 PM
Bout time you pulled your finger out.I was enjoying this build until you packed it in last year.Now you have the cover off,leave it off and do some work.
#213
_Liam_
_Liam_
-
- Guests
Posted 18 March 2012 - 07:51 PM
Haha just kidding mate. Good to have you back.
#214
notna
-
- Members
-
- 706 posts
Forum Fixture
- Name:Reverse of username
- Location:Sydney
- Car:1976 LX L32 SL/R
- Joined: 21-May 07
Posted 18 March 2012 - 08:33 PM
Looks like someone slapped a band-aid on it! I could probably pick it off and check out the wound underneath 
I could probably pick it off and check out the wound underneath
Edited by notna, 18 March 2012 - 08:34 PM.
#215
308 Sunbird
-

- Members
-
- 975 posts
Forum Fixture
- Name:Stuart
- Location:Melbourne
- Car:SS Hatch, 308 Sunbird sedan-Improved Prod racer (sold), HZ Kingy wagon
- Joined: 20-November 10
Posted 21 March 2012 - 09:31 AM
Glad to see you back Anton. I was wondering how long you could resist the Torana temptation!
6 months- not a bad effort.
6 months- not a bad effort.
#216
notna
-
- Members
-
- 706 posts
Forum Fixture
- Name:Reverse of username
- Location:Sydney
- Car:1976 LX L32 SL/R
- Joined: 21-May 07
Posted 22 March 2012 - 02:05 PM
mmhmm... and now I have the itch again... and not just from that nasty paint stripper burn!!
#217
hanra
-
- Members
-
- 11,033 posts
Oh My, Don't you post alot
- Name:Brad
- Location:Farrrrrr North Qld
- Car:1975 LH SL/R 5000, 1967 Morris Cooper S, E36 BMW, Toyota Corolla, Isuzu DMax
- Joined: 24-March 11
Posted 22 March 2012 - 04:37 PM
Is that Americas Greatest Superhero in your picture? Who could it beee.... believe it or not its just me....
#218
notna
-
- Members
-
- 706 posts
Forum Fixture
- Name:Reverse of username
- Location:Sydney
- Car:1976 LX L32 SL/R
- Joined: 21-May 07
Posted 22 March 2012 - 07:37 PM
Greatest American Hero.... lol... so bad it's good!!
#219
hanra
-
- Members
-
- 11,033 posts
Oh My, Don't you post alot
- Name:Brad
- Location:Farrrrrr North Qld
- Car:1975 LH SL/R 5000, 1967 Morris Cooper S, E36 BMW, Toyota Corolla, Isuzu DMax
- Joined: 24-March 11
Posted 22 March 2012 - 07:56 PM
Man that show is so old...!!! Surprising it's not back on tv?
#220
notna
-
- Members
-
- 706 posts
Forum Fixture
- Name:Reverse of username
- Location:Sydney
- Car:1976 LX L32 SL/R
- Joined: 21-May 07
Posted 01 April 2012 - 05:28 PM
A little more progress this weekend.
I have decided to take a different approach to this resto. I like to do things right. Perfection is a personality trait that I enjoy applying to things that I love. Sometimes though, it can be a real PAIN IN THE ASS, because my constant quest for making things right seems to play on my mind continuously, and it gets to me. Rather than look at the whole car, and dwell on everything that needs the resto treatment, I am now taking much smaller areas and turning them into mini-restos. Once I have completed a mini-resto, I can move onto the next with a sense of satisfaction.
The current mini-resto is the front guards. You would have seen that I stripped them bare already, and now I am finishing them off to a high level of detail. The driver's side was first. A small rust repair, some minor panel work, file finishing, etc.... Then when I have more time, etch prime, prime, blocking back and prime again, ready for colour. Hopefully that can be done next weekend.
First the rust hole.
SML_01.jpg 67.26K
3 downloads
I cut out the small section...
SML_02.jpg 72.13K
1 downloads
...and also the small support piece below ir. You can see there it is RS...
SML_03.jpg 87.52K
3 downloads
Then I once again took my trusty old Mini Clubman door, and cut some decent metal out for my repair sections.
SML_04.jpg 104.52K
1 downloads
I bent a piece to the right shape and reformed the support piece on the under / back of the guard.
SML_05.jpg 97.41K
2 downloads
Then welded in the repair section on top, and underneath.
SML_06.jpg 92K
4 downloads
Ground it back, and will have to skim fill that one unfortunately.
SML_07.jpg 120.48K
3 downloads
Then I gave the rest of the guard a file finish. There was a small dent in the wheel arch, right on the crease actually, but I tapped it out really nicely and file finished it flat. I gave the whole guard a hit with the file, and was really interested to see all the very minor high and low spots.
SML_08.jpg 107.51K
1 downloads
SML_09.jpg 135.22K
1 downloads
I haven't done a whole lot of file finishing in the past, but after reading some really inspirational threads on this forum, I am picking up some great skills and tips.
Hopefully over easter I can do the same to the other guard, and get them primed. Stay tuned....
I have decided to take a different approach to this resto. I like to do things right. Perfection is a personality trait that I enjoy applying to things that I love. Sometimes though, it can be a real PAIN IN THE ASS, because my constant quest for making things right seems to play on my mind continuously, and it gets to me. Rather than look at the whole car, and dwell on everything that needs the resto treatment, I am now taking much smaller areas and turning them into mini-restos. Once I have completed a mini-resto, I can move onto the next with a sense of satisfaction.
The current mini-resto is the front guards. You would have seen that I stripped them bare already, and now I am finishing them off to a high level of detail. The driver's side was first. A small rust repair, some minor panel work, file finishing, etc.... Then when I have more time, etch prime, prime, blocking back and prime again, ready for colour. Hopefully that can be done next weekend.
First the rust hole.
SML_01.jpg 67.26K
3 downloadsI cut out the small section...
SML_02.jpg 72.13K
1 downloads...and also the small support piece below ir. You can see there it is RS...
SML_03.jpg 87.52K
3 downloadsThen I once again took my trusty old Mini Clubman door, and cut some decent metal out for my repair sections.
SML_04.jpg 104.52K
1 downloadsI bent a piece to the right shape and reformed the support piece on the under / back of the guard.
SML_05.jpg 97.41K
2 downloadsThen welded in the repair section on top, and underneath.
SML_06.jpg 92K
4 downloadsGround it back, and will have to skim fill that one unfortunately.
SML_07.jpg 120.48K
3 downloadsThen I gave the rest of the guard a file finish. There was a small dent in the wheel arch, right on the crease actually, but I tapped it out really nicely and file finished it flat. I gave the whole guard a hit with the file, and was really interested to see all the very minor high and low spots.
SML_08.jpg 107.51K
1 downloads
SML_09.jpg 135.22K
1 downloadsI haven't done a whole lot of file finishing in the past, but after reading some really inspirational threads on this forum, I am picking up some great skills and tips.
Hopefully over easter I can do the same to the other guard, and get them primed. Stay tuned....
#221
torana_nick
-
- Members
-
- 759 posts
Forum Fixture
- Name:Nick
- Location:victoria
- Car:LH Torana Project
- Joined: 11-December 11
Posted 01 April 2012 - 06:01 PM
great project you have going mate, i am enjoying watching some of the repairs you do. keep it up cant wait for more updates.
cheers nick
cheers nick
#222
notna
-
- Members
-
- 706 posts
Forum Fixture
- Name:Reverse of username
- Location:Sydney
- Car:1976 LX L32 SL/R
- Joined: 21-May 07
Posted 01 April 2012 - 06:11 PM
Thanks Nick and thanks to everyone else who comments also. A few encouraging words go a long way.
and thanks to everyone else who comments also. A few encouraging words go a long way.
#223
hanra
-
- Members
-
- 11,033 posts
Oh My, Don't you post alot
- Name:Brad
- Location:Farrrrrr North Qld
- Car:1975 LH SL/R 5000, 1967 Morris Cooper S, E36 BMW, Toyota Corolla, Isuzu DMax
- Joined: 24-March 11
Posted 01 April 2012 - 06:15 PM
The way I approached my build was to start at the rear and work my way forward. Completing section by section.
#224
_nial8r_
_nial8r_
-
- Guests
Posted 01 April 2012 - 06:50 PM
good to see your back in to it Anton, sometimes i wish i hadnt decided on the mods i have done because i would be playing with all the bolt on's , oh well no turning back now.
Keep up the good work
Keep up the good work
#225
notna
-
- Members
-
- 706 posts
Forum Fixture
- Name:Reverse of username
- Location:Sydney
- Car:1976 LX L32 SL/R
- Joined: 21-May 07
Posted 01 April 2012 - 06:53 PM
Thanks Fonzie All your mods will be telling you to "sit on it" I'd say 
Brad, I have tried that approach, but found myself chopping and changing and bouncing all over on different things. A Mini resto is fine because it's so small, but this Torrie is proving to be quite different.
All your mods will be telling you to "sit on it" I'd say Brad, I have tried that approach, but found myself chopping and changing and bouncing all over on different things. A Mini resto is fine because it's so small, but this Torrie is proving to be quite different.
Edited by notna, 01 April 2012 - 06:53 PM.


1 user(s) are reading this topic
0 members, 1 guests, 0 anonymous users

