Jump to content


Floor pan replacement help


  • Please log in to reply
42 replies to this topic

#1 _SnotGobbler_

_SnotGobbler_
  • Guests

Posted 31 October 2010 - 12:46 PM

righty-oh
giving this ago myself...
have traced around the rarespares replacement floor pan and then brought the cut line in about 20mm's. also removed the rusty crap thats just no good

Attached File  floor_hole.jpg   104.08K   56 downloads

so now.. do i just lay the floor pan on top of overlap, weld it to the floor and leave the overlap? which kinda will look tidy from inside but look crap underneath or is there something else i should do?


ie tack weld in place and then cut through both replacement and overlap with 1mm cutting disc so both edges are matching and weld it together (butt weld?)Attached File  P1020332z.jpg   304.64K   20 downloads

Have searched through the forum and found some stuff on replacement floorpans but am stuck on what i should do in the next part
gotta learn how to mig weld now hehe

#2 _Bomber Watson_

_Bomber Watson_
  • Guests

Posted 31 October 2010 - 12:57 PM

I would leave the overlap, stronger. Weld around the inside, then get under and tap the panel in really neat. Then after cleaning it up and priming it underneath run some seam sealer around the edge, shoudl look fine.

Cheers.

#3 wot179

wot179

    Green Eggs and Spam

  • Members
  • PipPipPipPipPipPipPip
  • 6,784 posts
  • Name:Jesus Bloody Christ
  • Location:Sunny Santa Maria
  • Car:Goon
  • Joined: 06-February 09

Posted 31 October 2010 - 01:04 PM

I agree with Bomber.
Dont forget to drill some holes so you can plug weld back to the floorbrace running down the center.

#4 wot179

wot179

    Green Eggs and Spam

  • Members
  • PipPipPipPipPipPipPip
  • 6,784 posts
  • Name:Jesus Bloody Christ
  • Location:Sunny Santa Maria
  • Car:Goon
  • Joined: 06-February 09

Posted 31 October 2010 - 01:06 PM

And check this thread out in detail.
http://www.gmh-toran...opic=46791&st=0

#5 _BATHURST-32D_

_BATHURST-32D_
  • Guests

Posted 31 October 2010 - 05:06 PM

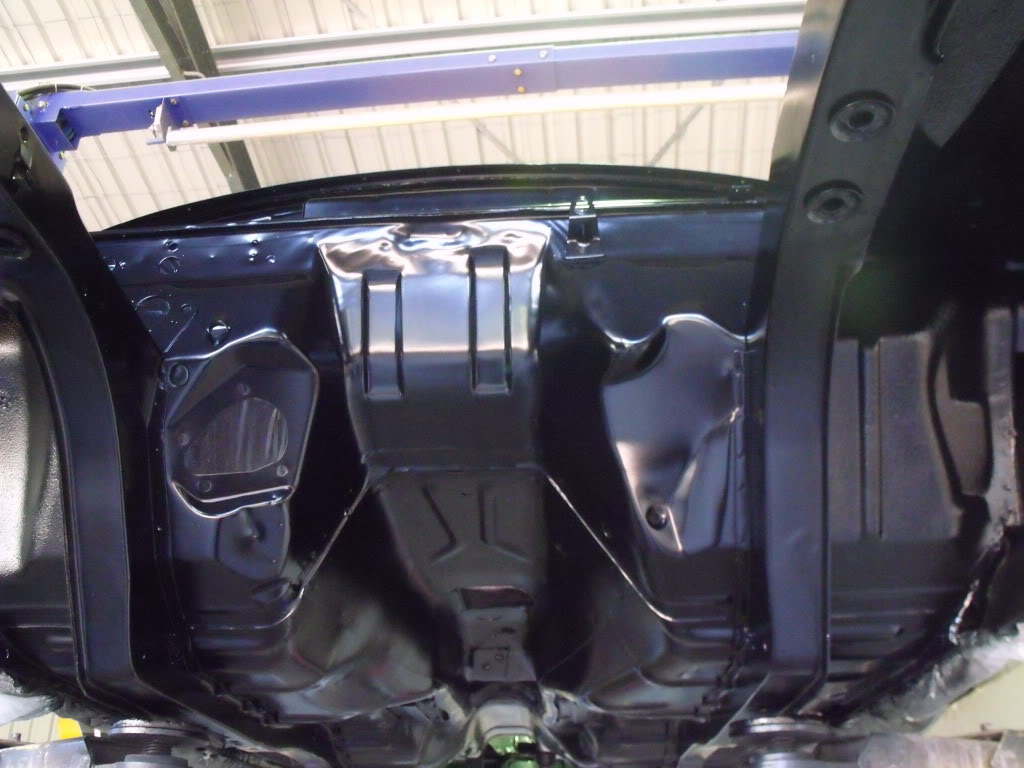
i must disagee 1 would be but joining them, i dont know if these pics of my 71 bathurst floor replacement will help, i have used a 73 full front floor, but it looks orsum

first of i bolted the new floor down then cut about 5mm inside it useing a 1mm cutting disc, then i hard butted them tak welded and the give em heaps of weld, just remember when you do your clean up, no one can see under your carpet so it dont matter if its alittle ruff but under your car you will need to do some grinding and prep work.

i hope these help.
Posted Image
Posted Image
Posted Image
Posted Image
Posted Image
Posted Image
Posted Image
Posted Image
Posted Image
Posted Image

mate i have got cars before that had the pans replaced the way you are talking of doing them and near always there is heaps of rust comming back.
cheers gong

#6 _AquaSLR5000_

_AquaSLR5000_
  • Guests

Posted 31 October 2010 - 05:13 PM

If your car is an SL then do as the boys above have said. If it is an SLR or SS then I would do your option B. But when you drop your new panel into place you will have more than 1mm gap. So, I would trace around your new panel on to the original floor and then cut 1mm inside the traced lines, adjust your new panel to suit your new hole as required making sure of a tight fit.
When panel is ready to weld in stitch weld from inside and make sure you alternate from side to side front to back as you go around. It will look ok from underneath touch up where required. file finish! It takes a lot longer but looks heaps better.

#7 _SnotGobbler_

_SnotGobbler_
  • Guests

Posted 31 October 2010 - 05:35 PM

thanks heaps.. thats just the info i was looking for.
ill try to do it the tight fit and butt weld it way.. then no uglyness underneath and no chance of rust in the overlap
its only an LJ S, but meh, ill give one side a go.. if i screw it up i have a back up panel beater that can fix anything

#8 _markm_

_markm_
  • Guests

Posted 31 October 2010 - 06:43 PM

Bathurst-32D, that last image of yours, the underside looks like a new car would (well better actually) is that the same LJ? Looks like a lot of work has gone into that. How much of it is new floor?

Cheers

i must disagee 1 would be but joining them, i dont know if these pics of my 71 bathurst floor replacement will help, i have used a 73 full front floor, but it looks orsum

first of i bolted the new floor down then cut about 5mm inside it useing a 1mm cutting disc, then i hard butted them tak welded and the give em heaps of weld, just remember when you do your clean up, no one can see under your carpet so it dont matter if its alittle ruff but under your car you will need to do some grinding and prep work.

i hope these help.
Posted Image
Posted Image
Posted Image
Posted Image
Posted Image
Posted Image
Posted Image
Posted Image
Posted Image
Posted Image

mate i have got cars before that had the pans replaced the way you are talking of doing them and near always there is heaps of rust comming back.
cheers gong


#9 TerrA LX

TerrA LX

    Fulcrum Fixture

  • Members
  • PipPipPipPipPipPipPip
  • 14,241 posts
  • Location:Sid 'n' knee
  • Joined: 31-May 06

Posted 31 October 2010 - 06:48 PM

I thought it was illegal to but join structural panels?

#10 _BATHURST-32D_

_BATHURST-32D_
  • Guests

Posted 31 October 2010 - 08:09 PM

only that 73 front part of the floor mate and some of the boot floor aswell, the car is a lc bathurst 71, and i said at the start of my post i used the 73 front floor,,, over all it had more work than most cars we spent 3 weeks on the under floor itself.

terra lx, it is illegal, but only when there is no other form of structer, and in this case he has the rails in the middle.

cheers gong

Edited by BATHURST-32D, 31 October 2010 - 08:11 PM.


#11 _deviot_

_deviot_
  • Guests

Posted 31 October 2010 - 08:30 PM

Bathurst-32D, that last image of yours, the underside looks like a new car would (well better actually) is that the same LJ? Looks like a lot of work has gone into that. How much of it is new floor?

Cheers


Agree, that is amazing.
Three weeks seems worth it when the finish is like that.

Edited by deviot, 31 October 2010 - 08:32 PM.


#12 _Woodsy_

_Woodsy_
  • Guests

Posted 31 October 2010 - 10:15 PM

I dont think it matters if its a S, SL, SLR or a GTR, its YOUR car have some pride in it no matter what model it is.

Edited by Woodsy, 31 October 2010 - 10:15 PM.


#13 _BATHURST-32D_

_BATHURST-32D_
  • Guests

Posted 01 November 2010 - 06:59 AM

thanks
hi woodsy, what we all need to know about and project we take on in life cars trucks bikes houses,,, the better the prep the better the end result

cheers gong

#14 _SnotGobbler_

_SnotGobbler_
  • Guests

Posted 06 November 2010 - 04:18 PM

so ive had a play weld with the old floor pan i cut out earlier.
Not welded panel steel before so heres my 1st attempt.. dont laugh LOL


not too sure what im doing or should be doing. certainly easier welding 2mm steel than panel steel
i think i have the amp right.. its on low and wire feed is pretty close give or take.

so what technique should i be using when welding the replacement in. tack every 40mm, then do i umm stitch (think thats what you call it) weld between the tacks. thats what i tried doing, need more practice.
or just do a full run between the tacks? think i tried it and it was ok, but blew some holes here n there

i can see from my play today that the less gap in the butt weld the better and easier it will weld with no blow throughs

anyway, heres the mess i achieved today.. prob wouldve helped if the metal surface was better and less wind outside

feedback would be appreciated

Attached File  P1020357_01.jpg   220.13K   27 downloads

closera
Attached File  P1020357.jpg   228.47K   13 downloads

underside
Attached File  P1020359.jpg   287.07K   10 downloads

#15 rodomo

rodomo

    To advertise here, call 13TORANA

  • Members
  • PipPipPipPipPipPipPip
  • 18,030 posts
  • Name:R - O - B Dammit!
  • Location:Way out west of Melbourne Awstraylya
  • Joined: 10-December 05

Posted 06 November 2010 - 04:41 PM

What size wire are you using?

#16 _SnotGobbler_

_SnotGobbler_
  • Guests

Posted 06 November 2010 - 04:44 PM

using 0.6

#17 TerrA LX

TerrA LX

    Fulcrum Fixture

  • Members
  • PipPipPipPipPipPipPip
  • 14,241 posts
  • Location:Sid 'n' knee
  • Joined: 31-May 06

Posted 06 November 2010 - 05:53 PM

In all seriousness I think what you should be doing is stepping away from the car with the welder till you have the skill required.

Weld is way too cold and it needs to be lapped by 1/2 inch in the floor.

#18 _SnotGobbler_

_SnotGobbler_
  • Guests

Posted 06 November 2010 - 06:18 PM

In all seriousness I think what you should be doing is stepping away from the car with the welder till you have the skill required.

Weld is way too cold and it needs to be lapped by 1/2 inch in the floor.


thanks. tis why im practising first.. last thing i want to do is screw it up or the floor to fall through lol

what do you mean by too cold?

#19 TerrA LX

TerrA LX

    Fulcrum Fixture

  • Members
  • PipPipPipPipPipPipPip
  • 14,241 posts
  • Location:Sid 'n' knee
  • Joined: 31-May 06

Posted 06 November 2010 - 07:11 PM

See how the weld is sitting on top?
You need more amps to burn into and slightly thru the metal fit it to work as intended.
Maybe try searching you tube for some tips.

#20 _SnotGobbler_

_SnotGobbler_
  • Guests

Posted 06 November 2010 - 07:31 PM

See how the weld is sitting on top?
You need more amps to burn into and slightly thru the metal fit it to work as intended.
Maybe try searching you tube for some tips.


yeah yeah i know what you mean there.. it must be a fine line between too high and low?
i was looking at http://www.mig-weldi.../thin-metal.htm and going by some of there stuff

if i held the torch there too long .. blow hole.. not long enough and i get those results.

well something to think on and will see if i can make an improvement tomorrow..

#21 yel327

yel327

    Oh My, Don't you post alot

  • Members
  • PipPipPipPipPipPipPip
  • 13,591 posts
  • Joined: 10-February 08

Posted 07 November 2010 - 10:01 AM

I'd just bolt/tack it in place and get a mate who can weld to finish it.

#22 TerrA LX

TerrA LX

    Fulcrum Fixture

  • Members
  • PipPipPipPipPipPipPip
  • 14,241 posts
  • Location:Sid 'n' knee
  • Joined: 31-May 06

Posted 07 November 2010 - 11:35 AM

You should not be holding the torch still, keep it moving.

#23 wot179

wot179

    Green Eggs and Spam

  • Members
  • PipPipPipPipPipPipPip
  • 6,784 posts
  • Name:Jesus Bloody Christ
  • Location:Sunny Santa Maria
  • Car:Goon
  • Joined: 06-February 09

Posted 07 November 2010 - 12:07 PM

Instead of turning the amps up,turn the wire down a bit.

Point the torch on a bit of an angle in the direction you are travelling as well.

And you cant weld rust.If it is at all rusty,you will get shit results.

The same goes for paint,oil or sound deadener.Without a clean surface,your results will be poor.


And Gong,nice job.Posted Image

#24 _SnotGobbler_

_SnotGobbler_
  • Guests

Posted 07 November 2010 - 04:29 PM

Instead of turning the amps up,turn the wire down a bit.

Point the torch on a bit of an angle in the direction you are travelling as well.

And you cant weld rust.If it is at all rusty,you will get shit results.

The same goes for paint,oil or sound deadener.Without a clean surface,your results will be poor.


And Gong,nice job.Posted Image


Yel327...Before getting someone else to do it, Id rather have a go at it first and learn something if i can.. or screw it up trying
and it might give motivation for someone else on the forum to give it a go. gotta learn somehow.. even if the floor falls through in a few years lol which is not the plan

Anyhow... had another play this arvo
cut up some 1mm tin plate, off cuts from a shelving unit i shortened time ago
cleaned all the paint off it etc

i turned the amps up a click and turned down the wire feed. somehow i prefer to point the torch into/at the weld and pull it away.. pull method?

oh man, much better and easier to weld then the crap previously.
well its an improvement anyways, getting there.. still blew holes here and there.. since they were there, had a go at filling them in, then ground down a few welds for interest sake
more practice coming, see if it gets better. try some over laps and plug welds maybe

heres some more pics.. everyone loves pics

started from top down...kinda got better and better untill i got a bit cocky, off track and screwed it up lol
3 and 6 looked good, 5 was until blow hole, they rest look messy but good penetration
Attached File  P1020360.jpg   166.99K   15 downloads

had a go at filling the holes in. made one larger but the rest went ok
Attached File  P1020361.jpg   167.43K   7 downloads

reversse side
Attached File  P1020362.jpg   178.74K   11 downloads

decided to grind some of the welds down
Attached File  P1020363.jpg   183.49K   8 downloads

#25 76lxhatch

76lxhatch

    That was easy!

  • Members
  • PipPipPipPipPipPipPip
  • 7,199 posts
  • Location:Unzud
  • Car:SS
  • Joined: 04-August 08
Garage View Garage

Posted 07 November 2010 - 05:05 PM

You're getting there, find a decent bit of copper to hold behind as you weld, it will sink some of the heat away and help stop blowing holes. I'd be perfectly happy with #3 and #6 as long as they're properly cleaned up and sealed against future rust forming.


1 user(s) are reading this topic

0 members, 1 guests, 0 anonymous users