
Love your work. You make it look so bloody simple!
Here's a silly idea Dirtbag- do the whole car like that...
In aluminium!
Stick it all on a kingswood chassis! You'd have the lightest Monaro yet!
Dirtbags dream car rebuild! HK monaro!
Started by
_dirtbag_
, Dec 24 2010 04:04 AM
416 replies to this topic
#202

its Paul
-

- Members
-

- 1,577 posts
Formerly lx8vd77
- Name:Paul
- Location:Gold Coast
- Car:LXSS, VUSS, VESSv & the mighty HB
- Joined: 07-January 08
Posted 17 May 2011 - 10:20 PM
Tim, that is awesome, Kev is going to have an excellent car when you have finished, I told the wife that I want you to do my next car, shit that woman can go on 
#203
_DomDom_
_DomDom_
-

- Guests
Posted 17 May 2011 - 11:15 PM
OMG!
That is awesome Tim. That rear quarter looks just like a......quarter.
I'm a builder and I build timber boats so I know wood pretty well but i wish I could do steel like that. I suppose it takes the right tools and the know how to use them correctly.
Thanks for showing us how its done I couldn't have envisaged it otherwise.
Dom
BTW I like this comment "you could make a monaro panel by panel". Good one Neils LX.
#204
_dirtbag_
_dirtbag_
-
- Guests
Posted 17 May 2011 - 11:18 PM
Tim, that is awesome, Kev is going to have an excellent car when you have finished, I told the wife that I want you to do my next car, shit that woman can go on
Oh crap! Do I have to give it back????? That changes everything......
#205
_Kush_
_Kush_
-
- Guests
Posted 18 May 2011 - 08:47 AM
After I make my money from this mining crap that I'm doing, I'm buying the house next door to yours...... Then you can show me how to do THAT!
You won't be able to get rid of me!
Excellent work, Tim
Rock on!
You won't be able to get rid of me!
Excellent work, Tim
Rock on!
#206
_nzstato_
_nzstato_
-
- Guests
Posted 18 May 2011 - 09:09 AM
Nice work as always Mr Dirt. Did you add the swage with the panbrake or a bead roller? The english wheeling is coming up good, is it affecting the swage at all as you run it through the rollers? I'd imagine you'd have the issue of flatting it out if you weren't careful. What are the plans for forming the lower half of the section? Is it possible to do the rest in the wheel or will it require some shrinking?
Looking great as always
Looking great as always
#207
_judgelj_
_judgelj_
-
- Guests
Posted 18 May 2011 - 01:35 PM
wasnt there a duo on gasoline or classic restos that made an entire monaro panel from scratch just by rolling and hammering. is that the guy you were referring to? pretty impressive stuff.
wont there be a difference in surface depth or will you be cutting out the existing section and replacing it with the new?
wont there be a difference in surface depth or will you be cutting out the existing section and replacing it with the new?
#208
_nzstato_
_nzstato_
-
- Guests
Posted 18 May 2011 - 01:42 PM
^ I believe you are referring to this....
#209
GML-31
-

- Members
-
- 5,239 posts
Oh My, Don't you post alot
- Name:Kev
- Location:Highland Park
- Car:too many
- Joined: 08-November 05
Posted 18 May 2011 - 01:48 PM
looking good mate keep up the good work
#210
_jabba_
_jabba_
-
- Guests
Posted 18 May 2011 - 02:52 PM
One day i want to be able to form metal as good as you . I'm being as adventurous, lets just hope i can pull it off. At least its only a ford that im cutting the crap outta!
. I'm being as adventurous, lets just hope i can pull it off. At least its only a ford that im cutting the crap outta!
#211

 View Garage
Posted 18 May 2011 - 03:04 PM
Nice work, thanks for taking the time to post up all the progress pics, its much more interesting seeing this stuff than looking at finished cars.
Are you turning it into a Holden?At least its only a ford that im cutting the crap outta!
#212
_jabba_
_jabba_
-
- Guests
Posted 18 May 2011 - 08:38 PM
Nice work, thanks for taking the time to post up all the progress pics, its much more interesting seeing this stuff than looking at finished cars.
I completely agree, i love looking at build logs with loads of progress pics so you get an idea on how it was done. The real art on a car like this is the transformation
.Are you turning it into a Holden?
Plenty of Holden steel is going into its making
.
#213
_dirtbag_
_dirtbag_
-
- Guests
Posted 18 May 2011 - 11:13 PM
Thanks for the kind words guys, glad you're enjoying it. However compared to Peach and Tommasini I'm just a big dirtbag with a hammer : )
nzstato, I put the centre swage in with a panbrake, as it's in a straight line. None of the other shapes were straight so used the bead roller.
As for the wheeling, I only wheeled the top half of the panel, so didn't have to roll over the swage. The lower half of the panel I just twisted into shape by hand, as it doesn't have as much crown/curve as the top half.
Well I did a bit more today.
I started on the lower swage and the small section of wheel arch. I also used the bead roller to start the fold where the lower part of the panel folds under behind the wheel arch. I can then hammer and dolly the whole section up from there.

I also wheeled the panel a bit more, and hammered out the flare a bit better. Plus I pulled the lower section into shape by hand. One of the reasons I like using the 1.15 zinc sheet instead of the more popular 1mm cold rolled is the fact it's a lot harder to shape, meaning you can really get into it without going to far with the shaping. Cold rolled sheet is a lot easier to form, but the zinc is stronger and can hold its shape a lot better.
You can see here how far the middle of the panel is in the air, meaning there is a fair bit of shape in the panel now. Yay : )

It's fitting on the car a lot better now. I still need to fold the lower lip up behind the wheel arch.

I used a heavy ball pein hammer and a largish flat dolly to hammer the lower lip up. It has a slight curve and a fairly wide return, so took a bit of convincing.


Starting to look like it belongs there.

I also hammer and dollied the top edge of the new panel so it curled in more towards the body. I'm pretty happy with how it's sitting on there now.

The front of the panel is sitting quite well now too.

I feel like a fraud explaining all this step by step like I know what I'm doing, when I have had no training whatsoever, but for those interested, the tools I used to do this are english wheel, panbrake (folder), bead roller and these assorted hammers and dollies.

This is a bad pic, but it shows the dies I used to make the lower swage.

Well now I'm happy enough with the shape of the new piece, it's time to remove the old piece.
When I traced out the shape I needed, I made the front section longer than it needed to be so I could cut the weld off from where I joined the new front half of the quarter. I didn't want two welds side by side, so this way there will still only be one weld down the panel.
My finger is on the weld I did when I fitted the new front half of the rear quarter.

I traced the new piece onto the car, so i could see where to cut. As I cut it, I left a few bumps of the original metal in the way, so when I hold the new piece up to butt weld on, it has something to lean against, rather than just falling in against the inner panels. Once it's tacked in place I can just run a 1mm cutting discs through it and line the two pieces up for a nice flush butt weld.

Pretty : )

Found a couple of nice things inside.
The lower corner of the wheel arch was all bog. There's a nice big chunk of it inside there too.

I put my finger in the pic so you can see how thick the filler is here.Yes, that;s filler in the spare wheel well. Nice : )

I also spent a bit of time tonight starting to clean up the inner panels. I'll take all this back to bare metal like I did the front half of the quarter and etch prime it before I weld the new outer piece on.

The old and the new : )


Well that's it for today. I had to spend a fair while up at the new house, but tomorrow morning I'll go and pick up all the front end bits from the powder coaters.
nzstato, I put the centre swage in with a panbrake, as it's in a straight line. None of the other shapes were straight so used the bead roller.
As for the wheeling, I only wheeled the top half of the panel, so didn't have to roll over the swage. The lower half of the panel I just twisted into shape by hand, as it doesn't have as much crown/curve as the top half.
Well I did a bit more today.
I started on the lower swage and the small section of wheel arch. I also used the bead roller to start the fold where the lower part of the panel folds under behind the wheel arch. I can then hammer and dolly the whole section up from there.
I also wheeled the panel a bit more, and hammered out the flare a bit better. Plus I pulled the lower section into shape by hand. One of the reasons I like using the 1.15 zinc sheet instead of the more popular 1mm cold rolled is the fact it's a lot harder to shape, meaning you can really get into it without going to far with the shaping. Cold rolled sheet is a lot easier to form, but the zinc is stronger and can hold its shape a lot better.
You can see here how far the middle of the panel is in the air, meaning there is a fair bit of shape in the panel now. Yay : )
It's fitting on the car a lot better now. I still need to fold the lower lip up behind the wheel arch.
I used a heavy ball pein hammer and a largish flat dolly to hammer the lower lip up. It has a slight curve and a fairly wide return, so took a bit of convincing.
Starting to look like it belongs there.
I also hammer and dollied the top edge of the new panel so it curled in more towards the body. I'm pretty happy with how it's sitting on there now.
The front of the panel is sitting quite well now too.
I feel like a fraud explaining all this step by step like I know what I'm doing, when I have had no training whatsoever, but for those interested, the tools I used to do this are english wheel, panbrake (folder), bead roller and these assorted hammers and dollies.
This is a bad pic, but it shows the dies I used to make the lower swage.
Well now I'm happy enough with the shape of the new piece, it's time to remove the old piece.
When I traced out the shape I needed, I made the front section longer than it needed to be so I could cut the weld off from where I joined the new front half of the quarter. I didn't want two welds side by side, so this way there will still only be one weld down the panel.
My finger is on the weld I did when I fitted the new front half of the rear quarter.
I traced the new piece onto the car, so i could see where to cut. As I cut it, I left a few bumps of the original metal in the way, so when I hold the new piece up to butt weld on, it has something to lean against, rather than just falling in against the inner panels. Once it's tacked in place I can just run a 1mm cutting discs through it and line the two pieces up for a nice flush butt weld.
Pretty : )
Found a couple of nice things inside.
The lower corner of the wheel arch was all bog. There's a nice big chunk of it inside there too.
I put my finger in the pic so you can see how thick the filler is here.Yes, that;s filler in the spare wheel well. Nice : )
I also spent a bit of time tonight starting to clean up the inner panels. I'll take all this back to bare metal like I did the front half of the quarter and etch prime it before I weld the new outer piece on.
The old and the new : )
Well that's it for today. I had to spend a fair while up at the new house, but tomorrow morning I'll go and pick up all the front end bits from the powder coaters.
#214
_jabba_
_jabba_
-
- Guests
Posted 18 May 2011 - 11:22 PM
Nice work, i love how fast you manage to get things done. I seem to spend hours just unpicking spot welds!
#215
_nzstato_
_nzstato_
-
- Guests
Posted 19 May 2011 - 05:44 AM
Nice work, I like the idea of leaving the little 'bumps' to help help hold the panel up, nice trick, will you also use clecos to hold it there while you spot weld it up?
#216
_dirtbag_
_dirtbag_
-
- Guests
Posted 19 May 2011 - 07:29 AM
Hi Sam. I wont need to use clecos to tack it on. The panel sits on there pretty nicely now so I can just lean my leg under it and it sits on there well. Having the wheel arch flare part helps support it a fair bit too.
#217
_nzstato_
_nzstato_
-
- Guests
Posted 19 May 2011 - 08:04 AM
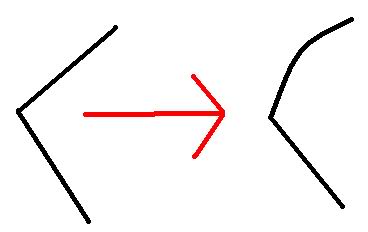
Sweet, sounds like you had it all planned out. What I ment about the wheel smoothing the swage isn't if you run over it, but if you are creating a curve 90 degrees to it you may artificially lessen the swage. Kind of like what I have below (though I suck at paint) or is this not an issue? Just curious to see how the metal behaves in this situation
#218
_dirtbag_
_dirtbag_
-
- Guests
Posted 19 May 2011 - 08:17 AM
Yeah I see where you're going with that. It wasn't really a problem with this though as it's such a shallow panel, and the main compound curve is high in the guard. If it were folded and curved as much as your drawing then yes you are totally correct. I did over fold the centre swage a bit, as I knew where I hammered in the flare would change the shape too, and it's easy to flatten a panel, but not easy to put more fold in once the flare is hammered out. Does that make any sense?????
Just so people understand what Sam is saying, whereever the top and bottom rollers of the english wheel touch the metal, it creates a high spot, so if you roll a panel too much in one spot, you need to roll the rest of the panel to bring it up, you can't roll things down.
Just so people understand what Sam is saying, whereever the top and bottom rollers of the english wheel touch the metal, it creates a high spot, so if you roll a panel too much in one spot, you need to roll the rest of the panel to bring it up, you can't roll things down.
#219
_nzstato_
_nzstato_
-
- Guests
Posted 19 May 2011 - 08:41 AM
That makes perfect sense to me, thanks for clarifying , makes it all the more interesting. Once I've finished the project I'll be buying/making an english wheel, shrinker/stretcher, bead roller and panbrake. Then I might attempt my own dirtbag-ness
#220
_dirtbag_
_dirtbag_
-
- Guests
Posted 19 May 2011 - 08:45 AM
Forget Dirtbag, that guy is a jerk, check out Marcel DeLay and Sons, those guys are freaks!!!! Tom Peach aint bad either.
#221
_nzstato_
_nzstato_
-
- Guests
Posted 19 May 2011 - 09:02 AM
Maybe if I get some skills I could approach this guy for some lessons, he's only up the road
Rod Tempero
Rod Tempero
#222
_1uzbt1_
_1uzbt1_
-
- Guests
Posted 19 May 2011 - 10:53 AM
i think you have the skills that any car person is pretty envious of, im sure we all wish we could do what your doing.
Just a few question, what brand and where did you get your bead roller from? some where in the states wasn't it?
Also what are those pins you are using to hold the panel onto the old one?
Just a few question, what brand and where did you get your bead roller from? some where in the states wasn't it?
Also what are those pins you are using to hold the panel onto the old one?
#223
_jabba_
_jabba_
-
- Guests
Posted 19 May 2011 - 03:01 PM
go to www.summitracing.com and search for bead roller. bit of choice.
#224
_Gunmetal LH_
_Gunmetal LH_
-
- Guests
Posted 19 May 2011 - 03:13 PM
Loving this! Thanks for showing each step and explaining why too.

#225
fenz
-

- Members
-
- 220 posts
Forum Member
- Name:Aaron
- Location:South Australia
- Car:LJ 2 door and UC V8 4door
- Joined: 26-July 09
Posted 19 May 2011 - 05:23 PM
The old girl has well and truely got her pants down now....like everyone else i am enjoying watching how this sort of panel work is done (not something you see in panel shops of today)
Not to many people around that have the skills to attempt what you are doing here.
keep up the good work
Not to many people around that have the skills to attempt what you are doing here.
keep up the good work


2 user(s) are reading this topic
0 members, 2 guests, 0 anonymous users

