LC Coupe - 350Chev, T400, 9in, AP and Skyline Brakes
#26
 _ls1lj_
Posted 22 August 2011 - 06:35 PM
#27
 _shan620_
Posted 23 August 2011 - 09:53 PM
#28

Posted 23 August 2011 - 10:15 PM
do you have any photos of your rear brake setup, I'm looking for hints and clues in relation to the nine inch with hand brake shoes, as I have the same calipers as you.
Cheers.
Edited by lx8vd77, 23 August 2011 - 10:17 PM.
#29
 _ls1lj_
Posted 24 August 2011 - 03:20 PM
looks good mate. What size slicks are on the rear and do they hit on anything or did u have to chop some of the lower wheel arch out?
In that photo they are 28 x 9.5" on 15 inch rim, it's been tubbed and there was bugger all clearance all round at that ride height, could run them if i jacked the back up an inch or so or could easily run with 26" diameter slick. Fitted up some 10" wide rims a month or so ago with with 3.5BS and 295/50/15 s had to take off the weel studs to get it in there. Had 1mm cleance on the outside but 1" on the inside. I could run them if i could find a 4" BS rim that i liked but i rekon that would be impossible. CBF getting the diff cut down to suit so guess I will have to settle for 8in wide rims :-( 10" rims looked the part though.....


Hi Ben
do you have any photos of your rear brake setup, I'm looking for hints and clues in relation to the nine inch with hand brake shoes, as I have the same calipers as you.
Cheers.
Here you go LX8vd77. Standard VR/VS backing plate, handbrake, disc and calliper. Haven't pulled the axles out of this diff yet so not sure what bearing/seal set up it uses. Have read there is issues with axel slop but mine are ok.
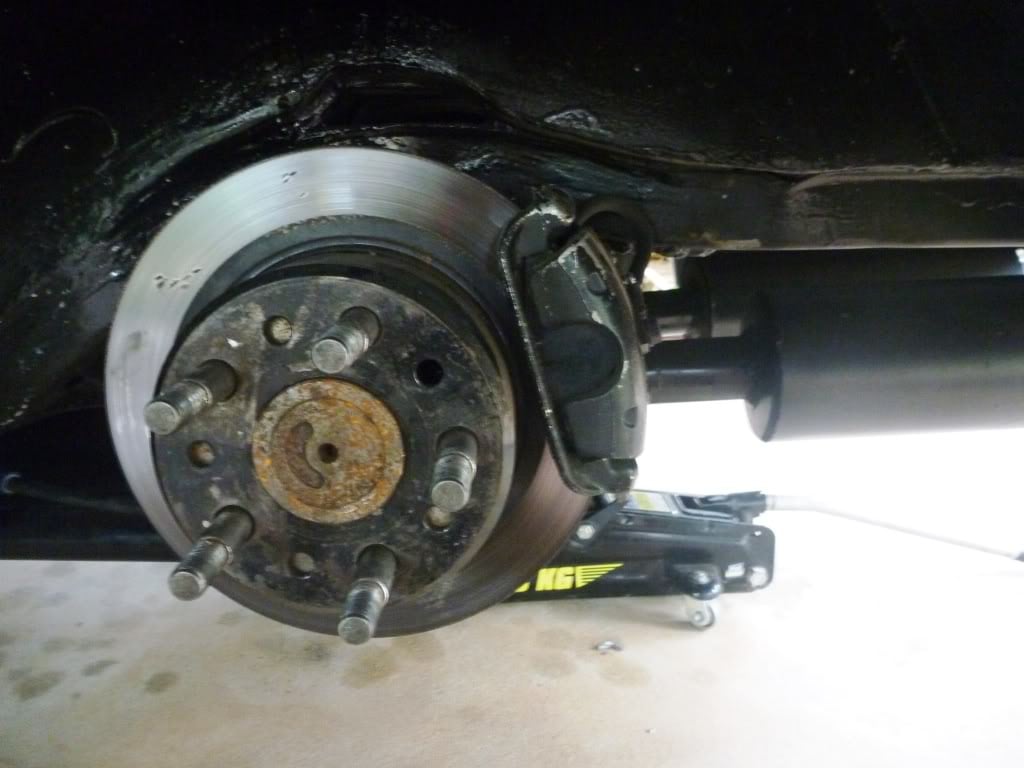
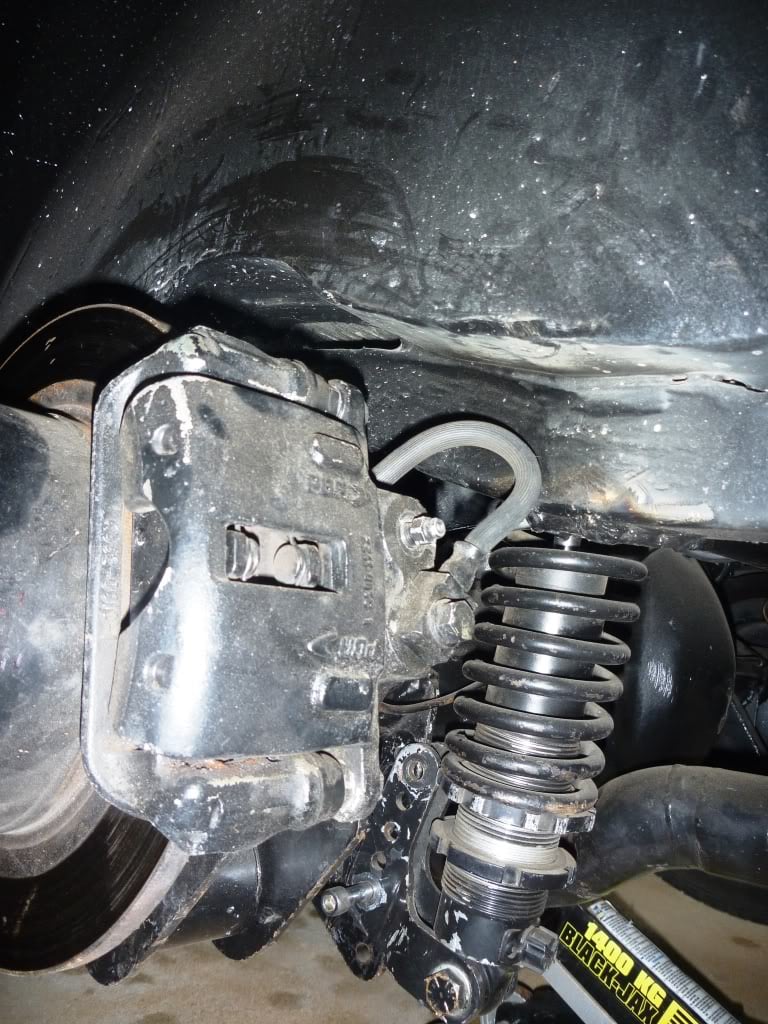
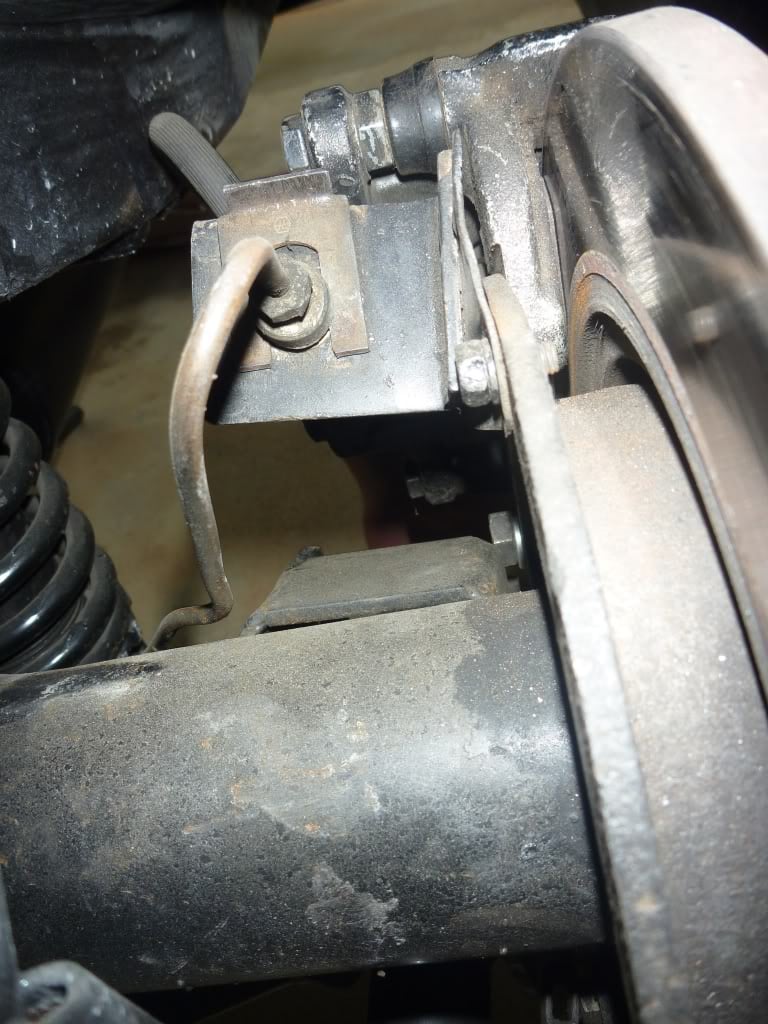
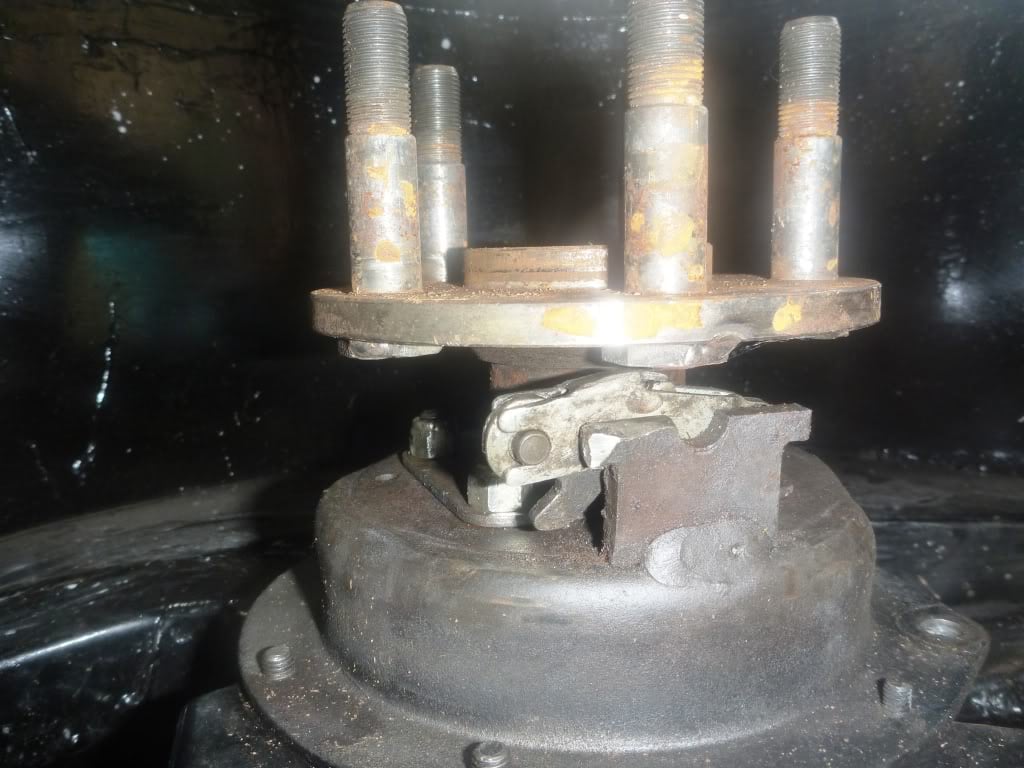
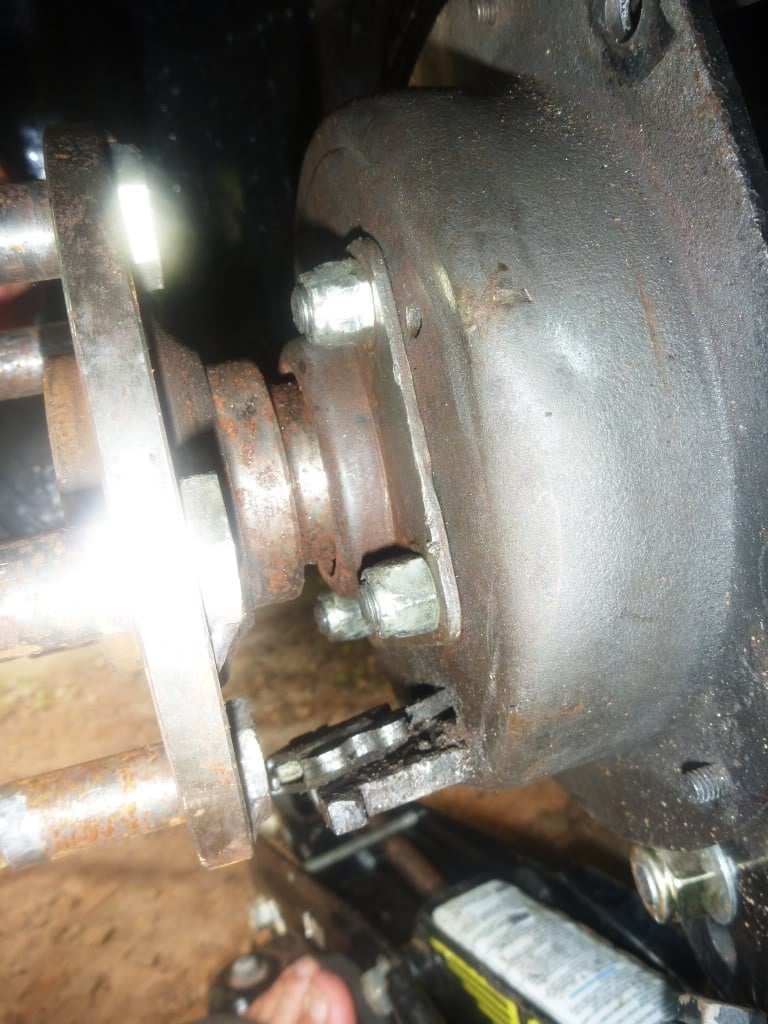
And complete VR setup on my VR ute for reference (notice that the handbrake pads have actually just fallen off the backing plates)
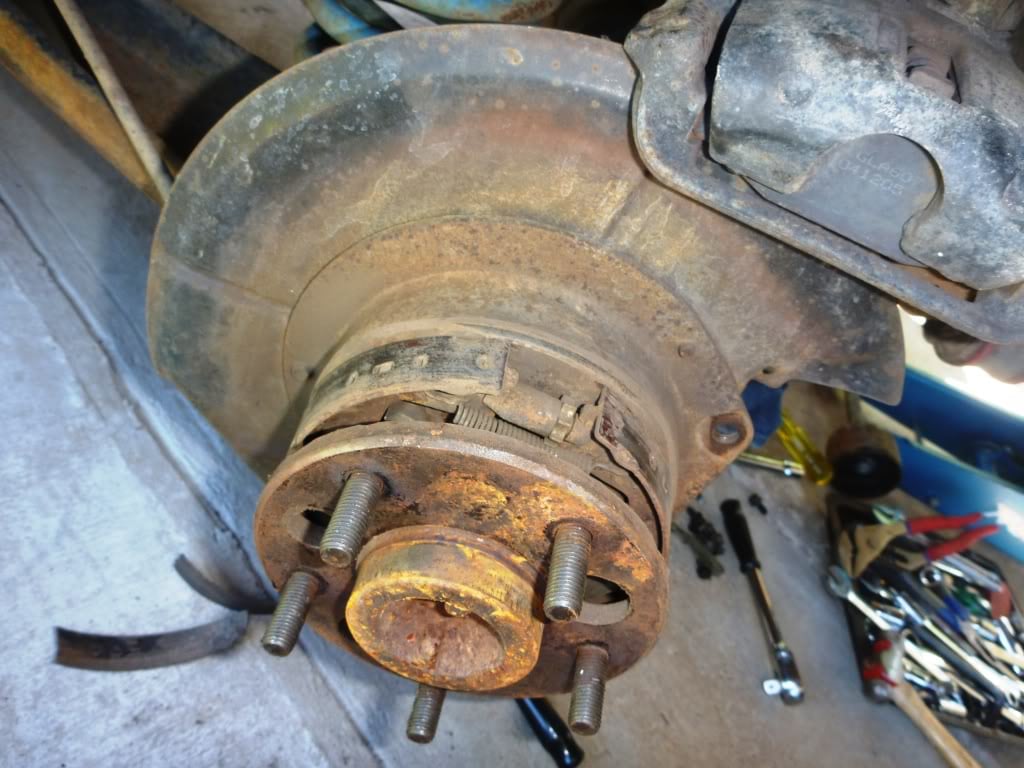
Brought all of the bits to upgrade when i swap the fronts over to AP 4 pot callipers and aluminium hat 5000 series discs. If u wanna upgrade the back VR/VS setup use VR/VS backing plate and handbrake setup, VN calais vented rotors - same handbrake set up so you just have to change the disc and calliper (needs new caliper adapter bracket). I plan to use R32 2 pots with thoes VN discs. I think i posted some photo of these trial fitted on the previous page or in the brakes section.
Have ordered a 20 mni fuse Ez wiring kit, electrical crimp set, satelite tracking and alarm system so might have a crack at rewiring this weekend if i don't have to work.
#30
 _mumbo_
Posted 25 August 2011 - 10:06 AM
#31
 _PROGMH_
Posted 29 August 2011 - 08:10 PM
#32

Posted 29 August 2011 - 08:31 PM
#33
 _ls1lj_
Posted 17 December 2011 - 01:14 AM
#34
 _ls1lj_
Posted 07 September 2012 - 03:27 AM
Ends up I ripped my ACL off the bone so was out of action for a few months but all good now. Worked away for the best part of 5 months so have basically done nothing to the LC this year.
Started on the wiring this week, Did a bit of investigation to find out why I almost had a massive electrical fire. Found countless bare wires, but the main culprit was when the previous owner had installed the GTR dash he pinched the main power wire, which must have wore through and created a short. There was heaps of smoke pissing out from under the dash so this was definitely the culprit as these wires had the most scorch marks.
Tried to follow the previous loom to see where everything ran but the loom had been so butchered I gave up and decided to just rip it all out and start from scratch.
What a nightmare......


Used an Ez Wiring 20 mini blade fuse kit costs 350 delivered from air ride and suspension. Fuse box is nice and compact and well labelled. You can also switch which side the wires come out of for easier mounting. Wires are colour coded and labelled every 200mm or so. Main wire from the starter is 10 gauge and wires get smaller depending on application.


Kit also includes 2 x headlight multi connect plugs, pre-terminated high beam multi-connect, dash light switch multi-connect that all fit the OEM Torana gear which saves some time.


You have to remove the wires from the pre-terminated column/ignition multi-connect and plug individual wires straight in or just insert them into the original loom plug.

All in all a pretty damn good kit and at a 1/3 of the cost of the painless kits it’s fro%king brilliant. However the instructions are a bit lacking and you will definitely need a colour copy of the original wiring diagram for reference.
Anyway loosely split all the wires into batches and plugged everything in. Attached the positive terminal and held a test light across the negative terminal to the negative lead. Light on = short. Since it was the first time I had rewired a car, I assumed I had stuffed up and removed the fuses one by one to find the fault. Fault in the accessories, checked all, all good, so was a bit stumped. Ended up checking everything again, eventually worked out the short was coming from the alternator exciter wire. Ie power was going to the alternator through the normal power wire and must have been fried internally and was shorting and coming back through the alt exciter wire giving the accessories power even when the ignition was off. Just unplugged the exciter wire for now, will have to buy another alternator later.
Tried to start the motor, but no joy. Turned over ok with starter, checked that fuel was ok, had power at the coil.
Tested the ignition switch, all worked except had power to the positive side of the coil in start position only, but not in run. Will rebuild the switch at a later date so as a temporary measure just bridged/piggy backed the two wires for the +ve side of the coil onto both terminals on the switch. Problem solved……. not. Went to start it again and still didn’t start. Pulled the dizzy cap off and no spark when cranking, reassembled and removed a spark plug lead and no spark when cranking. Figured it had to be the coil so stole one off one of the parts bomb cars in the back yard and hooked it up. The starter also has a small short in it internally somewhere but only when it is in the start position so will just use it until it dies. Cranked it over again and fired on the first crank, so cracked another beer to celebrate. I assume the damage to the ignition switch, coil, alternator and starter were all as a result of the short that almost started the electrical fire.
Next step is to work out where I want to run the wires and tidy the loom right up. Still need to hook in the lights and a few extra accessories and test. Also have power windows, keyless entry, security system and stereo to install which I’m assuming will be a PITA.
Edited by ls1lj, 07 September 2012 - 03:33 AM.
#35
 _shan620_
Posted 07 September 2012 - 04:14 PM
#36
 _ls1lj_
Posted 08 September 2012 - 12:36 PM
#37

Posted 09 September 2012 - 02:07 AM
Did use old toyota handbrake,shortened vs ute cables & new tunnel to clear 3" tailshaft(headache lol).
Car is nice..are wheel are stretched or standard & did you move diff back/forward at all?
#38
 _ls1lj_
Posted 11 September 2012 - 02:29 AM
Put the front and rear brakes back on and took it for a quick spin but was braking down at high revs. Lent the timing light to someone so tried to adjust the dizzy advance by ear without sucess. I also suspect that the twin point ignition is out of wack, but its good enough to move the car around while working on it.
Since i've been away so much everything is unregistered/un road worthy/broken/messy/lost so decided to knock off a few jobs. Brought a second hand passangers side axel from the wreckers as the one on the VR Ute daily driver was mega bent however the TA at the wrecking yard removed the drivers side axle, which is too long. Had to go back and swap it again. All went in nice and easy and had the diff jacked up on that side so didn't have to change the oil. Fixed the exhaust bracket, replaced a tail light and found exposed wires in the inner panels so tidied that up, some new bulbs, replaced the pedal rubbers. Battery had leaked at some point in the past and eaten through the body work, previous owner had repaired it but had rusted out again so repaired that. Wires to the starter relay had corroded out so rewired that. Hadn't washed the car for over a year so it was brown/black instead of white and mold had started getting into the paint. Had to wash it 4 times to get it back to white but cleaned up alright. will need a good cut and polish but have better thing to do for the short term. Took it in for rego and had to wait about 4 hours - Darwin MVR is a joke, had one poor bloke trying to cover 2-3 inspection bays simultaneously by himself while 30-40 cars waiting. Passed even though the ute is too low and bottomed out during the check.
Cleaned out the shed and garage also yesterday so i could actually find and use stuff. Today my dad came around and helped me put up the A-frame/engine hoist. Stripped out the slotted rotors, brakes, diff, motor, box, new rad, ac, fuse box, nudge bar, towbar and seat rails out of a parts VR Ute that i brought a while ago for 300 bucks registered but guy had wacked a tree with the drivers door so the door could not open. Could have easily fixed it with a new door and sill but just going to keep the parts for other projects and sell the body for scrap as need room for the new shed which is well overdue.
#39
 _ls1lj_
Posted 11 September 2012 - 09:29 AM
- Finish rewiring
- Install alarm, power windows/doors, stereo
- Fab up new brackets for passengers bucket seat and hand brake cables
- modify hurst ratchet shifter from 2 speed to 3 speed and fix neutral switch
- Weld up coil over holes in the boot and adjust coil overs
- Modify chassis kit rear brace as fouls on exhaust
- Check to see if i have HQ or Torana front stubs and change out to LC if required
- Install 12v hair dryers and ducting
- Replace ignition switch on steering column and rebuild colum so that it locks as it is supposed to.
- Install new klipan seat belts.
- Replace slightly bent axle
- Order and fit new rims
- Buy and install hidden washer bottle and hoses
- buy and install radiator overflow bottle
- Fit door rubbers
- probably a heap of other stuff i have forgotten.......
#40
 _greenmachine215_
Posted 11 September 2012 - 09:08 PM
TOP WORK Love it!
#41
 _ls1lj_
Posted 12 September 2012 - 04:18 PM
You forgot the dunny roll dispenser on the passenger door, I dare say there gonna be a few shitty arses after you take it for a squirt!
TOP WORK Love it!
haha good stuff! She doesn't have a name yet, so might have to call her "Brown Note" or "Durty Nelly" (after the irish pub) ie driver says to unsuspecting passenger "Have you ever herd a brown note?", reply "no", then you just floor it on a launch.....and then......
As long as the passenger doesn't crank out a number 3, as you would probably have to burn the car to get the smell out after that.
http://www.youtube.c...h?v=paw0M7p1-8k
#42
 _ls1lj_
Posted 15 September 2012 - 05:17 AM

Was still braking down a bit in the top end when i took it for a drive. It seems as though the TH400 is slipping like a bitch, I thought it might be low on oil but added some and didn't improve. I'm not an auto guy so what do you guys think it is likely to be?
Ordered 2 of these hairdryers to install under the dash as demisters, not sure what I will use for heat resistant ducting yet.
https://www.whitwort...tAbsolutePage=1
Ordered more stuff from rare spares
Product Code Quantity Description Price M020 1 W/SCREEN WASHER BOTTLE POLISHED ALLOY SUIT HOLDEN $81.77 X2467 2 GLOBE HOLDER HOLDEN STOP TAIL BA15d BASE GLOBE $9.73 DHP1000A 1 PLATE & SPRING WINDER HANDLE FE-WB LC-UC SET OF 4 $27.05 CLSK1 1 COURTESY LIGHT SWITCH KIT HK-WB LC-UC SUIT 4 DOORS $27.45 DH2 1 TOOL DOOR HANDLE REMOVING $17.23 H1177 1 KEY BLANK SET "HOLDEN" 2 SQUARE 1 OVAL HQ HX LJ- $10.09 DSS0001 1 SCUFF PLATE SCREW KIT STAINLESS STEEL 20 PCS $18.86 RG180 1 UNIVERSAL RUBBER GLUE 25ML BOTTLE $23.68 X2460 2 GLOBE HOLDER EARLY GMH INDICATOR LAMP BAY15s BASE $15.32 Total Order Cost Inc. GST: $295.05
Brought some 25x25x2mm RHS to fab up the new bucket seat mounts. Tapped the threads in the original mounting holes but my neighbor distracted me with cold beer so I called it a day.
#43
 _ls1lj_
Posted 17 September 2012 - 01:17 AM
JB Hifi had 30% off this weekend and Alpine is running out their old models so got double discount. Big savings for example the top of the range single din head unit RRP700, paid 270ish, so ended up buying a full system for the LC.
#44
 _shan620_
Posted 17 September 2012 - 09:27 PM
I saw the your post on my thread about the diff possibly hitting on the floor, did you mod yours? If so how much was need to clear it enough.
#45
 _ls1lj_
Posted 25 September 2012 - 10:47 AM
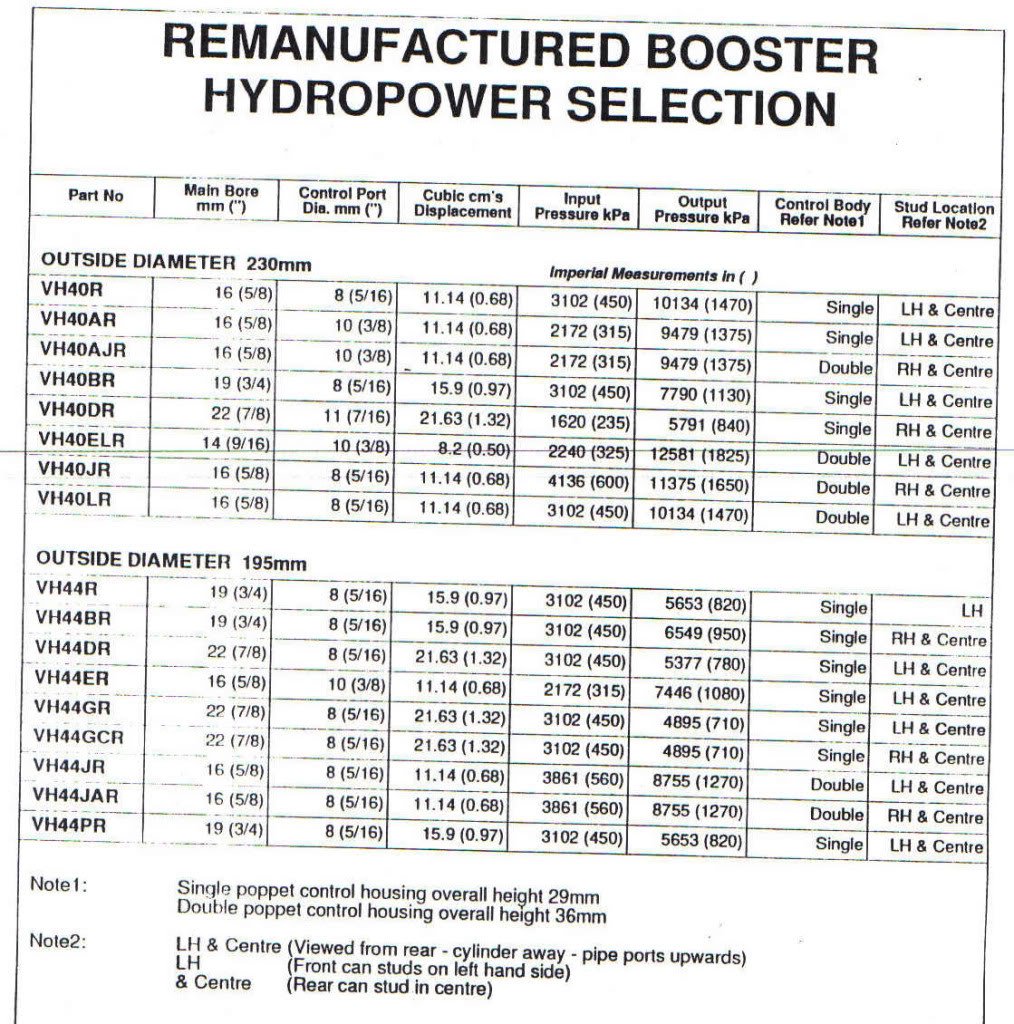
For reference what sizes and/or p/ns are you buying?
With my setup the pedal is spongey with excessive travel, so will have to rebuild mine, might also just delete the boosters altogether and install a pedalbox with balance bar.
Tere is more info in my brake thread
http://www.gmh-toran...4pot-callipers/
As for the boot floor i haven't modded mine yet as I don't know my finished ride height with new rims and tyres, but i rekon there is a 30% chance the diff centre will bottem out. My brake hoses might rub also at full travel.
#46
 _shan620_
Posted 26 September 2012 - 01:18 AM
If at anytime you want to swap torri's let me know.
#47
 _ls1lj_
Posted 27 September 2012 - 04:43 AM
I wish i was in your shoes and i could build the car the way i wanted to instead of fix/rebuilding everything that was ment to be fixed/finished by the previous owner.
Might do a few tests to see why my brakes are spongey I suspect it might be the XA master as it is not really ment to be a disc disc master.
Test 1: pump pedal a few times then hold the pedal in firm. Start engine and see if the brake pedal drops a bit, pedal effort should decrease also if the boosters are working.
Test 2: Remove vac hose before it splits and goes into the boosters and attach vac gauge. will hopefully be >16 inches of vac.
Test 3: Measure pressure entering each booster.
Test 4: Measure pressure exiting each booster.
Got my parts from rare spares, polished windscreen washer bottle doesnt have an electric pump supplied which is pretty useless considering how much it cost. Also recieved my hair dryers they are nice and compact + lite. Attempted to remove the folding handle but it has special safety screws that i have not seen before.
#48
 _shan620_
Posted 30 September 2012 - 02:34 AM
#49
 _ls1lj_
Posted 11 October 2012 - 01:46 PM
#50

Posted 28 November 2012 - 03:50 PM
Great build and read mate, very very simular to what I want to build (when I find the right LC), which also mekes it very educational for me.
I'm in Darwin too so I feel your pain trying to get things done up here.
Keep at it brus, hope to see it out and about around Darwin soon.
Cheers Bullet
1 user(s) are reading this topic
0 members, 1 guests, 0 anonymous users


