
looks great so far, i think you will need a bit more wrap on that water pump pulley but


Axistr's Father & Son LH SLR Project.
Started by
axistr
, Jan 27 2012 04:20 PM
333 replies to this topic
#27
 _Torrie_Man_
_Torrie_Man_
-

- Guests
Posted 18 March 2012 - 05:52 PM
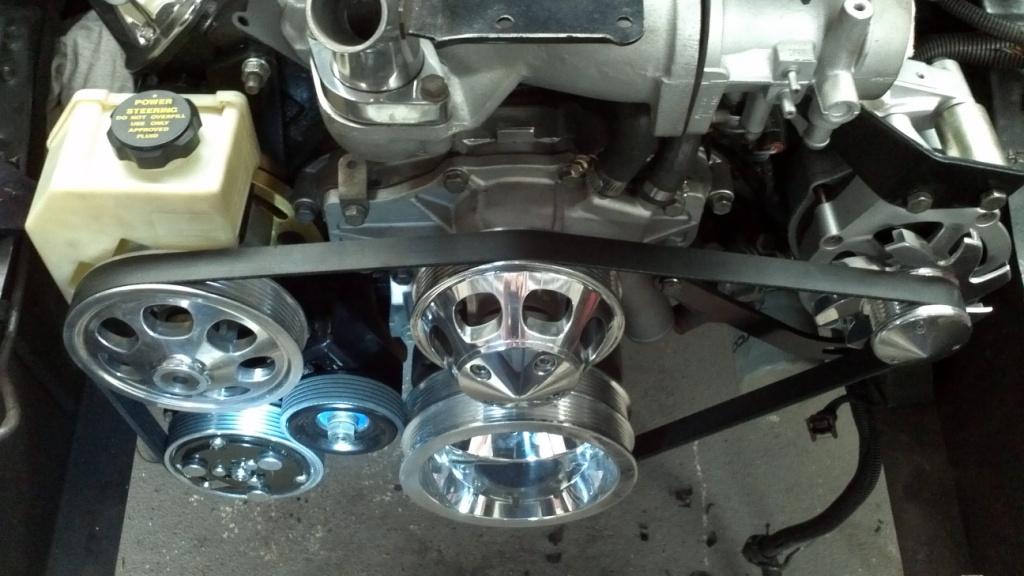
looks great so far, i think you will need a bit more wrap on that water pump pulley but
I agree with you there, there isn't much belt contact at all.
#28
axistr
 View Garage
-
- Members
-

- 1,212 posts
Forum Fixture
- Location:North west sydney
- Joined: 19-November 05
View Garage
Posted 18 March 2012 - 08:39 PM
Yep your right but the photo's don't do it justice, It's quite hard to turn the water pump pulley with the belt on, and the water pump don't take much power to drive it. I was hoping to reduce drag by not adding an extra idler pulley but if I have any problems with pulley slip I will have to add one more idler, which would be quite easy compared with setting up all the other pulleys. Its a shame I couldn't go under but the water pump would pump in the wrong direction.
I have see some of March Performance small block Chev conversion serpentine kits and some have around the same contact area on their water pump pulleys. I suppose I will have to wait and see.
I have see some of March Performance small block Chev conversion serpentine kits and some have around the same contact area on their water pump pulleys. I suppose I will have to wait and see.
#29
axistr
View Garage
-
- Members
-
- 1,212 posts
Forum Fixture
- Location:North west sydney
- Joined: 19-November 05
View Garage
Posted 18 April 2012 - 06:48 PM
Got a bit more done this week, fitted and made the tank straps but need to fit the rubbers. Also made a cover plate for the fuel pump.
 116 - Copy.JPG 303.52K
28 downloads
116 - Copy.JPG 303.52K
28 downloads
118 - Copy.JPG 28.13K
27 downloads
119 - Copy.JPG 296.21K
24 downloads
116 - Copy.JPG 303.52K
28 downloads
118 - Copy.JPG 28.13K
27 downloads
119 - Copy.JPG 296.21K
24 downloads
#30
tsn007
-

- Members
-
- 1,019 posts
Forum Fixture
- Name:Tony
- Location:LIVERPOOL, NSW
- Car:LX hatch, LX sedan
- Joined: 25-April 07
Posted 18 April 2012 - 09:24 PM
Nice work Len
is that a brown davis tank
will you be running a surge tank, or will the internal fuel pump be sufficient,
is that a brown davis tank
will you be running a surge tank, or will the internal fuel pump be sufficient,
#31
axistr
View Garage
-
- Members
-
- 1,212 posts
Forum Fixture
- Location:North west sydney
- Joined: 19-November 05
View Garage
Posted 18 April 2012 - 09:41 PM
G'day Tony, The tank was custom made for me, I drew up some plans for him and made the adaptor to suit a holden VT commodore electric pump assemble, these pumps have a built in surge chamber. I have secured the original torana fuel level sender to the pump housing. This will keep every thing contained in the tank to save room and keep it nice and quiet,
018 - Copy.JPG 270.66K
27 downloads
016 - Copy.JPG 263.08K
23 downloads
018 - Copy.JPG 270.66K
27 downloads
016 - Copy.JPG 263.08K
23 downloads
#33
LX2DR
View Garage
-

- Members
-
- 1,763 posts
Forum Fixture
- Name:Paul
- Location:Melbourne
- Joined: 21-November 05
View Garage
Posted 18 April 2012 - 09:50 PM
I think you need to revisit the belt location over the water pump, with that little contact i think it will slip and cause major overheating issues.At last I compleated the accesories drive system.
Edited by LX2DR, 18 April 2012 - 09:52 PM.
#34
axistr
View Garage
-
- Members
-
- 1,212 posts
Forum Fixture
- Location:North west sydney
- Joined: 19-November 05
View Garage
Posted 19 April 2012 - 06:17 PM
Yep you might be right, but I carn't turn it by one hand and water pumps take bugger all to drive . With 6PK belts the grip is about tripple to that of the standard vee belt. The A/C pump will draw the most power then the power steering pump, the alternator will take around 5-8 hp. I recken the water pump will draw around 1/2 hp. That will increase at bit at 5,000 rpm. If it does slip I will just have to make an extra idler pulley. I was trying to keep tis area clutter free as I might fit a little belt driven vortech later when I get bored.
Lenny
Lenny
#35
axistr
View Garage
-
- Members
-
- 1,212 posts
Forum Fixture
- Location:North west sydney
- Joined: 19-November 05
View Garage
Posted 23 April 2012 - 06:34 PM
Finnaly got my new tyres & rims. Now I can sort out my diff length, cut the guards and fit the flares. Rear's 17x10, tyres 275 40 but putting a tape measure across them they measure 285mm and still have good clearances. The biggest the engineer will allow is 17x10" rims.
2012-04-23_15-04-41_82 - Copy.jpg 152.93K
24 downloads
2012-04-23_15-04-23_30 - Copy.jpg 697.99K
23 downloads
2012-04-23_15-04-41_82 - Copy.jpg 152.93K
24 downloads
2012-04-23_15-04-23_30 - Copy.jpg 697.99K
23 downloads
#37
LX 0076
-

- Members
-
- 199 posts
Forum Member
- Location:nsw
- Joined: 25-April 07
Posted 24 April 2012 - 04:18 PM
Nice wheels are these the new simmons from tempe? Do you mind me asking how much?
Thanks Jayson
Thanks Jayson
#38
axistr
View Garage
-
- Members
-
- 1,212 posts
Forum Fixture
- Location:North west sydney
- Joined: 19-November 05
View Garage
Posted 24 April 2012 - 08:59 PM
LX Torry Freak, dont know mate if they are Wilsons as I bought them through Rare Spares.
Yes Jason they are new Simmons through Tempe Tyres. The total package, rims, tyres. centres & nuts cost me $3,810
One of the hardest decisions so far were the wheels. We were after Simmons OM17s which Neals Wheels had a set of reco rims but they wanted $4,800 plus tyres. So second choice were FR17s. They look much better in the flesh than in the photo.
Lenny.
#39
LX 0076
-
- Members
-
- 199 posts
Forum Member
- Location:nsw
- Joined: 25-April 07
Posted 25 April 2012 - 10:28 AM
Thanks Lenny, I have been contemplating a set of these in 17s or 18s for my hatch, the 17s look the goods and seem to be reasonable priced.
Jayson
Jayson
#40
axistr
View Garage
-
- Members
-
- 1,212 posts
Forum Fixture
- Location:North west sydney
- Joined: 19-November 05
View Garage
Posted 25 April 2012 - 01:51 PM
Hi Jayson, I know a lot of people want the largest rims they can get under their cars, but check with the people doing the regestration paperwork. I asked two engineers about the rims sizes and both said 17x10 rear & 17x8 front MAX, both a also commented ont the load ratings, My Simmons have a rating of over 700kg each. I have even off set/back space front & rear. If you go wide rim and small backspace they may also knock it due to the diff and wheel bearing size. I have an R.T.A rego licence and if they inspect my car and find out I did the pink slip I will go for a row. So like my hatch I want to make sure everything is 100 % legal.
Hope this helps
Lenny.
Hope this helps
Lenny.
#41
axistr
View Garage
-
- Members
-
- 1,212 posts
Forum Fixture
- Location:North west sydney
- Joined: 19-November 05
View Garage
Posted 12 May 2012 - 07:28 PM
Haven't had much time to do anything over the last three weeks as we have had three mechanics, sick, at TAFE or on holidays, so I have had to go back doing five day weeks again, so much for semi retirement.
On a good note I got the front guards cut and diff finished (3.9-1 L.S.D) just got to finish the disc brakes and then I can put it in and do the rear doors & guards cut.
All so managed to finish a power steering rack for my self before there all gone.
2012-05-12_12-34-06_699 - Copy.jpg 72.92K
21 downloads
2012-05-12_12-34-43_868 - Copy.jpg 109.67K
20 downloads
2012-05-12_12-35-03_902 - Copy.jpg 205.67K
19 downloads
rack fittings.jpg 368.84K
19 downloads
#42
Stinga
-

- Members
-
- 2,114 posts
.
- Name:Stinga
- Location:Wollongong, NSW
- Car:HD Holden ute, and sedan, UC torana
- Joined: 05-December 05
Posted 12 May 2012 - 08:33 PM
love the wheel choice, they will make the car.. not that it wasnt already going to be great!
#43
_dirtbag_
_dirtbag_
-
- Guests
Posted 13 May 2012 - 05:01 PM
Looking good Lenny! I think you need to donate one of your P/S racks for my torrie ute : )
#44
axistr
View Garage
-
- Members
-
- 1,212 posts
Forum Fixture
- Location:North west sydney
- Joined: 19-November 05
View Garage
Posted 13 May 2012 - 09:46 PM
No worries Dirtbag I will donate a power steering rack after your contribution. LOL
#46
axistr
View Garage
-
- Members
-
- 1,212 posts
Forum Fixture
- Location:North west sydney
- Joined: 19-November 05
View Garage
Posted 26 June 2012 - 07:55 PM
Finished all the power steering rack kits, so now it back onto the torrie.
Cut the rear guards today, I hate when the rear guards are cut on the 4 door torries, when you open up the rear doors there is a thin edge exposed on the dog leg..
I cut out the guards and left the lower lip intact, then folded up the lip and welded it back in. I had the cut out sections left over from the front guard cutouts and fitted and welded it into the dog leg. The photo doesn't show it very well but I will take some more picks when its all welded in and finished. When you look up from under side or open the door it looks much neater and the rear passengers won't take any skin off getting in.
2012-06-25_09-03-09_782.jpg 93.42K
19 downloads
2012-06-25_10-19-27_863.jpg 65.07K
18 downloads
2012-06-25_16-07-23_383.jpg 70.49K
17 downloads
2012-06-25_16-06-21_587.jpg 75.91K
19 downloads
#47
axistr
View Garage
-
- Members
-
- 1,212 posts
Forum Fixture
- Location:North west sydney
- Joined: 19-November 05
View Garage
Posted 30 July 2012 - 02:52 PM
Got around to finishing the diff installation today. I have seen a few posts regarding fitting up the park brake cables to commodore rear disc setup which didn't impress me. I had drum brake set up on the old standard bango diff so I cut off the balls from the original torana park brake cables. Then cut off the two cable ends from the commodore cable and drilled out the old cable wire. I then silver solderd them onto the original torana cable ends and fitted the cabled as per standard holder bracket on the commodore brackets and original torana keepers at the mount next to the control are mounts as standard.
To easy, it looks 100% factory made. And also works and is as strong as factory made.
Just remember you have to use silver solder no wiring solder
2012-07-23_11-09-08_388 - Copy.jpg 204.03K
17 downloads
2012-07-28_12-47-19_462 - Copy.jpg 105.02K
17 downloads
2012-07-28_13-21-31_300 - Copy.jpg 68.43K
19 downloads
#48
ls2lxhatch
-

- Members
-
- 5,332 posts
- Location:Perth
- Car:LX Hatch
- Joined: 29-May 06
Posted 30 July 2012 - 03:24 PM
Your brakes appear to be upside down, I thought the Commodore brakes usually have the handbrake lever at the bottom.
How is the clearance between the caliper and the shock?
How is the clearance between the caliper and the shock?
#49
axistr
View Garage
-
- Members
-
- 1,212 posts
Forum Fixture
- Location:North west sydney
- Joined: 19-November 05
View Garage
Posted 30 July 2012 - 03:36 PM
G'day Andy, the backing plate levers are in the same position as per factory. My diff is 15mm wider per side than the standard torana diff for two reasons. It gives me better tyre to flare clearance with 5" offset and 15mm more clearance from the lower shock mounts. When the rear pads have worn down I will still have around 10mm clearance or better. Sorry the photos don't show it better. Might have to take some more shots if anyone needs better explaination.
#50
ls2lxhatch
-
- Members
-
- 5,332 posts
- Location:Perth
- Car:LX Hatch
- Joined: 29-May 06
Posted 30 July 2012 - 08:04 PM
I thought the handbrake lever was normally at the bottom.


2 user(s) are reading this topic
0 members, 2 guests, 0 anonymous users

