Jump to content


- - - - -

UC Hatch rebuild: 383 Chev, mini tubs, full LX treatment.


  • Please log in to reply
115 replies to this topic

#1 _BLOWN V6HATCH_

_BLOWN V6HATCH_
  • Guests

Posted 13 April 2012 - 01:03 PM

So, i've been lurking around these forums for a while now, so i thought it was about time to show you all what i'm up to with my UC hatch.

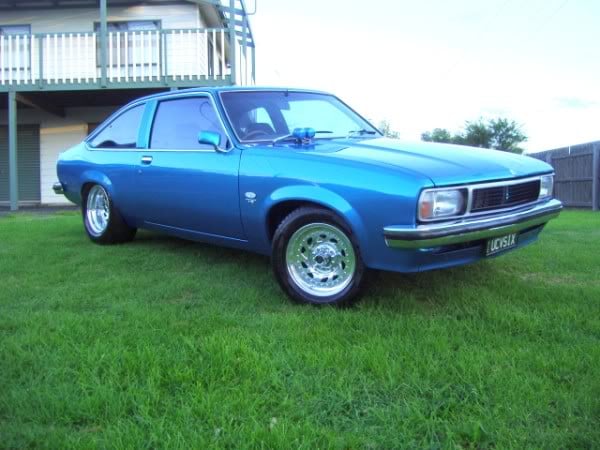
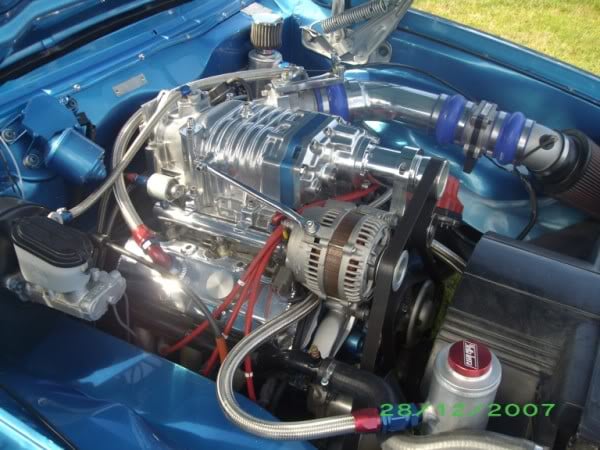
Some people may remember the car, it's been around a while and been in a couple of magazines. However, it was starting to show its age a bit, so it was time for a bit of a freshen up. It started out as just doing an auto conversion, putting a cam in the Supercharged V6 and tidying it up a bit. As it always seems to, somewhere along the line, it got way, way out of hand....

Anyway, it's undergoing a fairly extensive rebuild right now, it's been on the go for a little while. The body was getting fairly rusty in the usual spots, so it needed a fair bit of work. But, just to create more work for myself, i've gone down the whole LX conversion path (front, rear and dash). I also mini tubbed it (not quiet finished yet) to fit 10" Centreline Warriors on it wrapped in 295/50/15's.

Then the big decision was made to ditch the V6 and do a V8 conversion. I decided to go a bit old school with it and fit a carbied Chev. It'll be a street orientated 383, i'm looking for around 450HP, however i'm not overly concerned about power, along as it goes and sounds good i'll be happy.

Anyway, here are some random pics of the build. I've got heeeeeaps of pics, but i'll just run down the basics.

What it used to look like:
Posted Image
Posted Image

Progress pics:
Posted Image
Posted Image
Posted Image

Posted Image
Posted Image
Posted Image
Posted Image
Posted Image
https://cache.gmh-torana.com.au/i882.photobucket.com/albums/ac30/BlownV6Hatch/Torana%20engine%20bay/IMGP2613600x450.jpg[/IMG[IMG]https://cache.gmh-torana.com.au/i882.photobucket.com/albums/ac30/BlownV6Hatch/Torana%20engine%20bay/IMGP2622600x450.jpg[/img]
[img]https://cache.gmh-to...2623600x450.jpg
Posted Image
Posted Image
Posted Image
Posted Image
Posted Image
Posted Image
Posted Image
Posted Image
Posted Image
Posted Image
Posted Image
Posted Image
Posted Image
Posted Image
Posted Image
Posted Image
Posted Image
Posted Image
Posted Image
Posted Image
Posted Image
Posted Image
Posted Image
Posted Image
Posted Image
Posted Image
Posted Image
Posted Image
Posted Image

Edited by BLOWN V6HATCH, 13 April 2012 - 01:12 PM.


#2 _BLOWN V6HATCH_

_BLOWN V6HATCH_
  • Guests

Posted 13 April 2012 - 01:06 PM

I'm having trouble with my photobucket account, i'll fix it when i get home from work.

Edited by BLOWN V6HATCH, 13 April 2012 - 01:11 PM.


#3 MRLXSS

MRLXSS

    The Render Garage

  • Members
  • PipPipPipPipPipPipPip
  • 12,400 posts
  • Name:Matt
  • Location:Upwey, Melbourne
  • Car:355 LX Hatchback, DeLorean DMC-12, LX SS Hatch, VY Cross8 Crewman
  • Joined: 09-November 05

Posted 13 April 2012 - 01:38 PM

Wow! I have seen this car out and about a bit, it was always one of my favourite UC's

Can't wait to see it all finished with these new mods!

The C-Pillar repair looks really good mate! Did you just make those panels yourself?

#4 Neils LX

Neils LX

    Forum Fixture

  • Members
  • PipPipPipPipPip
  • 2,074 posts
  • Name:a
  • Location:North west NSW
  • Joined: 18-March 07

Posted 13 April 2012 - 05:42 PM

I liked this car before but it going to look phat as an LX.

#5 _V6 UC_

_V6 UC_
  • Guests

Posted 13 April 2012 - 06:01 PM

Bout time u got it up here Tim. Was pretty much the only reason I was going onto justcommodores lol

#6 _BLOWN V6HATCH_

_BLOWN V6HATCH_
  • Guests

Posted 13 April 2012 - 07:00 PM

Wow! I have seen this car out and about a bit, it was always one of my favourite UC's

Can't wait to see it all finished with these new mods!

The C-Pillar repair looks really good mate! Did you just make those panels yourself?


Thanks mate. Yeh, it used to get out to shows and stuff a fair bit, but it's been off the road for quiet a while now. This rebuild has been going for about 18 months so far.

Yep, made the C pillar sections my self. It was made out of a few pieces and welded together.

I liked this car before but it going to look phat as an LX.


I think so too, it was a UC for long enough, time for a change.

Bout time u got it up here Tim. Was pretty much the only reason I was going onto justcommodores lol


LOL, yeh finally made the effort to share it with fellow Torana people.

Anyway, here is the rest of the pics.

Posted Image
Posted Image
Posted Image
Posted Image
Posted Image
Posted Image
Posted Image
Posted Image
Posted Image
Posted Image
Posted Image
Posted Image
Posted Image
Posted Image
Posted Image
Posted Image
Posted Image
Posted Image
Posted Image
Posted Image
Posted Image
Posted Image
Posted Image
Posted Image
Posted Image
Posted Image
Posted Image
Posted Image
Posted Image
Posted Image

So, that brings us right up to how it sits now.

I will keep you all updated with progress updates.

Edited by BLOWN V6HATCH, 13 April 2012 - 07:02 PM.


#7 Collo

Collo

    ( . Y . )

  • Members
  • PipPipPipPipPipPipPip
  • 114,647 posts
  • Location:Newcastle...Home of me.
  • Car:A Black POS
  • Joined: 29-February 08

Posted 13 April 2012 - 07:06 PM

Always like seeing where you're up to on this. So will it be at Toranafest in sept?

#8 _BLOWN V6HATCH_

_BLOWN V6HATCH_
  • Guests

Posted 13 April 2012 - 07:11 PM

To be honest, i'm not really sure at this stage, i'd love to go when it's all finished. However, i won't rushing finishing it just to make it there. I'd rather wait until next year and have it fully finished properly.

#9 Collo

Collo

    ( . Y . )

  • Members
  • PipPipPipPipPipPipPip
  • 114,647 posts
  • Location:Newcastle...Home of me.
  • Car:A Black POS
  • Joined: 29-February 08

Posted 13 April 2012 - 07:18 PM

No worries mate. Look forward to seeing it when you do get up here.

#10 LX 0076

LX 0076

    Forum Member

  • Members
  • PipPipPip
  • 199 posts
  • Location:nsw
  • Joined: 25-April 07

Posted 14 April 2012 - 01:40 PM

Nice work, very high level of detail, i like it!

#11 Neils LX

Neils LX

    Forum Fixture

  • Members
  • PipPipPipPipPip
  • 2,074 posts
  • Name:a
  • Location:North west NSW
  • Joined: 18-March 07

Posted 14 April 2012 - 05:23 PM

I had a look before on just commodores, what made you change you mind on the UC front? Not that i mind it looks heaps better without it, ill send you mine if you want lol.

#12 _BLOWN V6HATCH_

_BLOWN V6HATCH_
  • Guests

Posted 15 April 2012 - 10:20 AM

Nice work, very high level of detail, i like it!


Thanks mate, i'm trying to do everything right the first time, so detail is pretty important.

I had a look before on just commodores, what made you change you mind on the UC front? Not that i mind it looks heaps better without it, ill send you mine if you want lol.


I just decided i wanted to go the whole hog, i didn't want it to look like bits of different models. I want it to look like it was an LX from the factory. Also, i've always wanted an LX hatch, but i can't afford to buy another hatch (this one was my first car and will never go anywhere) so i'm building one out of what i have available to me. Although i actually like the UC front, the LX looks better.

LOL, i've got enough on my hands with this project, i don't need someone elses project aswell.

Edited by BLOWN V6HATCH, 15 April 2012 - 10:22 AM.


#13 _youngy_11_

_youngy_11_
  • Guests

Posted 19 April 2012 - 07:30 PM

Tim thanks for posting :) Your standard of work done in house is unreal.

Its starting to take shape :) Its going to be one clean looking engine bay!.

See you at Torana fest 2013 :))

#14 _BLOWN V6HATCH_

_BLOWN V6HATCH_
  • Guests

Posted 19 April 2012 - 07:35 PM

Tim thanks for posting :) Your standard of work done in house is unreal.

Its starting to take shape :) Its going to be one clean looking engine bay!.

See you at Torana fest 2013 :))


Thanks Ryan. I try to do as much as i can in house, the only thing the car will be leaving my shed for is paint. Everything else is my work.

It's been taking shape a bit quicker lately as i'm pushing pretty hard to get it done. I've actually got a few more ideas for the engine bay to smooth it out a bit more, not big things, just small things that will help it a bit more.

Toranafest 2013 for sure (assuming i don't make it this year).

#15 _berro59_

_berro59_
  • Guests

Posted 19 April 2012 - 09:34 PM

Great work mate!
Having done the conversion myself i know and respect how much work you have done.
Im trying to get my torana mojo back so i went and bought some simmons yesterday!

Lx with UC floor pan............A9X?

PS what are you going to do with the hand brake? Are you going to modify the centre console or do the foot brake conversion too?

#16 _BLOWN V6HATCH_

_BLOWN V6HATCH_
  • Guests

Posted 19 April 2012 - 10:18 PM

Thanks mate, it is a fair bit of work, but the end result is more than worth it IMO.

I won't be running a console at all, i plan to just run a B&M shifter straight on the floor. So, the UC park brake will stay exactly where it is. Honestly, the foot operated park brake would drive me crazy, it's the only part of an LH-X that i don't like.

I have been following your thread a fair bit actually.

#17 Ruts

Ruts

    How Fast!?

  • Moderators
  • PipPipPipPipPip
  • 1,118 posts
  • Location:Bargo, NSW
  • Car:Blown A9X replica, Black SS hatchback, LH SLR5000
  • Joined: 23-December 06

Posted 20 April 2012 - 10:31 AM

:clap:

#18 Mort

Mort

    Lotsa Posts!

  • Members
  • PipPipPipPipPipPip
  • 2,760 posts
  • Name:Mort
  • Location:Moranbah, QLD.
  • Car:74 LH SL/R 4.2, 75 LH 4 door 186
  • Joined: 16-December 07
Garage View Garage

Posted 20 April 2012 - 02:12 PM

Great work Tim, i enjoy watching and reading about other peoples builds and projects.

I was cleaning out my old wardrobe today and found a 6yr old copy of Best Holdens, while flipping through it i noticed a blue UC hatch and the number plate rang a bell, good to see you still have the car, does your dad still have the HR, it looks nice as well and the pink and purple tends to grow on you after awhile.

Edited by Mort, 20 April 2012 - 02:14 PM.


#19 _BLOWN V6HATCH_

_BLOWN V6HATCH_
  • Guests

Posted 20 April 2012 - 05:21 PM

Thanks mate. That was a little while ago. It'll look a bit different this time, that's for sure. It's one of those cars i'll never part with, it was my first car so it holds a certain amount of sentimental value (had it about 14 years now). I would have never bought a UC hatch, but it sort of fell in my lap at the right price, now is the time to make it what i really want/ed.

Yes, Dad still has the HR, it's still pink and purple but it's getting a repaint this year as the colours are fairly outdated to say the least. It's a shame the colours have dated really, the paint itself is still nice. I've actually just mini tubbed it for him, it's now got 15x10 and 15x6 Convo Pros on it, apart from that it's still the same as when it was featured.

#20 _BLOWN V6HATCH_

_BLOWN V6HATCH_
  • Guests

Posted 22 April 2012 - 06:56 PM

Been fairly hard at it this weekend.

I started Friday night after work by paint stripping the bonnet. It had some rust in the rear corners from sitting on the ground, so i got to work on that Saturday morning. I had a donor bonnet that was absolutely rusted out, but the corners where i needed were good...Go figure?

After i'd done all the rust repairs on the bonnet and straightened out a previous repair, i gave the guards a bit of hammer and dolly lovin' to straighten out a couple of repairs that weren't quiet to my satisfaction. That was the day gone.

I did however, manage to weld up my low mount alternator bracket i've been working on after work during the week.

Today, i fixed a small rust spot in the nose cone, then deoxadined all the front panels then gave them a couple of coats of epoxy primer. I also gave the radiator support panel and inner guards a coat of epoxy aswell, the engine bay isn't quiet finished yet as there are a couple of small things i want to do, but it was starting to surface rust so i thought a coat or epoxy couldn't hurt.

Pics:

Low mount alternator bracket i made (not welded in this pic)
Posted Image
Posted Image
Posted Image
Posted Image
Posted Image
Posted Image
Posted Image
Posted Image
Posted Image

I'm really pleased with how the front conversion has come up, the inner guards won't even be picked as being modified once it's finished which is what i was looking for.

#21 _BLOWN V6HATCH_

_BLOWN V6HATCH_
  • Guests

Posted 28 April 2012 - 05:08 PM

More progress.

I did some work on the firewall to tidy up some things i wasn't happy with. The plate that bolts in with around steering column is a bit ugly IMO so i decided that needed to go. I also got rid of the lip and seam welded it. Then i cut out some lumps and bumps and put a new piece over the whole lower part. I have been thinking about a way to do this for a little while that i would be happy with, so i decided leaving the majority of the original firewall in place and simply welding a new one over the top was the best plan of attack.

So, basically most of the original firewall is still there from top to bottom but smoothed over with new steel.

I also plated over some recesses in the chassis rails at the rear to finish it all off. I still have some welding to finish off, but i ran out of MIG gas so i called it a day. I also just need to put a hole in the firewall for the steering column to go through. It'll just be a neat hole the size of the column, not the massive hole it had for the bolt in plate.

Pics:
Posted Image
Posted Image
Posted Image

Much better:
Posted Image
Posted Image
Posted Image
Posted Image

#22 _BLOWN V6HATCH_

_BLOWN V6HATCH_
  • Guests

Posted 29 April 2012 - 05:40 PM

Couple of little things done today, finished my low mount alternator bracket, just need to make an adjuster now and tidy up the welds a bit.

I also cut the hole in the firewall for the steering column and test fitted the column. Looks heaps neater IMO.

Pics:
Posted Image
Posted Image

#23 _BLOWN V6HATCH_

_BLOWN V6HATCH_
  • Guests

Posted 01 May 2012 - 08:59 PM

Sat the motor back in tonight (getting good at it now) so i could see how the engine plate is going to fit. It fits around all the obstacles perfectly, which i'm actually a little surprised about as it was made off an HQ one. Just need to make tabs to weld to the chassis, then the plate will just bolt onto the tabs. This motor won't be going anywhere, which will allow me to run with the air cleaner close to the bonnet as there will be no movement (which means no scoop, it will all be under the bonnet).

Pics:

Engine plate:
Posted Image

Fitted in the car (sorry about the lighting, my flash decided it doesn't want to work, so i used an LED light)
Posted Image

Heaps more room at the firewall with the lip removed:
Posted Image

Low mount alternator bracket fits nicely:
Posted Image

#24 _youngy_11_

_youngy_11_
  • Guests

Posted 07 May 2012 - 09:02 PM

I can see this engine bay looking so smooth once done!

#25 _berro59_

_berro59_
  • Guests

Posted 10 May 2012 - 09:12 PM

Well done on the bay!
You have been busy!

I have just started to get my torana mojo back!

Keep it up!


1 user(s) are reading this topic

0 members, 1 guests, 0 anonymous users