
G'day everyone! Just joined as new member & wondered if anyone remembers a post from a while back (I think from ls2lxhatch?) with a picture of a blue LH / LX engine bay, ghost flames on inner guards, very tidy 308 with what appeared to be a Sanden A/C compressor low-mounted on the passenger side (similar position to the alternator on ths driver's side). If anyone can tell me, what is the bracket & compressor used? Looks very similar to the low-mount alternator bracket..... I like this idea much better than high-mounting my Sanden on the passenger side like I used to on my old red 308. My new engine being built will use VR EFI heads - does anyone make a good looking compressor bracket to suit? All I can find is Chev stuff.
can anyone help RE: low mount a/c compressor bracket
Started by
_richo05_
, Jun 16 2012 09:34 PM
24 replies to this topic
#2

ls2lxhatch
-

- Members
-

- 5,332 posts
- Location:Perth
- Car:LX Hatch
- Joined: 29-May 06
Posted 16 June 2012 - 09:44 PM
#3
_richo05_
_richo05_
-

- Guests
Posted 16 June 2012 - 10:21 PM
G'day ls2lxhatch! Yes, that appears to be the one I recall. Galaxyhatch, if you're logged on, 1st thing I'd like to say is "well done!" - you deserve those trophies, prizes etc. I would really appreciate any info / suggestions you can give me as to how to go about mounting my Sanden compressor in the same position as yours. Where did you get the mount bracket? Or did you have it made? I remember another engine bay photo which showed your set up in more detail - can anybody show me one? Was that upside down position a problem in the end?
#4
ls2lxhatch
-
- Members
-
- 5,332 posts
- Location:Perth
- Car:LX Hatch
- Joined: 29-May 06
Posted 17 June 2012 - 03:49 AM
It would be worth sending a pm to galaxyhatch. According to hist profile he has not logged on since Mar 2012. The pm will probably also send him an email.
Try this link.
http://www.gmh-toran...41-galaxyhatch/
Try this link.
http://www.gmh-toran...41-galaxyhatch/
#6
_galaxyhatch_
_galaxyhatch_
-
- Guests
Posted 23 June 2012 - 06:40 PM
Hi Rich05,
Lucky I have these messages come through my Optus account as I haven't had the chance to have a look at GMH Torana forum for a long time.
I tell you what though............if I had a buck for everyone who asked me about that AC install ......................I would be a rich man
But luckily I love letting everyone know how have done things to my car................no secrets here.
The reason I did it this way was neatness, asymmetry and to hide the compressor............my opinion is that if I open a bonnet I want to see an engine......not every braided hose, compressor, and accessory hanging off it.
I have posted a pic of my wife’s SLR 5000, and my SS for comparison (I would have done this to my missus car also but I was going for original look)
You are right one the money with your assumption....It is a reverse mounted, low mount alt bracket. I machined up some round stock into spacers using a lathe and veneers to get them accurate, and then had them chromed.
Worked out that because of the position of the oil pump, I couldn't swing the compressor like the alternator to tighten the belt. So I had make up a solid bracket arm to the base of the compressor and welded a commodore pulley idler with adjuster to it and spent hours smoothing out the welds and the edges then had it chromed also.
I had cut off the un-used lugs on the compressor when I rebuilt it and polished it...............but one of my mistakes was that I cut the wrong ones off and ended up having to mount the compressor upside down which does make it hard to fill with oil and hard for the compressor to retain the oil. (so don't make the same mistake) even though the hoses look better coming from the bottom, it can still look good with 180 deg bends out of the discharge and suction fittings at the top and then back down to the chassis rail.
I made up the custom crank and water pump pulley (but now I think you can buy them with the Gilmer set)
The hoses disappear under the rail and to the receiver dryer at the back of the wheel well (out of sight).
I hope all this helps and I didn't waffle on too much. As always.....if you need any more help....let me know.
Cheers Dave
#7
Ando
 View Garage
-
- Members
-
- 527 posts
Forum Fixture
- Location:Coolangatta
- Car:6/'76 L32 SS white & black. 9/'76 L31 SS gold. 5/'77 L31 SS Chamois. 3/'79 UC SL Deluxe hatch.
- Joined: 10-February 08
View Garage
Posted 23 April 2014 - 06:54 PM
Just looking at doing this now..
#8
_Figjam61_
_Figjam61_
-
- Guests
Posted 14 May 2014 - 06:22 PM
Ando, I'm just working through this as well. What unit are you using inside your car.
#9
Ando
View Garage
-
- Members
-
- 527 posts
Forum Fixture
- Location:Coolangatta
- Car:6/'76 L32 SS white & black. 9/'76 L31 SS gold. 5/'77 L31 SS Chamois. 3/'79 UC SL Deluxe hatch.
- Joined: 10-February 08
View Garage
Posted 17 May 2014 - 06:54 PM
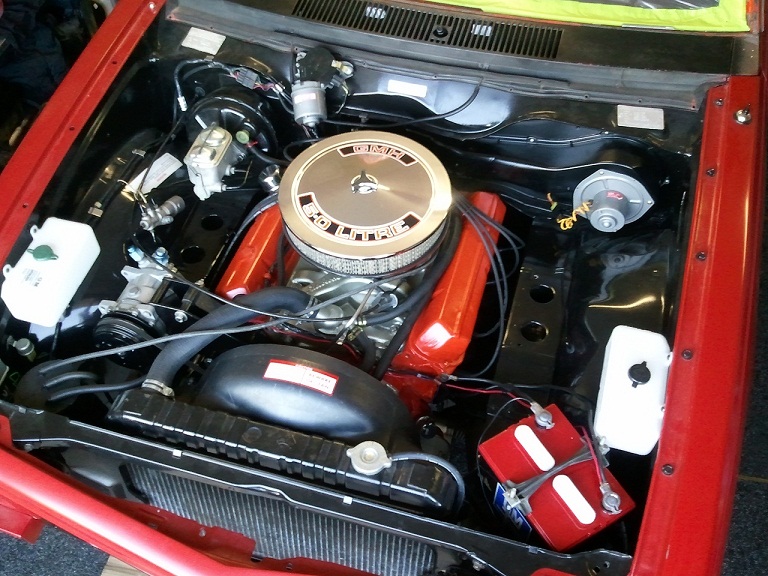
Figjam61, I'm looking at the Sanden compressor, model SD5H09 as it's compact enough to low mount it in front of the oil pump & above the oil filter. Should be arriving in a week or two..
Attached Files
-
 5h09_02_b.jpg 139.56K
12 downloads
5h09_02_b.jpg 139.56K
12 downloads
-
5072.jpg 68.87K
10 downloads
-
SD5H09_b.jpg 111.72K
8 downloads
#10
_Figjam61_
_Figjam61_
-
- Guests
Posted 26 May 2014 - 10:16 PM
Sorry, haven't been on for a while. Thanks for the info,.
Where did you get the mounting brackets.
Will it clash with the oil sender.
Where did you get the mounting brackets.
Will it clash with the oil sender.
#11
Cook
-

- Members
-
- 1,527 posts
Forum Fixture
- Location:Melbourne
- Car:LX Hatch
- Joined: 27-February 15
Posted 22 July 2015 - 04:01 PM
To galaxyhatch, you posted a pic in this thread of your wife's car with aircon. Can you tell me if the bracket in that car is original or have you had to manufacture it from something else? - Cheers
#12
HDT166
-
- Members
-
- 115 posts
Forum Member
- Name:Aaron
- Location:Perth
- Car:Lx 2 door, VC HDT
- Joined: 11-August 13
Posted 02 June 2019 - 05:48 PM
I tried an alternator bracket on the opposite side flipped and couldn't get anything to line up. Are there more than one alternator bracket?
#13
limo
-
- Members
-
- 2,672 posts
Lotsa Posts!
- Location:Adelaide
- Car:most Torana models, Jag, Vauxhall, Triton, Staesman
- Joined: 24-May 06
Posted 03 June 2019 - 06:17 PM
I know of 3, Torana and Holden H series that look similar and I have one some where that,s supposed to mount alternator and air
con compressor
#14
Cook
-
- Members
-
- 1,527 posts
Forum Fixture
- Location:Melbourne
- Car:LX Hatch
- Joined: 27-February 15
Posted 03 June 2019 - 08:26 PM
Aaron, throw up a pic of the one you are trying to use and I'm sure you will get a response as to right or wrong. Cheers Ron
#15
Ando
View Garage
-
- Members
-
- 527 posts
Forum Fixture
- Location:Coolangatta
- Car:6/'76 L32 SS white & black. 9/'76 L31 SS gold. 5/'77 L31 SS Chamois. 3/'79 UC SL Deluxe hatch.
- Joined: 10-February 08
View Garage
Posted 06 June 2019 - 05:23 AM
It can be done. Did mine a few years ago.
I went through a lot of trial fitting & different mock ups to make it work for my car.
It's one of those jobs you have to figure out yourself but I got there in the end.
Cheers
Attached Files
-
IMG_2078.JPG 215.3K
26 downloads
#16
HDT166
-
- Members
-
- 115 posts
Forum Member
- Name:Aaron
- Location:Perth
- Car:Lx 2 door, VC HDT
- Joined: 11-August 13
Posted 08 June 2019 - 11:53 PM
Thank you for the replies, I'm onto itnow , I think. I have done something similar to the mount you have made but am using a vn v8 alt mount , then using a rear entry plate for the sanden compressor . Once I get closer to it not looking like shit I will post some pics. The chassis rail lip will need a slight trim, mainly because I am anal about clearance . It is definitely something you have to work out as you go. It's tight space on the passenger side but I am so far really happy I stuck with putting it there, it's a lot easy to mount it high , but I really like the look of it being not smack bang in your face.
#17
axistr
View Garage
-

- Members
-
- 1,208 posts
Forum Fixture
- Location:North west sydney
- Joined: 19-November 05
View Garage
Posted 11 June 2019 - 05:39 PM
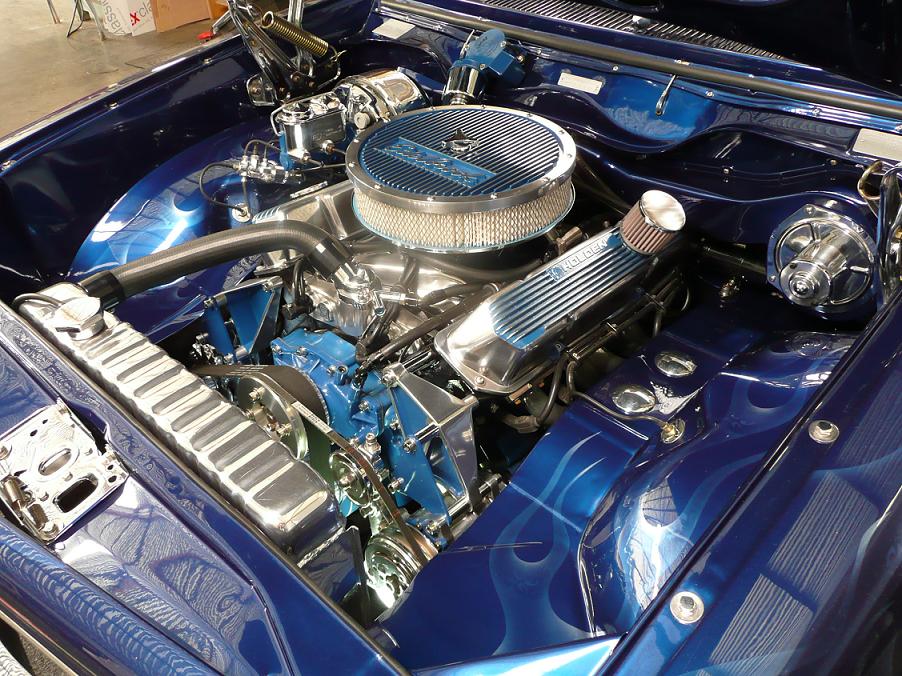
Both my Toranas have A/C, I found it better to put a Sanden compressor on the right of the Holden V8 and Left on the Chev engine. Both mounted down low so you cant see it without looking a bit harder.
IMG_20140912_163804_386_22752.JPG 289.53K
17 downloads
IMG_20150116_093301_7032753.JPG 316.97K
11 downloads
DSC_0136_22350.JPG 144.99K
11 downloads
DSC_0135_12345.JPG 212.21K
8 downloads
Attached Files
-
IMG_20150119_150834_620 - Copy (2).jpg 214.94K
14 downloads
#18
HDT166
-
- Members
-
- 115 posts
Forum Member
- Name:Aaron
- Location:Perth
- Car:Lx 2 door, VC HDT
- Joined: 11-August 13
Posted 11 June 2019 - 07:10 PM
is galaxyhatch compressor only monted by one bolt? looks like it in the pictures
#19
HDT166
-
- Members
-
- 115 posts
Forum Member
- Name:Aaron
- Location:Perth
- Car:Lx 2 door, VC HDT
- Joined: 11-August 13
Posted 16 June 2019 - 10:39 PM
Really like how you did your ac , axistr but how did you mount the alt on the passenger side ? What bracket did you Use?
#20
axistr
View Garage
-
- Members
-
- 1,208 posts
Forum Fixture
- Location:North west sydney
- Joined: 19-November 05
View Garage
Posted 17 June 2019 - 08:10 PM
Really like how you did your ac , axistr but how did you mount the alt on the passenger side ? What bracket did you Use?
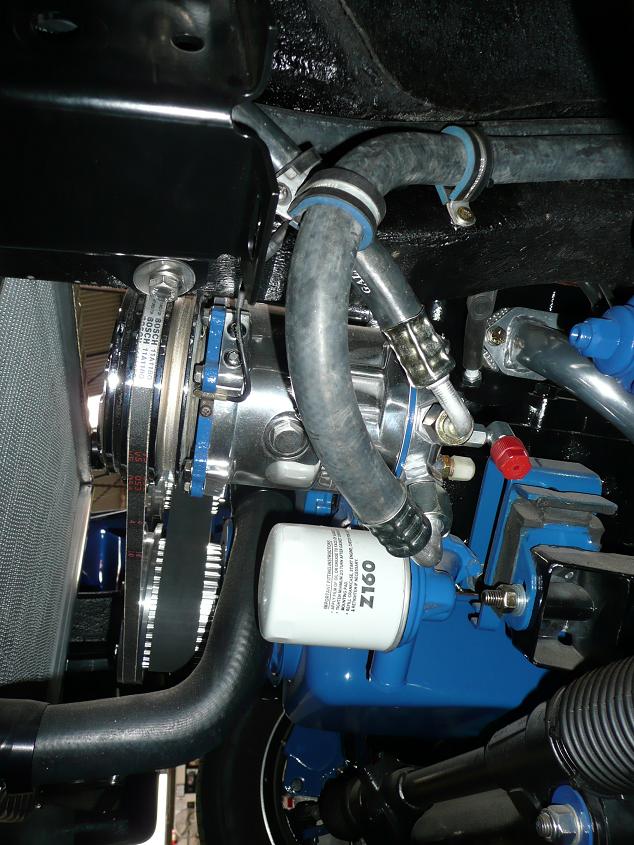
G'day Aaron, I used the original VR 5lt commodore alternator bracket and modified it slightly so the alternator mounted on the inner bolt and made a spacer for the outer. This allowed me to move the alternator in towards the engine by around two inches to clear the chassis. My alternator is adjustable but is all the way in. I have an adjustable idler pully to adjust the belt, I am running a serpentine belts. One belt drives the alternator, water pump, power steering pump. The second belt drives the A/C compressor only.
#21
HDT166
-
- Members
-
- 115 posts
Forum Member
- Name:Aaron
- Location:Perth
- Car:Lx 2 door, VC HDT
- Joined: 11-August 13
Posted 18 June 2019 - 11:07 PM
G'day Aaron, I used the original VR 5lt commodore alternator bracket and modified it slightly so the alternator mounted on the inner bolt and made a spacer for the outer. This allowed me to move the alternator in towards the engine by around two inches to clear the chassis. My alternator is adjustable but is all the way in. I have an adjustable idler pully to adjust the belt, I am running a serpentine belts. One belt drives the alternator, water pump, power steering pump. The second belt drives the A/C compressor only.
That's great work. I'm playing around with putting my alt on the passenger side , I used the head hole on the outside sort of like what you did , I rotated the alt housing and I have good clearance and good swing for adjustments . But I'm using v belts .
My dilemma at the moment is the alt doesn't line up with the crank . So it looks like I need to space the water pump and crank pulley . Or I could use a gilmer setup . Unsure which way to go
#22
axistr
View Garage
-
- Members
-
- 1,208 posts
Forum Fixture
- Location:North west sydney
- Joined: 19-November 05
View Garage
Posted 19 June 2019 - 07:21 PM
Yeah I had to space my alternator foward to get it to line up with the other pulleys. I also had to bend the bracket slightly to compensate for the foward spacing but was a reasonably simple mod.
#23
Ando
View Garage
-
- Members
-
- 527 posts
Forum Fixture
- Location:Coolangatta
- Car:6/'76 L32 SS white & black. 9/'76 L31 SS gold. 5/'77 L31 SS Chamois. 3/'79 UC SL Deluxe hatch.
- Joined: 10-February 08
View Garage
Posted 20 June 2019 - 07:03 AM
This is another AC & PS unit I made using 2 plates, long bolts & spacers.
I used 2 x 11A V belts which are individual for the compressor & pump.
The belts run over a Holden 3 row crank pulley. Everything clears.
The only change I made was to put the oil sender on a 90 degree elbow to clear the back of the compressor.
No need to change the Torana alternator location. The idler pulleys are slot adjustable for belt tensioning.
I find this design is a lot better to my first design as there is no belt slip when under load.
Cheers
IMG_4636.jpg 61.35K
11 downloads
IMG_4637.jpg 60.92K
9 downloads
IMG_4638.jpg 52.38K
8 downloads
IMG_0008.jpg 72.35K
11 downloads
#24
HDT166
-
- Members
-
- 115 posts
Forum Member
- Name:Aaron
- Location:Perth
- Car:Lx 2 door, VC HDT
- Joined: 11-August 13
Posted 20 June 2019 - 04:07 PM
that looks awesome , great work , very neat and tidy
#25
axistr
View Garage
-
- Members
-
- 1,208 posts
Forum Fixture
- Location:North west sydney
- Joined: 19-November 05
View Garage
Posted 20 June 2019 - 06:07 PM
Nice Ando.


1 user(s) are reading this topic
0 members, 1 guests, 0 anonymous users

