Jump to content


Photo
* * * * * 1 votes

Time to stop dreaming and start doing!


  • Please log in to reply
113 replies to this topic

#76 HIBERN8

HIBERN8

    Forum Member

  • Members
  • PipPipPip
  • 130 posts
  • Name:Mark
  • Location:SA
  • Car:1974 LH S
  • Joined: 05-July 12

Posted 04 July 2015 - 12:54 PM

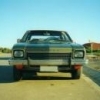
Just a real quick update - engine with a few more shiny bits on there :buttrock:


Attached File  P7031239.jpg   104.49K   10 downloads


#77 _Gunmetal LH_

_Gunmetal LH_
  • Guests

Posted 05 July 2015 - 10:15 PM

Looking sweet!


That green looks awesome.


Gotta ask, what's that black thing on the left of the pic behind the hydraulic lift?  Looks like a brake light and indicator?


#78 HIBERN8

HIBERN8

    Forum Member

  • Members
  • PipPipPip
  • 130 posts
  • Name:Mark
  • Location:SA
  • Car:1974 LH S
  • Joined: 05-July 12

Posted 05 July 2015 - 11:23 PM

Thanks mate!

Haha thought someone might ask about that...

It's actually a bat mobile!!

#79 HIBERN8

HIBERN8

    Forum Member

  • Members
  • PipPipPip
  • 130 posts
  • Name:Mark
  • Location:SA
  • Car:1974 LH S
  • Joined: 05-July 12

Posted 12 July 2015 - 10:30 PM

OK so the engine has taken position in the bay and I'm starting to see my vision come together.. There are a few small aesthetic things that need to be addressed such as changing that dizzy cap colour but I'm very happy to finally be at this stage of the project. Hope you enjoy this engine eye candy:


Attached File  P7101245.jpg   121.54K   5 downloads


Attached File  IMG_2360.JPG   124.23K   9 downloads


Attached File  IMG_2365.JPG   127.33K   12 downloads


#80 BIG KEV

BIG KEV

    Forum Fixture

  • Members
  • PipPipPipPipPip
  • 1,218 posts
  • Name:Kevin
  • Location:SYDNEY
  • Car:LHSLR5000 and The 6LT Project
  • Joined: 02-January 12

Posted 13 July 2015 - 07:43 AM

Looks awesome .....I could eat that eye candy ....lol

#81 IMORAL

IMORAL

    Bored

  • Members
  • PipPipPipPipPipPip
  • 2,568 posts
  • Name:Paul
  • Location:As far away from WA as possible
  • Car:LX SS HATCH - IMORAL
  • Joined: 24-February 11
Garage View Garage

Posted 13 July 2015 - 10:25 AM

Top job. Cant wait to see the finished product. You should be proud :clap:


#82 _parsons5000_

_parsons5000_
  • Guests

Posted 13 July 2015 - 04:46 PM

keep it up mate , plenty of headaches ahead , all worth it in the end :)


#83 _LS1 Taxi_

_LS1 Taxi_
  • Guests

Posted 13 July 2015 - 05:25 PM

Damn that's a sweet bay!

More info on bat mobile please

#84 Ice

Ice

    Cool

  • Members
  • PipPipPipPipPipPipPip
  • 15,162 posts
  • Name:Gene
  • Location:Galaxy's away from Ipswich
  • Car:77 HZ Sandman Van
  • Joined: 03-January 07

Posted 13 July 2015 - 06:42 PM

Green is nice

#85 IMORAL

IMORAL

    Bored

  • Members
  • PipPipPipPipPipPip
  • 2,568 posts
  • Name:Paul
  • Location:As far away from WA as possible
  • Car:LX SS HATCH - IMORAL
  • Joined: 24-February 11
Garage View Garage

Posted 13 July 2015 - 09:47 PM
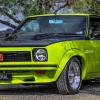
Green is nice


Bout time you said something that makes sense :P

#86 HIBERN8

HIBERN8

    Forum Member

  • Members
  • PipPipPip
  • 130 posts
  • Name:Mark
  • Location:SA
  • Car:1974 LH S
  • Joined: 05-July 12

Posted 20 April 2016 - 12:22 AM

It's been awhile.. but I guess that is a bit of a common theme amongst some of our projects 😩
Things are chugging along slowly with the main thing holding progress up being cost.. lots of expensive parts to buy. The next big goal is start up. Have got a fuel tank on the way, have got the radiator sorted but not in yet, fuel lines have been run, brake lines have been run, wiring has been started. Other small things are steering rack is on, booster and master are on, headers are on, have got the valve covers and air filter ready to go, some interior planning has begun in terms of dash/gauges and the flares have been fixed up.
Once a few more things are done I'll provide some picture updates. Hopefully it won't be quite so long between updates!

#87 N/A-PWR

N/A-PWR

    CABIN ENGINE CONTROLS GALORE

  • Members
  • PipPipPipPipPipPipPip
  • 9,619 posts
  • Name:Dave I
  • Location:Wooroloo, 65km's East of Perth
  • Car:'1969' LC RAT TORANA
  • Joined: 08-December 12

Posted 20 April 2016 - 12:34 AM

Excellent Mark.


#88 _kayesem_

_kayesem_
  • Guests

Posted 11 May 2016 - 03:27 PM

Sweet build, nice work : )


Yeh as per page 1 - the lower indicator front was picked up as a design flaw after manufacturing began. Did not meet ADR due to being about 1/2" too low. Possible cause of the mix-up being something along the lines of un-laden, empty car vs car holding a tank of fuel despite also carrying a number of free-loaders aka passengers. (design height - kerb height)


Front nosecone panel was used with adjusted lense mounting until a new nosecone design was introduced in '75 and (i'm guessing) that the lower chrome trim surround for the grill / radiator air-intake opening was probably deleted at this time.


The front spoiler cutout alignments took longer (some would say forever) to get the corresponding tidy up. All L34s had the lower indicator fronts and therefore properly fitting spoilers.


Source - Torana Tough - Norm Darwin


I like Race Tech digital stepper motor gauges with adjustable (idiot) warning lights. Shit all over auto-over-priced-o-meters imho.


Would be interested to see copper plated centers on those wheels just for something different but it's a nice colour and fair enough to want to share it around.


All the best with the rest of your build, so far so good : )


Also, plenum needs to be checked from underneath, not up top. Need to cut out that top panel to even see it / get to it. Yes that means arranging your body in semi-impossible ways to even get a look up at it, from the place where the front passenger's feet would normally hang out.


Edited by kayesem, 11 May 2016 - 03:36 PM.


#89 Cook

Cook

    Forum Fixture

  • Members
  • PipPipPipPipPip
  • 1,519 posts
  • Location:Melbourne
  • Car:LX Hatch
  • Joined: 27-February 15

Posted 11 May 2016 - 03:55 PM

Hi Mark,  Really love what you have done and the colour is just spot on.  The engine bay is exactly what I would like to achieve, just smoothed out enough to go wow. Well done.  Apologies if mentioned earlier in the build but what did you end up doing with the bolt heads for the bumper brackets that protrude into the bay on the canister side.  Can't quite see from the pics.   Cheers Ron 


#90 _Mox_

_Mox_
  • Guests

Posted 11 May 2016 - 09:14 PM

Good on you Mate, this is a awesome build keep it up,


#91 HIBERN8

HIBERN8

    Forum Member

  • Members
  • PipPipPip
  • 130 posts
  • Name:Mark
  • Location:SA
  • Car:1974 LH S
  • Joined: 05-July 12

Posted 13 May 2016 - 02:33 AM

Hey, thanks for the additional info in regards to my nosecone, I always love learning more about the history of these cars and this forum never disappoints in coming up with the goods!

Still looking at gauges, there are so many to choose from it's mind boggling! Think I may know kinda what I want but still a bit pricier than I'd prefer to pay.

I'm hoping the coloured wheels won't push the colour too far but won't really know until it's all painted. I try not to overthink any of my choices too much and just go with my gut otherwise I'll never get any sleep haha

I'm not the best contortionist but from what I can gather the plenum is fairly decent. The car was actually pretty tidy all around apart from the obvious problem area so once this rebuild is complete I hope it will be quite some time before needing another! 😁

Cook, that was definitely the goal! I didn't want to go the completely smooth look, just enough to give it a bit of wow whilst still maintaining a bit of character from its original form. Have tried to maintain some symmetry so the replacement battery section is quite similar to the opposite side so the bolt heads are all showing. Will hopefully be posting some more pics in the coming weeks so will try to get some better angles of everything.

Thanks everyone for all the comments, it's always nice to know that other Torana enthusiasts appreciate the thought that has gone into my rebuild.

#92 _kayesem_

_kayesem_
  • Guests

Posted 17 May 2016 - 08:23 PM

Makes sense mate. The less complicated the better, I would tend to agree.


Yeh the plenum is a common thing. If it ain't cactus, that's great. You'll know if it's really upset because it cries all over the floor.


I thought you were joking about the bat mobile. Then it was like, ayy, hang on a sec, wtf, nananannanannanna ZAP NAP POW


#93 HIBERN8

HIBERN8

    Forum Member

  • Members
  • PipPipPip
  • 130 posts
  • Name:Mark
  • Location:SA
  • Car:1974 LH S
  • Joined: 05-July 12

Posted 23 April 2017 - 08:00 PM

I think it's about time for an update.. a fair bit has been done since my last update but the big moment I've been waiting for happened on Friday.. the boys at autotransformers have done a stunning job on the car thus far and this is no exception. I'll let the video do the talking 😉

https://www.facebook...01309919900434/

#94 SmacT

SmacT

    Forum Fixture

  • Members
  • PipPipPipPipPip
  • 942 posts
  • Name:Sam
  • Location:Sydney
  • Car:LX 4dr 383, TKX, BW
  • Joined: 24-December 08

Posted 23 April 2017 - 10:22 PM

Holy shitballs - that looks magnificent.


#95 SmacT

SmacT

    Forum Fixture

  • Members
  • PipPipPipPipPip
  • 942 posts
  • Name:Sam
  • Location:Sydney
  • Car:LX 4dr 383, TKX, BW
  • Joined: 24-December 08

Posted 24 April 2017 - 09:40 PM

I've watched this a few times now... :-) Just wondering why they sprayed it panels on? Obviously a quality job, though most I know spray panels off. What's the thinking there? I like the idea of not having to bolt shiny new panels not a car and risk scratching/dropping them. Not criticizing at all, just want to understand why they/you went that way.


Also, was the masking for the blackouts done the same day as the first coats went on? I would have shat myself masking paint that fresh - again, what's the thinking?


Like I said, looks awesome and I love seeing how people do this stuff.


#96 HIBERN8

HIBERN8

    Forum Member

  • Members
  • PipPipPip
  • 130 posts
  • Name:Mark
  • Location:SA
  • Car:1974 LH S
  • Joined: 05-July 12

Posted 25 April 2017 - 02:13 AM

Hey, first of all thanks for the comments it's nice to hear the positive feedback 😬 The colour and blackout was all done the same day. I was a bit freaked about it too when they told me they planned to do it that way haha I wasn't really sure how it was going to work masking over freshly laid paint but I guess it dries a lot quicker than I thought 😝 I think the fact that it was all done on the same day, having the panels on kind of made sense in the fact that they could paint the green, mask up, paint the black, unmask and then clear coat the lot. I guess it also helped get a nice straight line across all the panels. Though I believe it did present a bit of a challenge in regards to the paint that goes through the gaps.
I guess once it's all unmasked I'll get to see exactly how it turned out but I'm very happy with it thus far! Once all the flares and bonnet etc are painted and fitted I'll post some pics. I need to post some other updates too on engine bay progress and drop tank etc so stayed tuned 😊

#97 _SQ5_

_SQ5_
  • Guests

Posted 25 April 2017 - 10:26 AM

Nice work - will watch with interest the remaining build. :P 


#98 SmacT

SmacT

    Forum Fixture

  • Members
  • PipPipPipPipPip
  • 942 posts
  • Name:Sam
  • Location:Sydney
  • Car:LX 4dr 383, TKX, BW
  • Joined: 24-December 08

Posted 25 April 2017 - 02:51 PM

Yes, more pics please! Did they back-mask the gaps? Really interested in how they made it work, because it seems to save a lot of time and reduces the risk of a re-assembly stuff-up. Really cool.


Look forward to seeing more!


#99 HIBERN8

HIBERN8

    Forum Member

  • Members
  • PipPipPip
  • 130 posts
  • Name:Mark
  • Location:SA
  • Car:1974 LH S
  • Joined: 05-July 12

Posted 25 April 2017 - 05:52 PM

I reckon the main issue was the gaps between the front panels and the doors and the front panels and the nose cone. All the other gaps would have been masked up.

I think this way did save a lot of time too. Will put some pics up when I'm on the computer. I think the image files are too big to do it from my phone.

#100 Covert

Covert

    Forum Fixture

  • Members
  • PipPipPipPipPip
  • 1,987 posts
  • Location:In my LH
  • Car:LH
  • Joined: 08-November 13

Posted 16 May 2017 - 06:19 AM

Awesome video Mark   :spoton:


1 user(s) are reading this topic

0 members, 1 guests, 0 anonymous users