
That colour looks very classy. Be great to see it finished and out in the sun because I think it will look fantastic in that colour and the car has a very clean look. 6 mths I don't know how you did it so fast.

LX project
Started by
_LS1 Taxi_
, Feb 26 2013 05:15 PM
469 replies to this topic
#102

ls2lxhatch
-

- Members
-

- 5,335 posts
- Location:Perth
- Car:LX Hatch
- Joined: 29-May 06
Posted 10 July 2013 - 01:32 AM
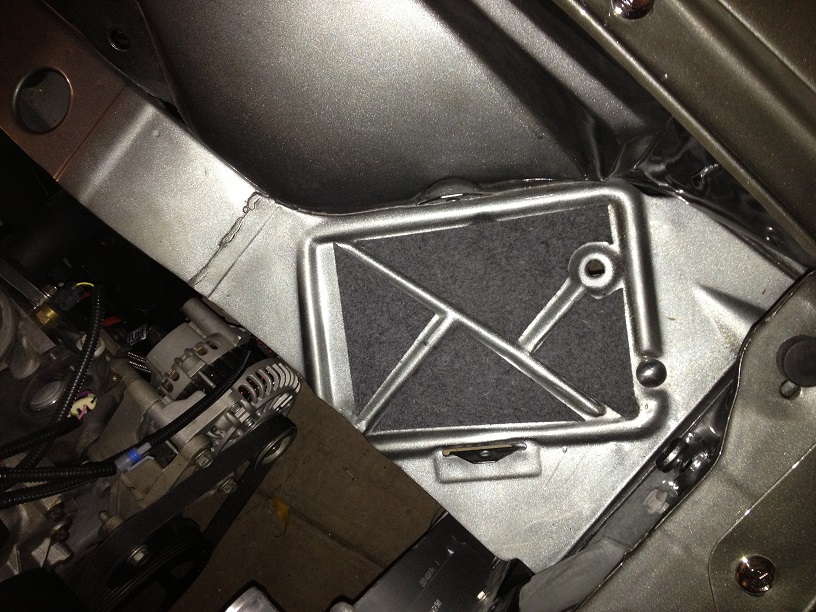
You would probably be better off using rubber instead of felt. The felt may hold moisture when you wash the car.Made this felt patch for the battery to sit on and have temp installed the battery. Still need to make all the cables and wire it up but that's next so things are moving along.
Edited by ls2lxhatch, 10 July 2013 - 01:33 AM.
#103
_LS1 Hatch_
_LS1 Hatch_
-

- Guests
Posted 10 July 2013 - 01:43 AM
Or something like these perhaps ?
http://www.amazon.co...f=pd_sim_auto_3
http://www.summitrac...ymat1/overview/
(I use an Optima battery in mine and have it mounted right against a billet mount and have no issues..but they are a sealed battery..supposedly of course)
#104
_LS1 Taxi_
_LS1 Taxi_
-
- Guests
Posted 10 July 2013 - 06:42 PM
That colour looks very classy. Be great to see it finished and out in the sun because I think it will look fantastic in that colour and the car has a very clean look. 6 mths I don't know how you did it so fast.
I'm hanging to see it in the sun too. Keeps me motivated. Cheers for the nice words. It really has been tonnes of work and it's nowhere near done yet. I'm hoping to turn the key on it in the next few days and bring it to life. Getting it started is one of the milestones I've been working towards.
Cheers for the ideas Andy and Jeff. I'll keep looking into it. Nothing is final yet 
I'll do a proper update in a few days when I have more time. Things are still progressing.
#106
_evilsim_
_evilsim_
-
- Guests
Posted 10 July 2013 - 08:36 PM
Yeah this car is comming out amazing ... the colour (gunmetal) along with silver are some of my favs.
#107
_LS1 Taxi_
_LS1 Taxi_
-
- Guests
Posted 12 July 2013 - 10:56 PM
Cheers guys
Here is a pic of the new slotted HQ rotors, pads as fitted (after I discovered the commo brake secret).
 photo1.jpg 110.57K
9 downloads
photo1.jpg 110.57K
9 downloads
So the time had come to fire up the motor for the 1st time. A few jobs were remaining like mounting the remote filter, fitting the coils, fitting the fuel system and wiring it all up inside the cabin. First job was the coils. I always hated the look of the coils on the heads on the LS engines without engine covers so after a bit of research I decided to get these Edelbrock coil covers.
photo2.jpg 130.73K
8 downloads
The coil bolt up to the underside of the covers and do away with all the factory brackets.
photo3.jpg 133.12K
9 downloads
photo4.jpg 145.2K
9 downloads
Really happy with how they came out.
photo5.jpg 137.36K
8 downloads
Next job was the remote filter. I mounted it down between the alternator and the battery (which I think is where most people mount it). Plumbed it in now worries and then it was time to get a filter. Not as easy as it sounds as google couldn't give me answers so I headed of to raid supercheap with the remote filter in hand. Ended up finding quite a few that fitted and settled on this silver one as it was pretty compact.
photo6.jpg 109.3K
10 downloads
At this stage I cranked the motor over to make sure oil was pumping....all good.
Then it was onto the fuel system. I mounted the MSD fuel pump and filter/pressure reg assembly under the boot, on the passenger side of the fuel tank. This suited my plumbing nicely. I plan to have an exhaust pipe running beneath it so I've made up a heat shield out of 2mm alloy plate.
photo7.jpg 101.2K
7 downloads
Then it was onto the wiring. It really wasn't that hard to tie the loom into the torana loom although I've done a few of these type of things in the past. Got it all hooked up, turned the key, fuel pump primes but no crank....nothing. I figured it was obviously something on the start circuit. Schoolboy error, I left the T bar park neutral switch unplugged. Bridged that with a split pin, turned the key and boom...she fired straight up...straight out the headers, loud as frOck (and it was a school night). Promptly shut it down after 2 or so seconds and drank a beer to celebrate.
I figured to get it running and check the cooling system is good etc at home before I take it off to get an exhaust, I had better make up so temp exhausts to quieten it down to a reasonable level. Headed off to my local exhaust guy, had a yarn, then scabbed his bin. Came home with these gems.
photo8.jpg 113.68K
8 downloads
Edited by LS1rana, 12 July 2013 - 10:57 PM.
#108
_LS1 Taxi_
_LS1 Taxi_
-
- Guests
Posted 12 July 2013 - 10:59 PM
Quickly whipped up 2 crappy exhausts, fitted them and much better. Cops won't need to come by after all.
photo9.jpg 108.9K
7 downloads
Lowered it back down to the ground, cleaned up the shed, drank a few beers and enjoyed the clean shed and car.
photo10.jpg 120.01K
8 downloads
photo11.jpg 103.69K
7 downloads
This photo shows where i had the front guards modded to clear the rubber.
photo12.jpg 110.76K
11 downloads
photo13.jpg 103.96K
10 downloads
I'm tipping the shed won't stay clean for long...got to get this thing back together!
Thanks.
#109
kudu
-
- Members
-
- 1,467 posts
Forum Fixture
- Location:Wanganui - New Zealand
- Car:LH SL/R 5000
- Joined: 08-November 05
Posted 12 July 2013 - 11:51 PM
What a great read...and car. One of my all time favourite LX's was when I came over to OZ for Summernats 17 and there was a gunmetal greay LX and it was the ducks nuts!!

#111
ls2lxhatch
-
- Members
-
- 5,335 posts
- Location:Perth
- Car:LX Hatch
- Joined: 29-May 06
Posted 13 July 2013 - 11:27 AM
Oil cap to go with the covers.

BQkGF-RM)w~~60_35.JPG)
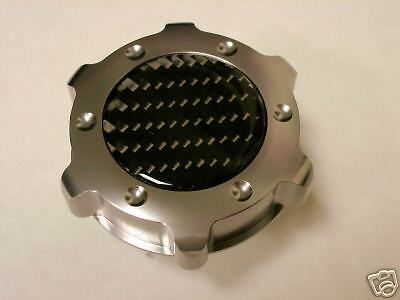
In my opinion it is preferable to use an oil filter with a bypass valve like the K&N HP-3003 for chevy style remote filters. What thread is your filter mount?
Edited by ls2lxhatch, 13 July 2013 - 11:34 AM.
#112
_LS1 Taxi_
_LS1 Taxi_
-
- Guests
Posted 14 July 2013 - 12:02 PM
Oh yeah, I definitely need a flash oil cap. Thanks Andy.
The thread is 3/4 I think.
#113
_LS1 Hatch_
_LS1 Hatch_
-
- Guests
Posted 14 July 2013 - 12:06 PM
This photo shows where i had the front guards modded to clear the rubber.
When you trim them the rest of the way for flares, you will really be all set. 
#114
_LS1 Taxi_
_LS1 Taxi_
-
- Guests
Posted 14 July 2013 - 12:10 PM
LOL.
The postage on those caps from the states is more than the price of the cap!
Maybe Autobarn or someone sell something?
#115
_LS1 Hatch_
_LS1 Hatch_
-
- Guests
Posted 14 July 2013 - 12:17 PM
How much is postage ? $25 - 30 or so ?
#117
ls2lxhatch
-
- Members
-
- 5,335 posts
- Location:Perth
- Car:LX Hatch
- Joined: 29-May 06
Posted 14 July 2013 - 01:39 PM
Often the remote mounts either use a Ford Style 3/4-16 or Chevy Style 13/16-16 filter.Oh yeah, I definitely need a flash oil cap. Thanks Andy.
The thread is 3/4 I think.
Sounds like yours may use a Ford style filter. The K&N HP-3001 has a built in bypass, 3/4-16 thread, Height 143 mm, Dia 93 mm.
http://www.knfilters...px?prod=HP-3001
#118
_LS2 Hatch_
_LS2 Hatch_
-
- Guests
Posted 14 July 2013 - 01:54 PM
Sorry to back up a stage or two, but where did you get the coil covers from? They look great. Are they pricey?
I was going to put the large engine cover on, but those covers look awesome
I was going to put the large engine cover on, but those covers look awesome
#119
_LS1 Hatch_
_LS1 Hatch_
-
- Guests
Posted 14 July 2013 - 02:00 PM
http://www.summitrac.../parts/edl-4118
?
(they come in polished and black as well..)
I moved my coils into the intake manifold runners, but those covers are not too bad an idea either
#120
_LS2 Hatch_
_LS2 Hatch_
-
- Guests
Posted 14 July 2013 - 02:25 PM
Sweet. Thanks, I really like them
#121
_LS1 Taxi_
_LS1 Taxi_
-
- Guests
Posted 18 July 2013 - 08:46 AM
Yep, I got the coil covers from Summit. (too expensive locally sadly)
They install up nicely albeit after some fairly major trimming (refer photo above). These ones are the polished variety, they come in unpolished and black as Jeff said.
I've been busy with the final radiator install, fans, wiring, heater hose plumbing, had custom brake lines made and bled braking system.
I ran the engine up to temp and once it pressurised I have a coolant leak on the lower heater hose. Will need to get to that.
Only thing stopping the car from driving is a tailshaft. I really should measure up and order 
Thanks.
#122
_LS1 Hatch_
_LS1 Hatch_
-
- Guests
Posted 18 July 2013 - 08:55 AM
Sounds like it is coming right along well
#123
_LS1 Taxi_
_LS1 Taxi_
-
- Guests
Posted 28 July 2013 - 04:04 PM
So, I had to get one of these 38mm radiator hose gauge adapters to make up a lower hose to suit. I had a hose which was close and it worked but it was stretching a bit and asking for trouble. This works much better.
IMG_1920.JPG 113.04K
5 downloads
I also got a plug for the 1/8 NPT fitting as I don't want to run the temp sensor in the lower hose due to inaccurate readings when the thermostat is closed.
The LS1 has a bung in the drivers side head behind the rear most exhaust outlet....
IMG_1921.JPG 123.2K
6 downloads
And here is the VDO sensor (which has 1/8 NPT fitting) screwed into an adapter I bought and needed to modify (bore out) to allow the VDO sensor dick to slide in.
IMG_1922.JPG 103.2K
5 downloads
Screwed it in with some thread sealant and ran the wire with the main loom into the cabin for the gauge. Still unsure where to route the accelerator cable. Not really happy with how it sits.
Here are the custom brake lines I had made up to suit the VN V8 1" master & booster.
IMG_1926.JPG 111.4K
6 downloads
IMG_1928.JPG 156.27K
5 downloads
Apologies for the rubbish photos of that. Gravity bled the lines, buttoned it up and now have a rock hard pedal straight off the bat which I found really surprising. Didn't have much time to play around so not 100% sure it's totally bled but it sure felt like it.
Now that the car has been wet rubbed and polished I've been keeping it under this car cover. Mate reckons it looks like a collingwood supporters car which isn't ideal.
IMG_1999.JPG 124.16K
5 downloads
Next jobs are to fix the heater hose leak, install the tailshaft, set up the B&M shifter and mod the console to suit.
I've actually got huge detailed list of all the small jobs. 1 job at a time....
Thanks.
#124
_LS2 Hatch_
_LS2 Hatch_
-
- Guests
Posted 28 July 2013 - 08:01 PM
Where are you connecting the head ballast/steam pipe to. On the commodore it goes back into the radiator neck below the cap. Yours doesn't seem to have that option. Are you going to add it somewhere else?
To sort my bottom radiator hose issue I bought an adjustable angle housing for my thermostate. Much better than I'm directly at the chasis rail.
Make that much better than aiming at the chasis rail!
To sort my bottom radiator hose issue I bought an adjustable angle housing for my thermostate. Much better than I'm directly at the chasis rail.
Make that much better than aiming at the chasis rail!
#125
_LS1 Taxi_
_LS1 Taxi_
-
- Guests
Posted 28 July 2013 - 08:27 PM
Where are you connecting the head ballast/steam pipe to. On the commodore it goes back into the radiator neck below the cap. Yours doesn't seem to have that option. Are you going to add it somewhere else?
I bought a rubber bung and blocked it off with a hose clamp.
Does it need to have flow or is it OK to block it off?


1 user(s) are reading this topic
0 members, 1 guests, 0 anonymous users

