
Getting closer all the time!

LX project
Started by
_LS1 Taxi_
, Feb 26 2013 05:15 PM
469 replies to this topic
#151

Litre8
-

- Administrators
-

- 2,399 posts
Thrillseeker
- Name:Howard
- Location:Melbourne, Victoria
- Car:1976 LX SLR8000
- Joined: 05-February 07
Posted 13 August 2013 - 06:58 PM
#153
_LS1 Taxi_
_LS1 Taxi_
-

- Guests
Posted 15 August 2013 - 07:11 PM
I had previously ran the fuel line up the wheel arch and to the front of the motor and I wasn't happy with it. Too messy and a bit close to suspension bits for my liking so I re-ran it up the back of the engine back...much happier with it now.
 IMG_1951.JPG 147.49K
8 downloads
IMG_1951.JPG 147.49K
8 downloads
I then cleaned up the fuel tank vapour manifold thing and the lines and installed it all with new rubbers. Pretty boring but a milestone to me.
IMG_1952.JPG 117.38K
4 downloads
IMG_1955.JPG 144.55K
4 downloads
IMG_1956.JPG 111.98K
4 downloads
Here is a shot I took showing the tailshaft and my temporary homemade shed exhaust which works a charm.
IMG_1954.JPG 133.53K
5 downloads
It's funny how sometimes the most time consuming jobs appear to be nothing but anyway, I wired in the fans and finally fitted up the loom to the inner arch and also mounted the remote oil filter plumbing. Really happy with how it came out.
IMG_1964.JPG 153.89K
6 downloads
IMG_1966.JPG 160.15K
10 downloads
Geez the Ford fans are powerful. With the added shroud thing I fabbed out of alloy, they really get a good seal to the radiator and you can feel them pulling loads of air in from the front. Very happy with them. I didn't get a chance to run the engine up to temp to ensure the computer switches the fans on/off. Hopefully get to that tomorrow.
I also dummied up the centre console, B&M shifter, gauge pod and it's all going to fit well I think. So despite the car actually looking like nothing much has happened, it was a good day. 
Thanks.
#154
_LS1 Taxi_
_LS1 Taxi_
-
- Guests
Posted 16 August 2013 - 06:07 PM
OK, fired it up today and let it run for about 30 minutes.
Oil pressure and water temp all good. Fans turned on and off as they should...great news.
Gave it a few big revs throughout and it sounded good and strong.
Brakes felt a bit spongy so gave them another bleed and they are a little better but still feel soft. I guess new pads, rotors etc will do that. Will see if it improves after some driving.
Did some more work on the wiring. Geez it never ends but it is much nicer now although still a lot more to go.
Anyway, I'm taking the weekend off. Need a rest..and a beer!! 
Oh....and still no word from the trimmer 
![]()
I actually just bought some old rooted front seats just so I bolt it in to move the thing about once I get it back on the ground as the milk crate wasn't going to cut it.

#156
mika03au
 View Garage
-
- Members
-
- 812 posts
Forum Fixture
- Name:Michael
- Location:Brisbane
- Car:LX hatch
- Joined: 06-July 11
View Garage
Posted 17 August 2013 - 10:11 AM
Great work so far, thread is a good read (and inspiration).
Just a tip Daz, if you aren't running any of the lower inner splash guards on the front chassis rails then the first rock the front tyre flicks up will knock that relay off. You might need to protect all that wiring in there.
Cheers.
Just a tip Daz, if you aren't running any of the lower inner splash guards on the front chassis rails then the first rock the front tyre flicks up will knock that relay off. You might need to protect all that wiring in there.
Cheers.
#157
_LS1 Taxi_
_LS1 Taxi_
-
- Guests
Posted 17 August 2013 - 06:00 PM
Hi Michael,
Cheers mate, appreciate the nice words.
You are dead right. I'll need to fab something up to protect that relay - and will.
Cheers for the heads up.
#158
mika03au
View Garage
-
- Members
-
- 812 posts
Forum Fixture
- Name:Michael
- Location:Brisbane
- Car:LX hatch
- Joined: 06-July 11
View Garage
Posted 18 August 2013 - 07:10 PM
No problem Daz. Would the standard splash guards fit on there?
#159
_LS2 Hatch_
_LS2 Hatch_
-
- Guests
Posted 18 August 2013 - 07:56 PM
Looks like its coming along. Hope you enjoyed the weekend off. From what I have noticed over years a trimmer needs pushing to do your work. They never seem to want to do anything when they say they will. Get on the phone and start being the squeaky wheel.
Can't wait to see it up and going
Can't wait to see it up and going
#160
_LS1 Taxi_
_LS1 Taxi_
-
- Guests
Posted 19 August 2013 - 06:42 PM
Hi Grant,
Was a great weekend...good to get away from the car.
I know what you're saying about the trimmer. I've been calling every month or so...and have been pretty casual as I was a fair way away from needing them...but it is getting closer. I am still a month or 2 off needing them I think. Got a heap of small fiddly jobs left which will take loads of time.
No problem Daz. Would the standard splash guards fit on there?
Hahahahaha! My splash guards are long gone Michael. Very funny though - read below
So here is the standard shifter hole in the tunnel...
IMG_1993.JPG 144.14K
5 downloads
And I need to get the B&M mounted like this...
IMG_1994.JPG 140.51K
5 downloads
So I made up a piece to fill the hole (out of one of the old splash guards - I've been using these to make random brackets etc for months!)
IMG_1995.JPG 132.79K
4 downloads
IMG_1996.JPG 129.66K
4 downloads
Then I welded some bolts onto it to bolt the B&M shifter on.
IMG_1997.JPG 130.84K
6 downloads
Dummied it all up, all good
IMG_1998.JPG 153.72K
5 downloads
Then removed it all for a quick splash of paint.
IMG_1999.JPG 108.4K
4 downloads
Let it dry overnight and hopefully get a crack at it tomorrow.
I plan on using the standard console. I've had to mod it a fair bit and have dummied it on and it should work out nicely.
Thanks.
#161
_LS1 Taxi_
_LS1 Taxi_
-
- Guests
Posted 20 August 2013 - 05:13 PM
Bolted in the shifter and all connected up. Tested - works perfectly.
Torqued front end up and gave it a home job wheel alignment.
Bolted wheels on, dropped it down and bolted in my new rubbish drivers seat.
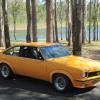
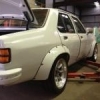
Started it up and drove her out of the shed for the first time with the LS1...all good (except home temp exhaust scrapes bad!).
Snapped a few happy shots and feeling pretty chuffed 

I can wait to be driving this thing properly....
IMG_2006.JPG 268.65K
10 downloads
IMG_2002.JPG 203.24K
4 downloads
IMG_2008.JPG 248.7K
5 downloads
IMG_2004.JPG 303.21K
5 downloads
IMG_2010.JPG 263.55K
7 downloads
Thanks.
Edited by LS1rana, 20 August 2013 - 05:15 PM.
#162
_LS2 Hatch_
_LS2 Hatch_
-
- Guests
Posted 20 August 2013 - 08:13 PM
Well done Daz! That's a great milestone
The colour looks awesome outside. If mine wasn't orange it was going to be a similar colour. This is going to look brilliant finished.
Well done so far keep it up. I love it
By the way, what are those divets in the doors for? Look like some sort of recess to open the door with!!??!! Ha ha :0
The colour looks awesome outside. If mine wasn't orange it was going to be a similar colour. This is going to look brilliant finished.
Well done so far keep it up. I love it
By the way, what are those divets in the doors for? Look like some sort of recess to open the door with!!??!! Ha ha :0
#163
_FERGnz_
_FERGnz_
-
- Guests
Posted 20 August 2013 - 09:49 PM
so sick
the small cooler out front looks funny, needs to be bigger (probly just me)
thanks for showing the shifter to, im just about to put in mine.
what kind of shifter was it??
thinking i should have gone LS now....
keep going!! your very fast
#164
Stinga
-

- Members
-
- 2,114 posts
.
- Name:Stinga
- Location:Wollongong, NSW
- Car:HD Holden ute, and sedan, UC torana
- Joined: 05-December 05
Posted 20 August 2013 - 10:26 PM
looks Greyt.. 
#165
_SmartE_
_SmartE_
-
- Guests
Posted 20 August 2013 - 11:14 PM
bloody hell this build is moving fast, should be cruising around in the next couple of weeks hey?
#166
_LXSS350_
_LXSS350_
-
- Guests
Posted 20 August 2013 - 11:27 PM
Started it up and drove her out of the shed for the first time with the LS1.
I can wait to be driving this thing properly....
Gets too tempting once its drivable. Hell if that was me I would have went around a block or two. Brocky drove around the mountain flat chat with no windscreen and no back window. Good enough for Brock even though it was a dunnydore.
Colour looks clean and classy.
#168
_LS1 Taxi_
_LS1 Taxi_
-
- Guests
Posted 21 August 2013 - 09:01 AM
Thanks guys - I'm really happy with it but nowhere done yet.
The shifter is a B&M job, street something? Got it from Summit, simple to install and adaptable to work with torana console (at least I think it is at this stage!)
The shifter is a B&M job, street something? Got it from Summit, simple to install and adaptable to work with torana console (at least I think it is at this stage!)
#169
_Matvex_
_Matvex_
-
- Guests
Posted 21 August 2013 - 10:25 PM
Awesome! Youll need a front screen for rego though.
Superfast build!
Superfast build!
#170
_LS1 Taxi_
_LS1 Taxi_
-
- Guests
Posted 22 August 2013 - 06:38 PM
Tail lights in.
Grill and head lights in.
Indicators in.
Bar irons wire wheeled and POR15 painted.
Moving along...
#171
_LS1 Taxi_
_LS1 Taxi_
-
- Guests
Posted 25 August 2013 - 03:24 PM
Got the front and rear bars on. Front bar still needs a little adjustment.
IMG_2019.JPG 183.38K
4 downloads
IMG_2020.JPG 174.8K
5 downloads
Damned CAE starter is playing games these past few days.
Sometimes it cranks, then it won't crank for a minute or so, then it'll crank again and then it'll be fine for the next 20 cranks and so on.
Also, occasionally the starter rubs on the flex plate. I'm going to try and shim the starter to move it away from the flexplate but I actually think the starter may be rooted which is causing the no crank problem and also it's not retracting fully sometimes causing the noisy rubbing. $400+ starter. LOL
#172
eyepeeler
-
- Members
-
- 1,959 posts
Forum Fixture
- Location:Perth
- Car:77 SL Hatchback, Chrome Yellow L34, LX IPRA Race Car the White Ghost
- Joined: 16-August 08
Posted 25 August 2013 - 04:30 PM
Just read the whole thread, nice work!! The car and the work you've done is a credit to you.
It's going to be fun to drive when you're finished. Won't be to far down the track either considering the work rate you've gone at so far.
It's going to be fun to drive when you're finished. Won't be to far down the track either considering the work rate you've gone at so far.
#173
_LS1 Hatch_
_LS1 Hatch_
-
- Guests
Posted 26 August 2013 - 01:40 AM
How come you didn't just stick with the factory starter out of curiosity ?
Good enough for a few hundred thousand miles and I couldn't see why going with something else off hand...(since they are pretty compact as well that is compared to the ones in the 'olde' days..lol)
#174
ls2lxhatch
-

- Members
-
- 5,332 posts
- Location:Perth
- Car:LX Hatch
- Joined: 29-May 06
Posted 26 August 2013 - 11:16 AM
I had previously ran the fuel line up the wheel arch and to the front of the motor and I wasn't happy with it. Too messy and a bit close to suspension bits for my liking so I re-ran it up the back of the engine back...much happier with it now.
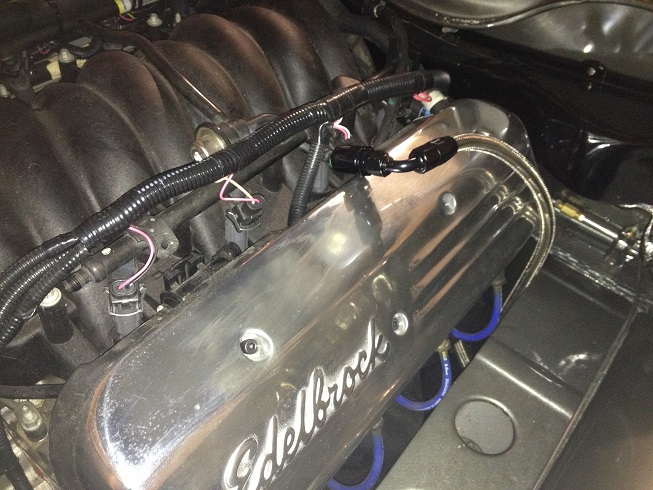
It would be worth checking that the fuel line won't rub on anything when the motor rocks. The braided stainless lines will make short work of paint and alloy if they chafe.
You could try putting a bit of electrical heat shrink over the fuel line to protect the paint on the chassis rail if it is as close to the chassis rail as it appears in the photo.
How come you didn't just stick with the factory starter out of curiosity ?
The CAE headers do not fit with the factory starter.
See this post.
http://www.gmh-toran...oject/?p=737526
Edited by ls2lxhatch, 26 August 2013 - 11:18 AM.
#175
_LS1 Taxi_
_LS1 Taxi_
-
- Guests
Posted 27 August 2013 - 03:52 PM
Hi Andy,
Yep I'll need to do something about the fuel line. It doesn't move much as its secured under the rail but still needs something. You're right about the factory starter and CAE pipes. The factory starter was so close to fitting. In hindsight, I probably could have modded the pipes and used the factory starter. The CAE starter aside from being expensive doesn't make me feel good about needing shimming etc. I'll see how it goes with the shimming and move on from there.
If I ever need to pull the engine after its on the road, I plan to mod the pipes then and go back to the factory starter.


2 user(s) are reading this topic
0 members, 2 guests, 0 anonymous users

