Jump to content


Photo

HZ Premier wannabe


  • Please log in to reply
102 replies to this topic

#1 SHEEL

SHEEL

    Forum Fan

  • Members
  • PipPipPipPip
  • 337 posts
  • Name:Daniel
  • Location:Melbourne
  • Joined: 09-October 09

Posted 10 April 2013 - 09:43 AM

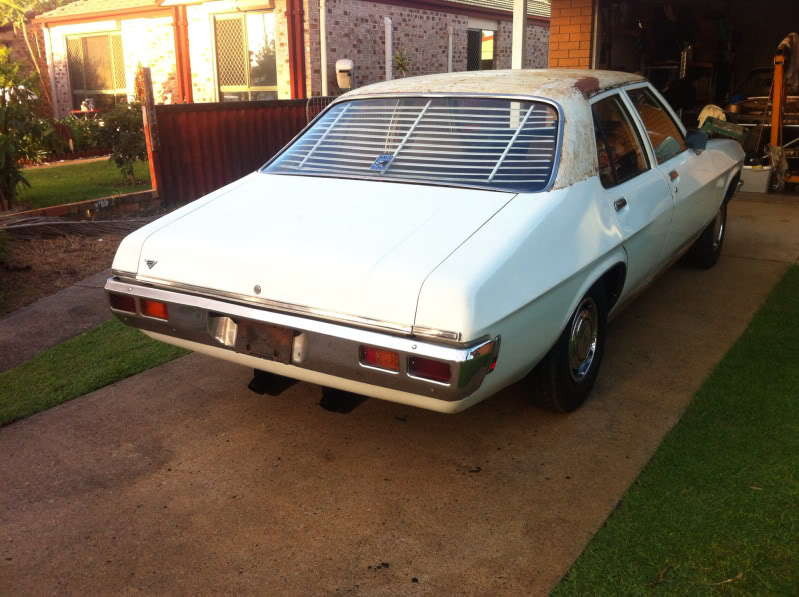
Well I bought this thing last weekend:


17322_10151364165786476_1013226282_n.jpg

537343_10151368219901476_1200474994_n.jp

36620_10151368219921476_279092743_n.jpg


Its a great project start. 


HZ Kingswood, 202, traumatic.


NO rust in the plenum on the driver side. A tiny 5cent hole on the passenger side. Tiny hole at the bottom of the windscreen on the same side. Passenger front door has rust at the bottom on the skin only. A half skin repair section should take care of that.


Got a Prem front and decent bumpers sitting inside it. All the chrome trims are in the boot.


Rear drivers side quarter is a concern, it has a bit of a ding right on the body line (you can just see it in the pics) which is going to be a pain to get straight. I'm going to try to get it as straight as possible with hammer/slapstick/dolly so I hopefully won't need much filler.


Plans are to tidy up the body and give it new paint. I've done a little painting over the years so I'm going to have a crack at my first complete respray in the garage at home. Not sure of colour yet. I'm thinking either the original Gold with a touch more flake in it. Or Maybe changing it to Mediterranian Blue.

I'm really undecided on the colour to tell the truth. I really want a period correct colour on one hand, but most colours in that era are either really dull, or really bright! I kind of want something that stands out, but is still classy at the same time. Any suggestions for colour would be welcome...


It's got no interior so I'm thinking get some seats/trims and send it off to the trimmer for a new chamios vinyl makeover. Then I want to put black dash and carpet. going to try to get it as cloase as I can to a factory look prem interior.


Initially I'll lower it on the stock rims and chrome trims, later I might put some welds or convos or something like that on it.


Driveline will be just the standard 202 for a while, then I might do an ls1 conversion after its on the road. Just going to put club reg on it.


#2 _Quagmire_

_Quagmire_
  • Guests

Posted 10 April 2013 - 11:40 AM

that looks like a sweet easy fixer noice score
brick bolsters work well for getting the body lines straight on these :)

#3 yel327

yel327

    Oh My, Don't you post alot

  • Members
  • PipPipPipPipPipPipPip
  • 13,592 posts
  • Joined: 10-February 08

Posted 10 April 2013 - 12:01 PM

I'd leave the Kingswood front on it and paint it the same colour. Makes for a great sleeper for when it has an LS motor later!


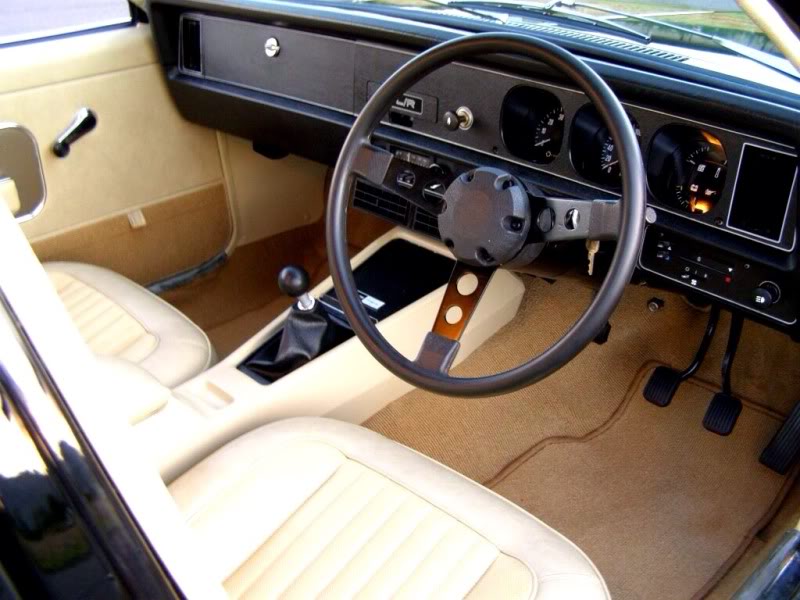
The trim you are talking about is 60A which isn't a HZ trim, it is a later HJ trim that carried over into HX, called Chamois/Black. HZ neutral trim is called Chamois/Covert, looks almost the same as in my 60V HJ Premier. Only major difference would be a factory HZ Premier U17 dash will have woodgrain on it whereas 1974-early 1975 HJ Prem got a silver dash if U17 ordered. Plus the 1974 HJ's got the HQ steering wheel which you can see in the picture. 1975 HJ through to HZ were the softer type, not hard plastic like this one.


Attached Files


#4 SHEEL

SHEEL

    Forum Fan

  • Members
  • PipPipPipPip
  • 337 posts
  • Name:Daniel
  • Location:Melbourne
  • Joined: 09-October 09

Posted 10 April 2013 - 12:42 PM

That interior looks realllllly nice... I'm not too fussed about sleeper status... I've always wanted a prem, but this kingswood was just too rust free to resist so I'll make a prem out of it!

Not too fussed about getting all the trim options within factory spec. As long as its close enough for average joe to think it's original! that combo up there with a black dash and carpet would look awesome I reckon... 


Quagmire - I'm curious... how the hell to you panel beat with a brick cutter? If it really is some old wise mans trick I'm keen to know... please explain!


#5 hanra

hanra

    Oh My, Don't you post alot

  • Members
  • PipPipPipPipPipPipPip
  • 10,931 posts
  • Name:Brad
  • Location:Farrrrrr North Qld
  • Car:1975 LH SL/R 5000, 1967 Morris Cooper S, E36 BMW, Toyota Corolla, Isuzu DMax
  • Joined: 24-March 11

Posted 10 April 2013 - 12:51 PM

I would imagine that dash colour is covert?


My SLR is -60Y which is similar but due to being SLR it uses a black dashpad/dash etc.


F4AFC285-89C5-4131-A34C-6AC9A5126D3F-144


#6 mika03au

mika03au

    Forum Fixture

  • Members
  • PipPipPipPipPip
  • 812 posts
  • Name:Michael
  • Location:Brisbane
  • Car:LX hatch
  • Joined: 06-July 11
Garage View Garage

Posted 10 April 2013 - 01:35 PM

Here is some pics below that might help you make your mind up.

This was my Contessa Gold HX Premmie (stupidly sold off) after its resto.

Modded from 202 trimatic to 308 TH400 with GTS dash & factory air added as well.

Cheapest option for me for those mods was to buy a donor Stateman with all that in it. 

It was standard coloured interior (for HX)  with the dash & carpets in black, console, seats, headlining & door trims all in the chamois trim.

You will find the HZ dash was colour coded normally, not black.

Here are links for interior colours over at Old Holden http://gallery.oldho...Interior Codes/ & paint colours http://gallery.oldho.../Paint Colours/.

Both those links have good pics.

Good luck with the build.

Attached Files


Edited by mika03au, 10 April 2013 - 01:43 PM.


#7 _Macca97_

_Macca97_
  • Guests

Posted 10 April 2013 - 01:58 PM

Quagmire - I'm curious... how the hell to you panel beat with a brick cutter? If it really is some old wise mans trick I'm keen to know... please explain!


you could check out my build thread on my hj ute, we used a brick cutter and also made a bigger type one to push the side out.


Danny


quote didnt work :/


Edited by Macca97, 10 April 2013 - 01:59 PM.


#8 SHEEL

SHEEL

    Forum Fan

  • Members
  • PipPipPipPip
  • 337 posts
  • Name:Daniel
  • Location:Melbourne
  • Joined: 09-October 09

Posted 10 April 2013 - 02:05 PM

OOOOOOOooo YEAH!!!


that is beautiful...


Macca... I really like that pushing tool you used with the porta power... very nice! I assume a similar method is used with the brick cutter to push the line from the inside... Thanks for the awesome tip!


Edited by SHEEL, 10 April 2013 - 02:10 PM.


#9 yel327

yel327

    Oh My, Don't you post alot

  • Members
  • PipPipPipPipPipPipPip
  • 13,592 posts
  • Joined: 10-February 08

Posted 10 April 2013 - 02:42 PM

Here is some pics below that might help you make your mind up.

This was my Contessa Gold HX Premmie (stupidly sold off) after its resto.

Modded from 202 trimatic to 308 TH400 with GTS dash & factory air added as well.

Cheapest option for me for those mods was to buy a donor Stateman with all that in it. 

It was standard coloured interior (for HX)  with the dash & carpets in black, console, seats, headlining & door trims all in the chamois trim.

You will find the HZ dash was colour coded normally, not black.

Here are links for interior colours over at Old Holden http://gallery.oldho...Interior Codes/ & paint colours http://gallery.oldho.../Paint Colours/.

Both those links have good pics.

Good luck with the build.


Yep, that is 60A Chamois/Black. Uses black instead of Covert which is what is in 60V. The fascia isn't originally black though, it will have been woodgrain.


#10 _Quagmire_

_Quagmire_
  • Guests

Posted 10 April 2013 - 02:47 PM

OOOOOOOooo YEAH!!!
 
that is beautiful...
 
Macca... I really like that pushing tool you used with the porta power... very nice! I assume a similar method is used with the brick cutter to push the line from the inside... Thanks for the awesome tip!

yeah...you use it like a dolly
gets the lines nice and straight :P

#11 _Bomber Watson_

_Bomber Watson_
  • Guests

Posted 10 April 2013 - 08:13 PM

A nice 6" Brickies Bolster is in my dolly kit to, Quag is not alone.


Cheers.


#12 SHEEL

SHEEL

    Forum Fan

  • Members
  • PipPipPipPip
  • 337 posts
  • Name:Daniel
  • Location:Melbourne
  • Joined: 09-October 09

Posted 15 April 2013 - 10:50 AM

Righto well I got a few hours on it over the weekend... started the process of stripping it back to find more surprises! well... we all know that on many of these old things someone has had a go before us... so I knida knew there would be something lurking under this paint. the important thing is I knew any repairs would only have been small. It definately is not a bog monster.


First discovery is no surprise. Small amount of rust on the lower rear drivers side quarter. Also theere is some light damage around where the bumper/tail light/body line all intersect. I'm going to need to massage it with the hammer and dolly for a few hours to get it mostly back into place then a small amount of bog to sculpt it into perfection! These pics pretty much just show what I'm starting with.


I also picked up a new bonnet as the old one has been opened too far and bent at the rear corners, plus the front guards are a bit knocked around so I got a passenger one, still deciding if I will try to save the drivers side or just find a replacement.


pics:

733982_10151374749881476_1060151247_n.jp

64425_10151374749886476_390882288_n.jpg

562992_10151374749901476_792979911_n.jpg

563858_10151374749951476_195039718_n.jpg

483413_10151374749971476_429328667_n.jpg

554564_10151374749966476_1299710453_n.jp


#13 yel327

yel327

    Oh My, Don't you post alot

  • Members
  • PipPipPipPipPipPipPip
  • 13,592 posts
  • Joined: 10-February 08

Posted 15 April 2013 - 12:02 PM

Save the bottoms of the guards if you replace them.


#14 SHEEL

SHEEL

    Forum Fan

  • Members
  • PipPipPipPip
  • 337 posts
  • Name:Daniel
  • Location:Melbourne
  • Joined: 09-October 09

Posted 15 April 2013 - 12:56 PM

Yeh I will be for sure... could come in handy in 10-20 years time! I'll just cut them into repair sections rather than keep the whole guard.


#15 SHEEL

SHEEL

    Forum Fan

  • Members
  • PipPipPipPip
  • 337 posts
  • Name:Daniel
  • Location:Melbourne
  • Joined: 09-October 09

Posted 17 April 2013 - 02:31 PM

Took the day off work yesterday to go to a few wreckers and also go to the paint shop to get primer, kbr (por15) and a massive amount of sandpaper (yay for sanding!)


anyway after driving round half the city I came home and spent a couple of hours on the car:


546086_10151377614746476_1803835895_n.jp


I didn't do any panel beating on this today, just a progress shot. It's looking slightly better than when I started but still needs a lot of work!


540062_10151377614766476_945607124_n.jpg

547139_10151377614761476_1092655068_n.jp

164224_10151377614841476_1647142639_n.jp

77169_10151377614876476_2114267964_n.jpg

555072_10151377614941476_1733669354_n.jp


#16 SHEEL

SHEEL

    Forum Fan

  • Members
  • PipPipPipPip
  • 337 posts
  • Name:Daniel
  • Location:Melbourne
  • Joined: 09-October 09

Posted 17 April 2013 - 02:43 PM

I found this on Ebay:


http://www.ebay.com....9#ht_500wt_1414


Is it a good price for the condition?


I need a full interior but I'm thinking I should get the paint all done first, do the interior last....


Only thing is I'm not sure how often seats like these come along....


Do you guys reckon I should get them now or wait till later and hope something else is around at the time?


#17 yel327

yel327

    Oh My, Don't you post alot

  • Members
  • PipPipPipPipPipPipPip
  • 13,592 posts
  • Joined: 10-February 08

Posted 17 April 2013 - 03:29 PM

I'd be grabbing it. Will cost you 3 x that much just for the seat covers repro.


#18 Ice

Ice

    Cool

  • Members
  • PipPipPipPipPipPipPip
  • 15,188 posts
  • Name:Gene
  • Location:Galaxy's away from Ipswich
  • Car:77 HZ Sandman Van
  • Joined: 03-January 07

Posted 17 April 2013 - 05:00 PM

There seats alone in good cond go for around the $300 mark or more thats a bargin for all that

#19 _Quagmire_

_Quagmire_
  • Guests

Posted 18 April 2013 - 03:48 AM

you will need to recover those front seats sooner rather than later
so long as the arm rests aren't warped i'd be onto them like Charlie sheen on a line of coke

#20 _greenmachine215_

_greenmachine215_
  • Guests

Posted 20 April 2013 - 10:15 PM

.It's amazing what a bit of hard work can do, my neighbour swapped his dirt bikes for this HQ Prem a few months back, rusted out in some spots, dash was cut out of the car back to the firewall and vinyl roof ripped off, not a single wire in the car,only things really going for,it was the driveline, carby'd LS1, 2spd glide, 9"

When I saw it I thought to myself fhark that wouldn't bother, but in 4 weeks of toil in the shed at nights and spending under 2k including new welds/tyres and rego its gone from a rolling bucket of shit to a very neat cruiser

cb7c25f76a7c6b9ccaf9b868ac232e98.jpg

73d64a8d63330ce1f806f8d23988b6ac.jpg

4920036c352ff99fbc56e510006815a8.jpg

And it goes very well.

Edited by greenmachine215, 20 April 2013 - 10:18 PM.


#21 SHEEL

SHEEL

    Forum Fan

  • Members
  • PipPipPipPip
  • 337 posts
  • Name:Daniel
  • Location:Melbourne
  • Joined: 09-October 09

Posted 29 April 2013 - 12:28 PM

Well I took friday off last week so I could spend 4 days working on the car, ended up only getting 2 days on it! other things got in the way... oh well.


It is progressing steadily but I have ran into a few problems which maybe some of you guys can give your opinions and advice on... mainly concerning welding repair sections into large panel areas. The 2 I've done so far I'm really dissapointed with and I'm hoping to try something different maybe for the other 2 I have planned.

The sections I am yet to attack is an LPG filler in the passenger rear quarter and the passenger front door needs a lower skin section.


any for now here is the current progress:


Continuing on from last week here is the rust repair behind the rear drivers side wheel arch:

935650_10151394149041476_533758992_n.jpg

228507_10151394149021476_1436158755_n.jp

417808_10151394149026476_1950573877_n.jp

311674_10151394149131476_1382945608_n.jp


It looks fantastic to this point but it's far from perfect. The whole panel had major stresses through it due to what appeared to be minor damage around the tail light and bumper recess. I think this damage had already caused massive ripples through the entire guard. right up to the wheel arch, then on top of that I went welding at the bottom, which has really pulled the metal tight in some areas, so now there are a lot of highs and lows... As will become evident with the amount of filler going on in the next few pics....It's probably looks worse than it is, I'd say no section of bog is any more than 2mm deep. But any bog at all is a concern in 10+ years, who knows how much it could shrink or expand under the paint...


247563_10151394149221476_1787799439_n.jp


I'm really happy with this area, I got it really close to perfect just using hammer / dolly and a brick bolster as some people suggested on here... worked an absolute treat! this small amount of filler here is just to fill the fine hammer marks, probably 0.5mm deep if that... really happy with this part.


945110_10151394149226476_1478738494_n.jp


and here is where it gets ugly....


945494_10151394149376476_1350424000_n.jp

923157_10151394149411476_1980305093_n.jp


Above the body line is pretty good though, which is a relief. At least the problem area is down low...


The area above the body line has 2 low spots which I think I will be able to get flat with hi fill primer...


progress isn't very pretty!


600926_10151394149356476_1287445721_n.jp


Now the next problem area, this time the front quarter. It had a deep ding in it intially, I thought at the time this ding had stretched the metal too much and was going to be better off just cutting it out and welding a repair section in.

Turns out this was wrong. Welding made far more of a mess.... massive warping from the heat, I had wet rags and air blowing on it, welding in smail 5-10 second bursts then walking away, coming back a few minutes later...But still no good... 

this warping was quite deep and I'm ashamed to say that the filler here is possibly 3-4mm deep in the worst areas. Not cool.


I'll continue to try to "sculpt" the guard into shape but if I find a good replacement guard this one will get the flick.


Here is the section cut out:

941533_10151394149151476_1831526725_n.jp 


pinched a new section from the passenger guard which is no good anyway and is being replaced

21306_10151394149146476_1220298995_n.jpg


217549_10151394149286476_1325798958_n.jp

947298_10151394149296476_971914578_n.jpg

315420_10151394149311476_358682608_n.jpg


YUKKKK:

428697_10151394149456476_1259651615_n.jp


#22 _Quagmire_

_Quagmire_
  • Guests

Posted 30 April 2013 - 01:58 AM

2-3 mm is sfa bog and should not cause you any probs so long as you preped it right
it's when you go into 5-10mm thick you run into problems

#23 SHEEL

SHEEL

    Forum Fan

  • Members
  • PipPipPipPip
  • 337 posts
  • Name:Daniel
  • Location:Melbourne
  • Joined: 09-October 09

Posted 30 April 2013 - 09:59 AM

Prep was pretty basic, Just applied it to the bare metal, washed the metal down with prepsol before application...should be fine I think?


#24 _Quagmire_

_Quagmire_
  • Guests

Posted 30 April 2013 - 02:34 PM

ha ha you went old skool with it
you roughen it up with 24 or 40 grit sand paper first?
it needs to be roughened up for it to stick
the "new" school way is to roughen it up apply 2k etch and apply the bog to that

#25 SHEEL

SHEEL

    Forum Fan

  • Members
  • PipPipPipPip
  • 337 posts
  • Name:Daniel
  • Location:Melbourne
  • Joined: 09-October 09

Posted 30 April 2013 - 03:14 PM

eehh I actually used 60 grit on the long sanding float... hopefully will be ok!


I have the 2k etch there obviously so I might do that next time. I'm using some fancypants modern filler so I should probably do it the new school way. It didn't have any info about prep on the packaging for the filler... doesn't even tell you how much catalyst to mix into the filler. I suppose that is to large of a variable anyway, climate, working time etc all weigh in.


thanks for the tips Quagmire.


i've been watching a few welding vids on you tube and I reckon I might know where I went wrong. I think I'm holding the gun too close and too straight on. Need more distance and angle to reduce heat. Also I saw one video where a guy would do on tack, then space the next tackk 3-4 inches along the join and repeat to the end of the section. then he went again with tacks halfway between each of the first pass tacks, then repeated with cool down periods between each pass... looked like a good method, my thought was even if a little heat does get into the panel at least it would not be concentrated on one stress point.  


Edited by SHEEL, 30 April 2013 - 03:14 PM.


3 user(s) are reading this topic

0 members, 3 guests, 0 anonymous users