
Im curious as to how you got 3" under past the NCOP?
Reaper Customs Projects
Started by
_Viper_
, May 08 2014 11:22 PM
76 replies to this topic
#27

dattoman
-

- Administrators
-

- 16,487 posts
Do I feel lucky? Well, do ya, punk?
- Name:Neil
- Location:Perth Western Australia
- Car:LX SS , 76 Cadillac , 3 x dattos
- Joined: 04-February 07
Posted 15 May 2014 - 10:49 PM
They just drop it Bomber
When the yellow sticker appears on the window they raise it
If the shock bottoms before the car hits the bump stops... it can be abit of a problem
The car might not have been designed for such drop and the shocks might not suit (or aftermarket shocks fitted with different travel to stock)
#28
_Bomber Watson_
_Bomber Watson_
-

- Guests
Posted 15 May 2014 - 10:54 PM
Bit differnt in QLD apparently, a defect requires a several hundred dollar visit to the pits to be cleared, whether the car passes or not.
Cheers.
#29
_Viper_
_Viper_
-
- Guests
Posted 20 May 2014 - 10:51 PM
So the roof swap is complete, no more rusty Gutters!
Same ol same ol but finished welding in the two other inner C-pillar sections:
 passcpillerwelded.jpg 67.48K
3 downloads
passcpillerwelded.jpg 67.48K
3 downloads
drvcpillerwelded.jpg 86.23K
4 downloads
Also welded on the C-pillar gutter section (after sandblasting and weld through priming the insides of course)
gutterwelded.jpg 61.17K
4 downloads
There was a rust repair in this following section altho I don't have the progress pics as Cam did this while I was working on the inside, Involved repairing the inner section, a section of the gutter and just above the gutter. Here is one pic I do have from when the roof was off the car:
photo.JPG 99.86K
3 downloads
rustpatch.jpg 78.34K
3 downloads
I had a couple more holes to fill on the passenger side, not sure what these were from as they were then when the car was delivered... im guessing there was a rust hole and someone had cut the sections out in preparation, anywho they needed to go.
cpillerholes.jpg 77.67K
5 downloads
cpillerholedgone.jpg 80.93K
4 downloads
Then both outer C-pillar seams were blasted and then lead wiped... Same deal tho Cam did this part so I don't have the in between pics:
Blasted:
cpillerblastedforlead.jpg 67.22K
3 downloads
Lead:
cpillerlead.jpg 79.2K
3 downloads
passcpillerlead.jpg 88.7K
3 downloads
#30
_Viper_
_Viper_
-
- Guests
Posted 20 May 2014 - 11:12 PM
Then the rest of the sections we had worked on were sandblasted and everything sealed up with Epoxy
Some of the blasted bits:
blas1.jpg 88.92K
5 downloads
blas2.jpg 72.21K
3 downloads
blas3.jpg 64.35K
4 downloads
blas4.jpg 67.96K
5 downloads
Some of the bits primed:
drvcpillerprime.jpg 62.37K
3 downloads
prime2.jpg 81.6K
4 downloads
prime3.jpg 68.61K
3 downloads
prime4.jpg 75.75K
3 downloads
hmm Seems I didn't take a pic of the car as a whole.
Thats enough on the Torry for me, Rob will take over and do the Beaver panel next. Ive got another Gemini to work on.
#31
_LONA-CK_
_LONA-CK_
-
- Guests
Posted 21 May 2014 - 07:11 AM
great reading thanks for sharing
cheers gong
#32
John/lj
 View Garage
-

- Members
-
- 40 posts
Forum Participant
- Name:john
- Location:Perth
- Car:Lj torana
- Joined: 22-February 12
View Garage
Posted 21 May 2014 - 03:31 PM
null.jpg torana.jpg 202.92K
4 downloads
hey guys just thought we would post a pic of what the car looked like before it got dinged.
#33
_mick74lh_
_mick74lh_
-
- Guests
Posted 22 May 2014 - 10:11 PM
Looks like a nice car in the photo. What happened that warranted the roof swap? Was it rolled or something?
Beaut job on the roof swap by the way though Clint.
#34
John/lj
View Garage
-
- Members
-
- 40 posts
Forum Participant
- Name:john
- Location:Perth
- Car:Lj torana
- Joined: 22-February 12
View Garage
Posted 23 May 2014 - 11:07 AM
photo.jpg gtr crunched.jpg 141.15K
3 downloads
this is why it went into the panel beaters and has been the old story of opening a can of worms, the drip rails had a fair bit of cancer so a roof swap seemed the best option.
#36
_Bomber Watson_
_Bomber Watson_
-
- Guests
Posted 23 May 2014 - 11:21 AM
Well thats one way to make it look like a 4cyl model....
#37
dattoman
-
- Administrators
-
- 16,487 posts
Do I feel lucky? Well, do ya, punk?
- Name:Neil
- Location:Perth Western Australia
- Car:LX SS , 76 Cadillac , 3 x dattos
- Joined: 04-February 07
Posted 23 May 2014 - 11:02 PM
Took a look at the black falcon today you've been playing with CLint.
Mums the word... wink wink
The boys are very impressed
#38
_Viper_
_Viper_
-
- Guests
Posted 23 May 2014 - 11:22 PM
Hah how'd you manage to get a look at that?
#39
N/A-PWR
-

- Members
-
- 9,636 posts
CABIN ENGINE CONTROLS GALORE
- Name:Dave I
- Location:Wooroloo, 65km's East of Perth
- Car:'1969' LC RAT TORANA
- Joined: 08-December 12
Posted 23 May 2014 - 11:29 PM
Gee's sorry John,
That is very Painful. Dave I
#40
dattoman
-
- Administrators
-
- 16,487 posts
Do I feel lucky? Well, do ya, punk?
- Name:Neil
- Location:Perth Western Australia
- Car:LX SS , 76 Cadillac , 3 x dattos
- Joined: 04-February 07
Posted 24 May 2014 - 12:27 AM
Hah how'd you manage to get a look at that?
People ring me when their brakes don't work 
#42
N/A-PWR
-
- Members
-
- 9,636 posts
CABIN ENGINE CONTROLS GALORE
- Name:Dave I
- Location:Wooroloo, 65km's East of Perth
- Car:'1969' LC RAT TORANA
- Joined: 08-December 12
Posted 03 June 2014 - 11:25 AM
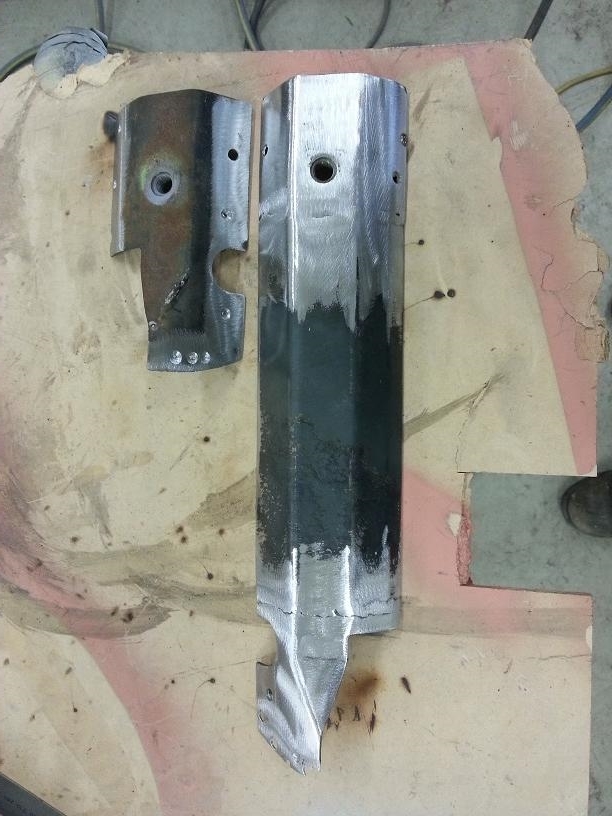
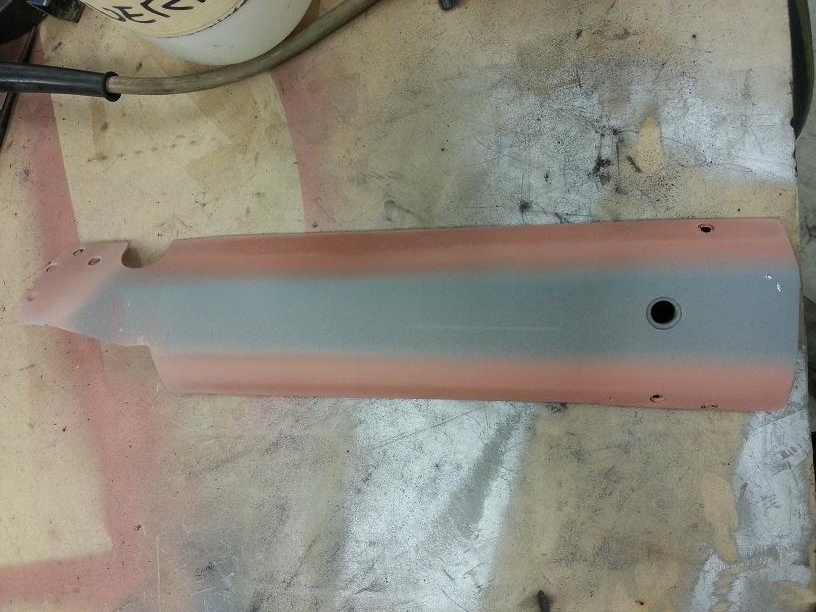
Nice Tig welding on the fancy pipe work Clint,
the Lead wiping makes the Torana look like a bought one,
and a fantastic body repair Reaper Custom shop you have there too.
Edit:-
Oh and almost forgot, here is the LHD Torana link:-
http://www.gmh-toran...-lhd-lj-torana/
Edited by TORYPOWER, 03 June 2014 - 11:29 AM.
#43
_Viper_
_Viper_
-
- Guests
Posted 03 June 2014 - 10:16 PM
Cheers Dave, appreciate the kind words Hah Factory Chev badge on a Torana 
Ok so Robs been busy as on the Torana, I raided his phone the other day for some pics.
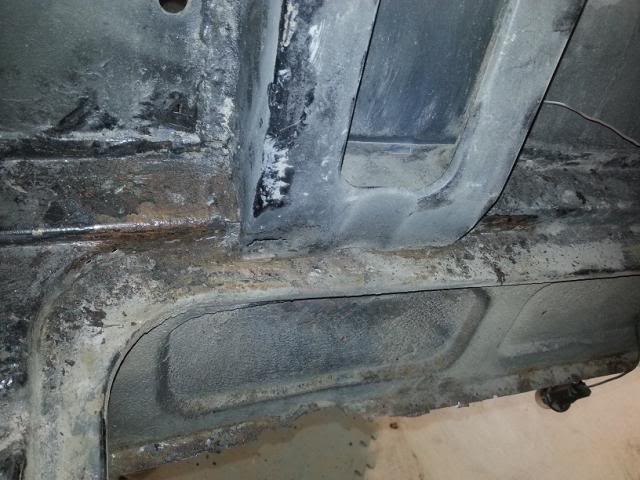
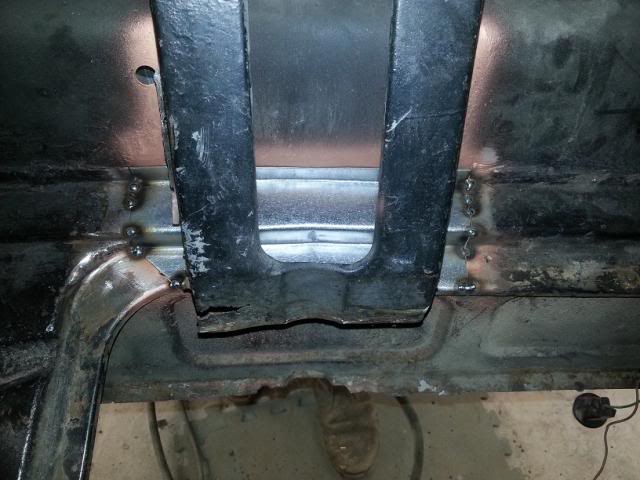
The rear beaver panel had evidence of rust in once corner, originally was just planning to patch that section but after cutting the corner out and having a look inside with a torch we could see the rust inside and decided it best to open her up to clean it inside and out.

Looking further we found some holes in the inner panel that was hidden by bog :/

Blasted the lot

A section of the inner beaver was cut out the way to give access and all the rusty steel was cut out.

Patch made up:

Test fit:

And fully welded into place:

Another Pesky hole:

Gone:

Inner beaver section put back in place:

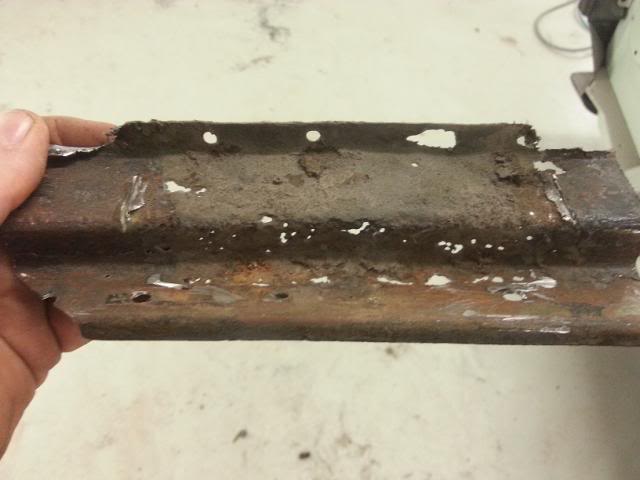
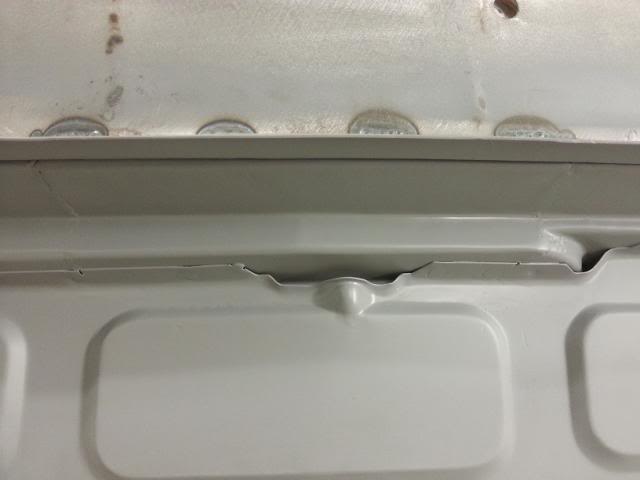
More holes!
Which seemed to be caused by debri getting trapped behind this bracket:
Usual story, cut out wherever there is rust:

Make a replacement part: (was a little trickyer as its not just straight but has a kink in the middle but only in the second fold not the first)
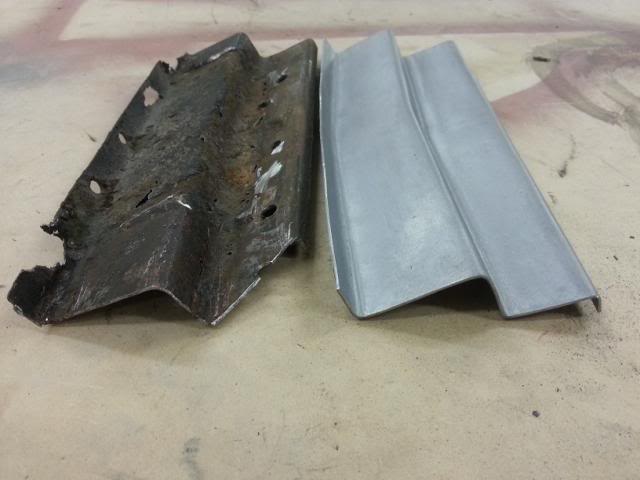
just about done
No more holes:
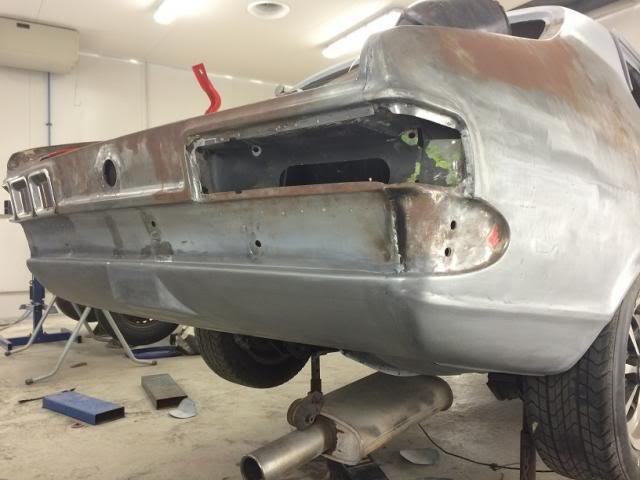
Onto the lower rear outer quarters... the passenger side didnt look too bad at first but the inside was very badly pitted, already starting to pinhole and very thin so off it came:

Rare spares made it a relatively quick and easy repair


No warping

Drivers side had been "repaired" at a earlier date, John wasnt happy with it so out that came also. including the spare wheel tub


Out with the old

In with the new


New beaver on (best pic rob took sorry)

Small patch on the corner


And that was where the car was up to last friday...
Edited by Viper, 03 June 2014 - 10:17 PM.
#44
Ice
-

- Members
-
- 15,198 posts
Cool
- Name:Gene
- Location:Galaxy's away from Ipswich
- Car:77 HZ Sandman Van
- Joined: 03-January 07
Posted 03 June 2014 - 10:21 PM
Great work clint looks like you guys are on the ball
#45
N/A-PWR
-
- Members
-
- 9,636 posts
CABIN ENGINE CONTROLS GALORE
- Name:Dave I
- Location:Wooroloo, 65km's East of Perth
- Car:'1969' LC RAT TORANA
- Joined: 08-December 12
Posted 03 June 2014 - 10:30 PM
and I like the Rares Spares Stickers on the Weld in Parts for the Photo Shoot too,
also I noticed one thing you said that is great, and that was the cut-out piece is the piece to make a repro from,
now that may sound funny, but the action-ed thought makes thinking simple.
top progress
#46
madtoranajzedded
-
- Members
-
- 2,893 posts
Sir ask alot
- Name:Maz
- Location:Southern Tasmania
- Car:72 LJ SL SEDAN.
- Joined: 30-September 13
Posted 03 June 2014 - 11:08 PM
very professional fab work Clint love it,when are you moving to tassie its great you have put pics up of the work to beaver panel
as thats helped me out on how far the panel goes up to where you have cut it out,didnt think they went up that far.
love the lead work,had any experience with allmetal,its like bog but its alloy and sets real hard you can hammer it.havn't seen anyone on the forum use the stuff yet,thinking about using it instead of lead
cheers Maz
#47
_Viper_
_Viper_
-
- Guests
Posted 04 June 2014 - 01:14 AM
The beaver was actually 10mm short on one side, Rob actually made up a extension but didn't seem to take any pics, it does go right down to the bottom like factory and it actually went abit higher to the next bend but we trimmed it back as it was easier to do a buttweld and grind flush the external bend.
Have not heard of allmetal, do you have a link to any info?
We have tried the lead free solder but it's plasticity range is a lot narrower then the "normal" lead/tin sticks, also was a higher melting temp so would cause warping easier.
Hah rare spares stickers were not intentional but I wouldn't say no if they wanted to sponsor us haha
#48
N/A-PWR
-
- Members
-
- 9,636 posts
CABIN ENGINE CONTROLS GALORE
- Name:Dave I
- Location:Wooroloo, 65km's East of Perth
- Car:'1969' LC RAT TORANA
- Joined: 08-December 12
Posted 04 June 2014 - 01:23 AM
Mate, your comments are Fantastic.
Hope Rares Spares do Sponsor 'Reaper Customs'
#49
_Viper_
_Viper_
-
- Guests
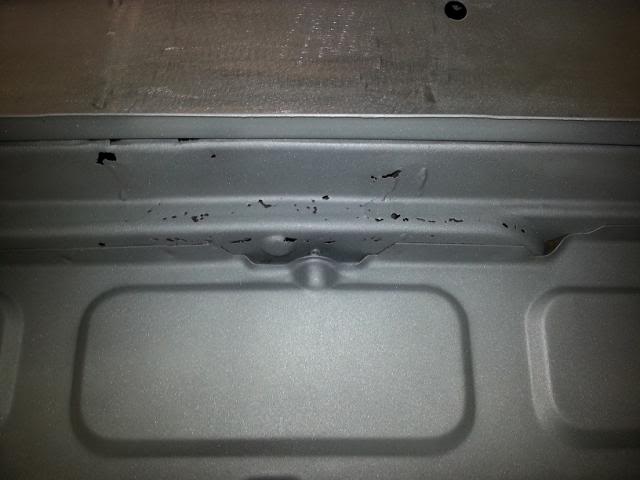
Posted 04 June 2014 - 09:13 PM
Few more pics...
slightly better pic of the beaver:
And the bracket on the inside of the boot repair and glued back to the floor:

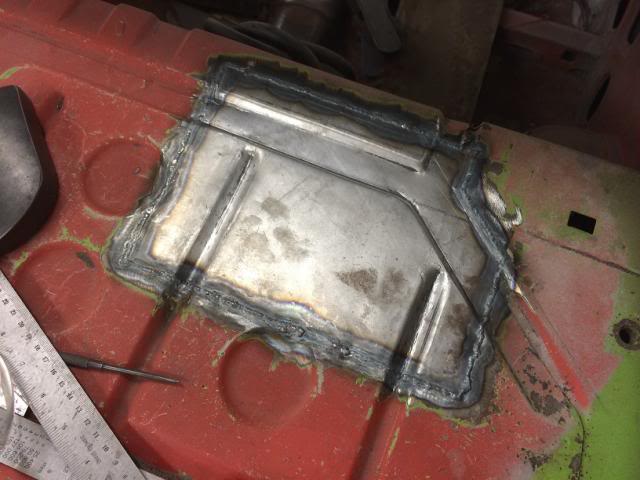
The parcel shelf had been hacked out for speakers at some stage, John prefers to listen to the sweet sounds of the engine and wanted them filled in. Dont actually have a pic of them before but im sure you can imagine a rough hole cut for speakers... But here is some progress pics:
Passenger side:
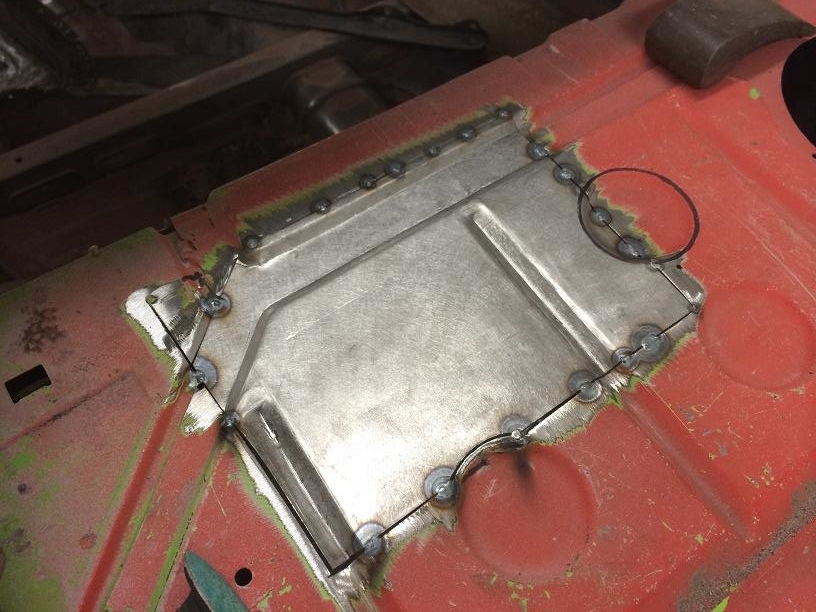
Drivers Side:
Another job was to re-locate the seat belt mount holes. John prefered the location of the later LJ's as the seat belt doesnt fall off your shoulder as easy.
here is the original mount with the pic taken from the inside:
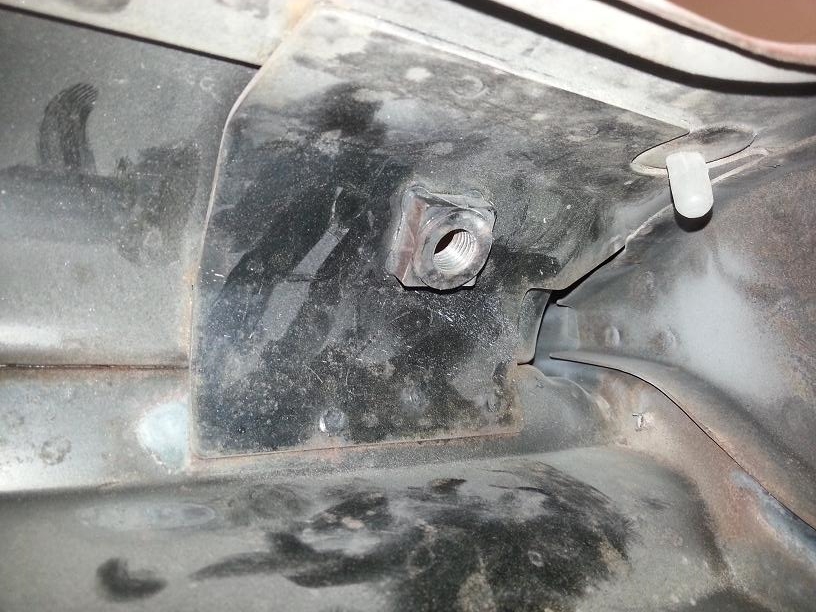
And both the passenger side and drivers side mounts removed from the car:
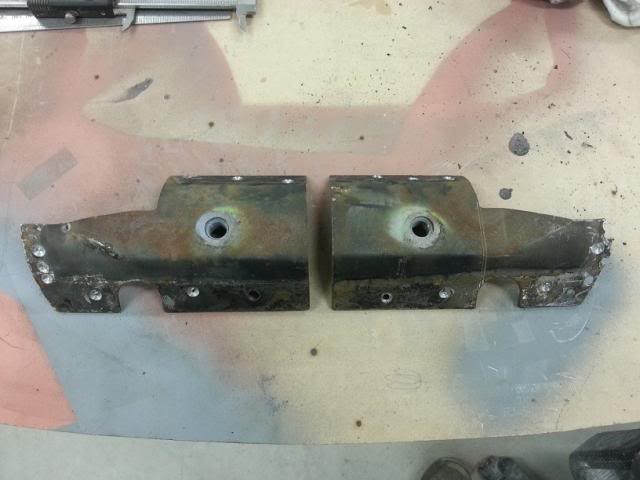
The original mounts actually tied into the B-pillar and since we were moving them back a couple hundred mm we had to also extend the brace.
Welded in place:
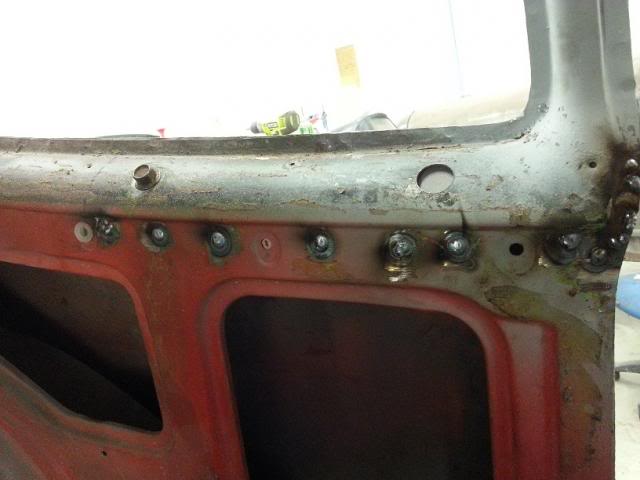
Old hole welded up

Oh I actually just found some more pics of some earlier work we did on this car around the lights... but will post them tomorow
#50
N/A-PWR
-
- Members
-
- 9,636 posts
CABIN ENGINE CONTROLS GALORE
- Name:Dave I
- Location:Wooroloo, 65km's East of Perth
- Car:'1969' LC RAT TORANA
- Joined: 08-December 12
Posted 04 June 2014 - 11:08 PM
This is a Request for Clint and Maz:-

http://www.eastwood....tal-2-1-lb.html
more info here:-
https://www.google.c..._sm=93&ie=UTF-8


2 user(s) are reading this topic
0 members, 2 guests, 0 anonymous users

