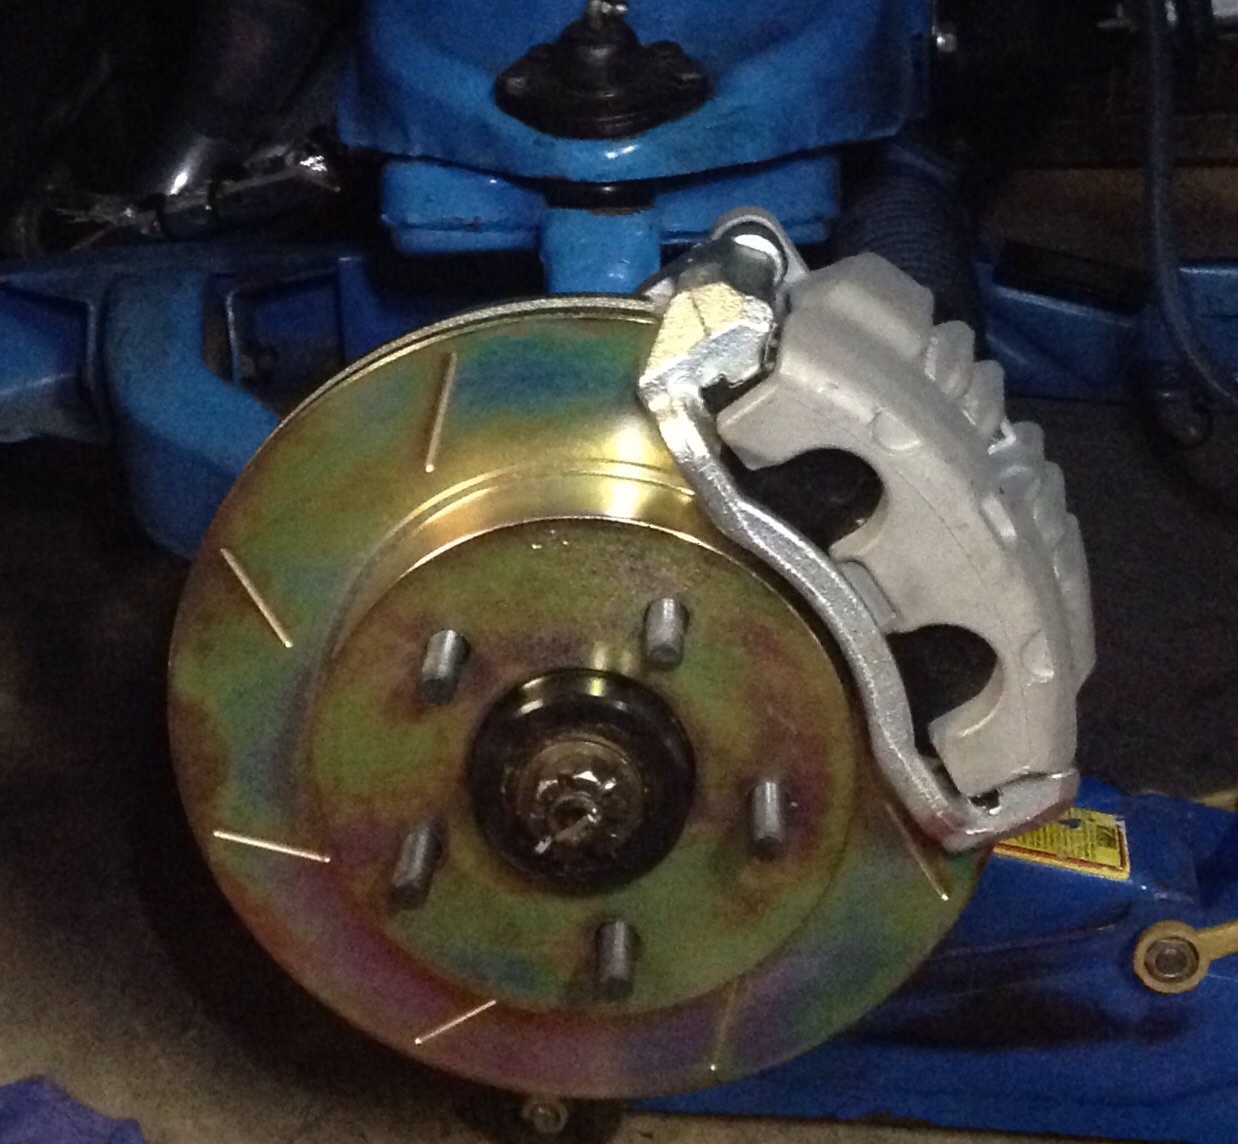
Fitting UPC 287mm Torana stub kit to LX hatch
#26

Posted 25 November 2014 - 01:14 PM
#27

Posted 26 November 2014 - 07:22 AM
#28

Posted 26 November 2014 - 12:11 PM
Let me know!
#29

Posted 26 November 2014 - 02:43 PM
#30

Posted 26 November 2014 - 07:23 PM
#31

Posted 26 November 2014 - 08:33 PM
Haven't seen anyone successfully make the 330 kit work no
But there may be exceptions
#32

Posted 24 December 2014 - 07:58 AM
Yeah that's not what I had in mind .....more like has anyone on here made the 330mm kit work ???
#33
 _LS1 Hatch_
Posted 24 December 2014 - 12:25 PM
Gave up and made my own 360mm kit instead. Used the hubs and the upc rotors and calipers are new and sitting on the shelf for the past bunch of years ever since.
#34

Posted 24 December 2014 - 06:33 PM
My car has been a long build 6.5 years so far - nearly done. I tried fitting the kit up to the car before its strip down, it became very obvious this was not the case. Front or rear mount!
Ok, so I made a frame ( attached the k- frame to it using the chassis rail bolts) to mount a spare unsprung & unshocked front end on (UC), so that I could easily test for any binding or loss of full movement through the full range articulation.
As others have said steering lock is almost nonexistent at full droop let alone full compression, mainly due to the caliper hitting the top arm. So I rang Tony ( mr spares - romac upc ) & had a lengthy conversation about the issues I was experiencing.
His response was all you have to do is remove the top arm balljoint & mount it on the bottom side of the top arm with a 25mm spacer between the 2.
I ran this past my mod plate engineer. Although he thought it would pass using the correct grade bolts, I didn't like the idea. So I sourced the correct taper extended length ball joints from a nascar supplier & fitted them in the original position.
With this extended length ball joint installed & a 3mm space tracked to the lower arm steering lock stop, I am able to get full movement up & down left & right without modifying the top arm at all. I did have to grind a radius on the bottom of the caliper main bracket just above the tie rod end, to allow clearance for full movement ( was a right angle, now a 5mm radius).
Ok so I checked how this might effect camber, compared to the std UC Torana setup. I set up the std setup with 1deg negative camber at normal ride height, this decreases with compression of suspension (going positive at full compression). The longer top balljoint setup at std ride height set the same adds more negative camber with compression.
I'm no suspension expert, but I'm going to give it a go. It's all installed & engineered, just waiting on me to complete the hiding of my wiring & a couple of other things, so I can get it registered. Then real world feedback......
#35

Posted 24 December 2014 - 06:42 PM
And pics and part # of that upper BJ
#36

Posted 24 December 2014 - 08:52 PM
#37
 _LS1 Hatch_
Posted 25 December 2014 - 02:41 AM
#38
 _LS1 Hatch_
Posted 25 December 2014 - 02:44 AM
http://www.speedwaym...ngth,35802.html
(don't quote me on that one, it's early still this morning, lol) But have a look around there, they have a ton of different ball joint styles there!)
#39

Posted 26 December 2014 - 02:08 PM
This is where I brought them from http://www.howeracin...fits-k5108.aspx
Yes they are to suit 67-69 Camaro, but they are the same mount & taper as Torana uppers.
I brought the +0.9" longer units
 ImageUploadedByTapatalk1419566541.267270.jpg 241.88K
34 downloads
 ImageUploadedByTapatalk1419566564.436745.jpg 256.97K
24 downloads
ImageUploadedByTapatalk1419566564.436745.jpg 256.97K
24 downloadsThey bolt into the same holes as the originally riveted top ball joints, with a slight adjustment here & there ( minor drilling & filing)
The only other change I had to make was a droop stopper, so that at full droop the top arm only travelled down as much as the original set up.
 ImageUploadedByTapatalk1419566774.166659.jpg 168.79K
20 downloads
 ImageUploadedByTapatalk1419566787.033880.jpg 164.18K
21 downloads
ImageUploadedByTapatalk1419566787.033880.jpg 164.18K
21 downloadsShown next is the steering stop mod, So that the rear of the caliper won't hit k-frame as the pads wear.
Sent from my iPhone using Tapatalk
Edited by UC308Hatch, 26 December 2014 - 02:22 PM.
#40

Posted 26 December 2014 - 02:13 PM
 ImageUploadedByTapatalk1419567086.150394.jpg 375.35K
16 downloads
ImageUploadedByTapatalk1419567086.150394.jpg 375.35K
16 downloadsobviously some of these shots were taken before I sandblasted the parts & fitted new components, but I still have the same suspension travel as factory, just with a couple of degrees less full lock. All I did in the above shot was added a 3mm shim to the existing UC lower Arm steering stop.
Sent from my iPhone using Tapatalk
Edited by UC308Hatch, 26 December 2014 - 02:26 PM.
#41

Posted 26 December 2014 - 02:31 PM
Sent from my iPhone using Tapatalk
Edited by UC308Hatch, 26 December 2014 - 02:39 PM.
#42
 _napes_au_
Posted 02 April 2016 - 05:41 PM
I'm sure it would of been discussed before, just can't seem to find it.... Has anyone got this brake set up with V5 Simmons fitted on an LX Hatch???? Was there any clearance issues????

#43

Posted 01 June 2016 - 03:40 PM
I'm sure it would of been discussed before, just can't seem to find it.... Has anyone got this brake set up with V5 Simmons fitted on an LX Hatch???? Was there any clearance issues????
From memory you will have issues with the Simmons wheels. they do make a machined caliper that will work with 14" wheels now.
#44

Posted 01 June 2016 - 03:48 PM
Hi Rexy,
Great post. Did you have any issues with the brake hose length?
I was just assembling my kit and it looks too long. Measures 450mm between connectors
 torana-37.jpg 79.77K
1 downloads
Now it's time to install the new provided brake line. Make sure you use the provided copper washers. One goes between the head of the bolt and the line, The other between the line and the caliper body.
image.jpg
Undo the line from the old caliper where it joins the hard line in the upper inner wheel arch.
Very quickly attach the new line as the brake fluid attempts to escape.
I found the system gravity bled itself quite nicely.
Top up brake fluid.
Reinstall wheel. You will need new wheel nuts unless your old setup had half inch studs (std holden is 7/16). These cost me $20.
Check you have a brake pedal.
Trundle around the block to test.
Recheck on return for brake fluid level, leaks and check bolt tightness.
#45

Posted 04 June 2016 - 02:58 PM
#46

Posted 13 June 2016 - 04:50 PM
I know it's an old thread but I recently fitted the 287mm kit I bought via eBay years ago.
As above I had to remove a little metal from the stub axle but other than that it was an easy job. Unfortunately the Walkinshaw wheels I was planning on using won't fit but that is the wheel. I can fit a standard 15" Commodore wheel on. The components in the kit look good, happy with the purchase just not my decisions leading up to it. Regarding the length of the brake hosw, it looks long but I did not see it causing any issues, was going to attach it to the original brake hose bracket on the inner guard to keep it out of harms way
I have always liked the Walkinshaw wheel and wanted to use them which is why I went Commodore PCD but now I am not so sure. Might be looking for different wheels or maybe I won't be using the UPC brakes.
Wish I had found the following thread before I tried the Walkinshaw wheels, http://www.gmh-toran...ls-on-my-torry/
 P1110052.JPG 158.01K
7 downloads
 P1110053.JPG 153.62K
9 downloads
 P1110057.JPG 158.9K
9 downloads
#47

Posted 13 June 2016 - 05:04 PM
i remember reading that the Vl walky wheels do fit over drum brakes as well
#48

Posted 13 June 2016 - 08:46 PM
Since it is about the only disc they fit on I will try using the 290mm VL-VN disc to see if I can make it work with a different caliper
#49

Posted 13 June 2016 - 09:03 PM
Would love to see a picture of the inside of one of them.
#50

Posted 13 June 2016 - 09:32 PM
Mine fitted on the car using one of the adapter hubs and a VX disc but no caliper
The gap below the ruler and the mounting face is 12mm so the disc mounting face needs to be smaller in diameter than the AU disc used with the UPC/Hoppers kit and then even if the wheel fits onto the disc mounting face it needs a caliper that does not protrude far outward from the disc face.
Hope the pics help
 P1110063.JPG 160.22K
10 downloads
 P1110062.JPG 149.25K
8 downloads
 P1110061.JPG 156.51K
8 downloads
 P1110060.JPG 160.66K
8 downloads
2 user(s) are reading this topic
0 members, 2 guests, 0 anonymous users


