Jump to content


- - - - -

'76 LX Torana Sedan Build


  • Please log in to reply
13 replies to this topic

#1 _j.e.d._

_j.e.d._
  • Guests

Posted 08 November 2014 - 08:06 PM

Howdy all. New project time...


Not too much to show so far - I picked this car up a few months ago for a good price initially to cut up for patch panels for the hatch, but it's just too good for that so I've decided to put the hatch on hold while I try & get this on the road.


Lotta work ahead of me, but I'd like to get it done by xmas next year (famous last words I know). Getting a shed built over xmas/new year this year so I'll have a bit more space, but in the mean time I'll do what I can in the 'might as well be' single garage.


Here is a pic of it coming home & in it's new parking space making friends with big brother..

20140425_113629.jpg

20140425_121332.jpg


First job was to empty the car out of all it's spare parts, lucky I've got a spare room as it filled that up pretty well. The car came with two sets of doors, guards, bonnet, boot, bumpers so I should get a good set sorted for the car.


All the mechanical parts I've collected for the hatch are going to go in this car, then once this is done I'll hopefully know what direction I'll be taking with the hatch. Mocking it all up to a point before I start on rust repairs.


Had a VN V8 brake booster for a while, so I've cut the end off it & welded the Torana end on & shorter as well..

20140906_171633.jpg

20140906_171747.jpg


Fitted HQ sump to the VR clubsport engine..

20140914_122747.jpg


Mounted on to hatch front end, lifted up front of car with engine hoist, dropped old front end out & rolled this one under..

20140920_162008.jpg


Engine in place..

20140920_174847.jpg

20140920_175758.jpg


Temporary gearbox crossmember..

20140920_174958.jpg


At this stage the car sat for a few weeks & I had second thoughts about the direction I was heading with it, but a mate came around the other day & convinced me I just had to do it all out with the V8 & flares so we decided to tape the flares on & chuck on the nose cone & front spoiler to see what it'd look like..

20141107_123526.jpg

20141107_124850.jpg

20141107_124857.jpg

20141107_125043.jpg


Rolled one of my newly acquired hotwires in front to see what it'd look like & I was pretty happy..

20141107_123814.jpg


Today I finished welding up the radiator support panel. I bought this a couple of years ago when rare spares didn't know how to make them properly & it was straight when it needed to be curved. So I cut some slots, spread it out a bit & welded it up. I'm no fantastic welder but it came up alright. I'll probably weld a plate to the front through just to strengthen it up a little..

20141108_193554.jpg


This brings me up to date on this. It's not going to be a fast build but I'll be ticking along on it & I'll update this thread whenever progress is made if y'all are interested 


#2 _LS1 Taxi_

_LS1 Taxi_
  • Guests

Posted 08 November 2014 - 08:41 PM

Interested!


Looks like a cool build.  It's always good when you've got some spare bits and pieces laying about for inspirational dress ups.  Beer helps also :)


#3 _j.e.d._

_j.e.d._
  • Guests

Posted 08 November 2014 - 08:49 PM

Ah, yes it does  :spit:


Yea I figured I'd use this car as a test bed to get better with my welding & to practice painting as well, then I'll feel more confident attacking the hatch cos that's got some serious work to be done to it compared to this one  :unsure:


#4 _j.e.d._

_j.e.d._
  • Guests

Posted 09 November 2014 - 01:14 PM

Today's small amount of progress..


Welded the plate to the front of the rad. support panel & it came up ok. I won't weld it up to the car til I practice some more on butt welding joints. Maybe next weekend.


Knocked up these plates as the car was missing them after one of the previous owners repaired the typical bonnet hinge rust. My welding sucks but I'll get better..

20141109_154213.jpg

20141109_1546570.jpg


Edited by j.e.d., 09 November 2014 - 01:16 PM.


#5 76lxhatch

76lxhatch

    That was easy!

  • Members
  • PipPipPipPipPipPipPip
  • 7,192 posts
  • Location:Unzud
  • Car:SS
  • Joined: 04-August 08
Garage View Garage

Posted 09 November 2014 - 05:10 PM

Needs more shielding by the looks of that?


For your radiator support piece, drill some holes and plug weld it where the original was spot welded.


#6 _j.e.d._

_j.e.d._
  • Guests

Posted 09 November 2014 - 07:25 PM

You'd probably be right mate. I'm running C02 but I can hear it leaking at the join to the back of the mig welder so it's not really as effective as it should be I don't think.


I'll sort that out before I do any more but I'm really enjoying the learning curve  :D


I like the idea of plug welding the rad. support panel, but I'm not sure how it'll look as you'll see the join lines? Does that matter? I'll take some pic's of what I've got left on the car & the back of my rad. support panel so you can see what I'm working with. (I may not be understanding what you're saying sorry mate)


#7 76lxhatch

76lxhatch

    That was easy!

  • Members
  • PipPipPipPipPipPipPip
  • 7,192 posts
  • Location:Unzud
  • Car:SS
  • Joined: 04-August 08
Garage View Garage

Posted 09 November 2014 - 08:39 PM

I assume you're talking about the front piece in the photo above? I don't seem to have any photos of it installed but you can see here where I drilled out the original spot welds in the old rusty part, I just drilled the same holes (slightly smaller) in the new piece:

http://www.gmh-toran...e-3#entry612675


Or am I not seeing that properly and it has both skins?


#8 _j.e.d._

_j.e.d._
  • Guests

Posted 09 November 2014 - 09:28 PM

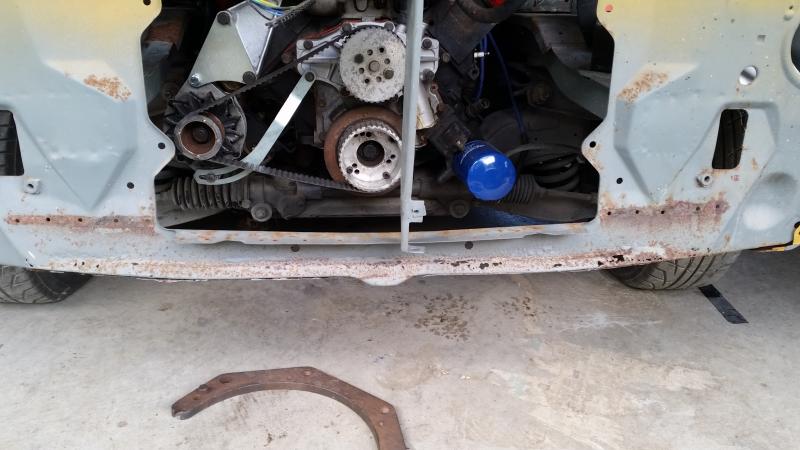
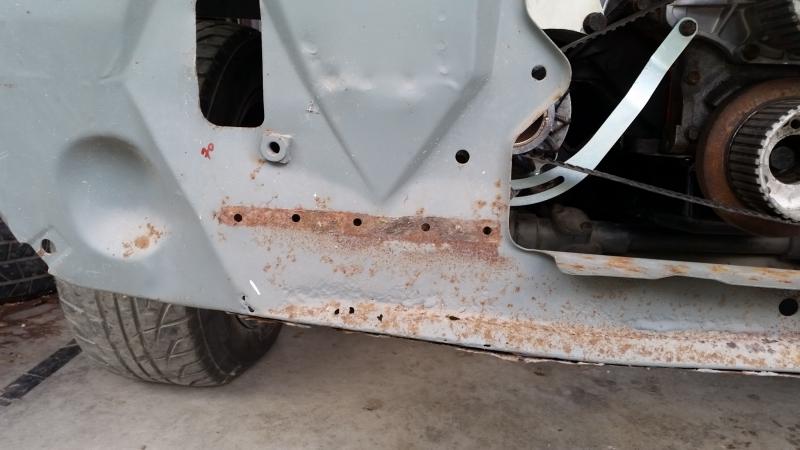
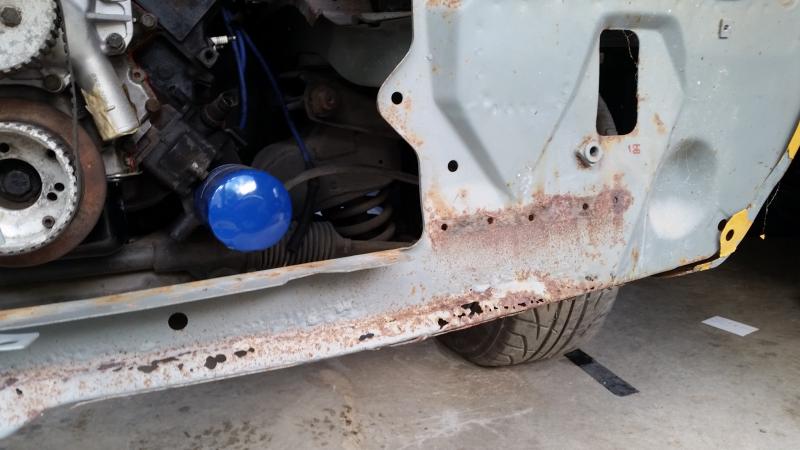
Yea, mine has both skins. This is good though as I need to cut out pretty much all of the skin on the engine side.


I'll post a pic tomorrow..(today lol)


#9 _j.e.d._

_j.e.d._
  • Guests

Posted 13 November 2014 - 03:58 PM

Here's what it looks like..

20141113_173040.jpg

20141113_173045.jpg

20141113_173049.jpg


#10 76lxhatch

76lxhatch

    That was easy!

  • Members
  • PipPipPipPipPipPipPip
  • 7,192 posts
  • Location:Unzud
  • Car:SS
  • Joined: 04-August 08
Garage View Garage

Posted 14 November 2014 - 05:16 AM

Yeah just ignore me... it will look a lot nicer if you can make the joins for replacing that piece seamless. Some more photos of how I did it in the link above, but didn't have the two skins attached together before starting. If you wanted to do it the hard way you could separate them first, might make installing the first part a little easier.

#11 _j.e.d._

_j.e.d._
  • Guests

Posted 14 November 2014 - 06:16 AM

All good mate - not gonna be any easy job but I'll take a look at it over the weekend hopefully.


Problem with this radiator support panel is that the curved edges that form the bottom corners of the radiator opening don't even line up with the original - something like 5mm out, so will have to do the best I can to make it look ok.


#12 Rockoz

Rockoz

    Oh My, Don't you post alot

  • Members
  • PipPipPipPipPipPipPip
  • 4,006 posts
  • Name:Rob
  • Location:Cowra NSW
  • Joined: 21-September 08

Posted 14 November 2014 - 07:33 AM

Clean the surface rust off before welding as well. Will make a difference.


#13 _j.e.d._

_j.e.d._
  • Guests

Posted 14 November 2014 - 07:48 AM

Will do mate, cheers  :D


#14 76lxhatch

76lxhatch

    That was easy!

  • Members
  • PipPipPipPipPipPipPip
  • 7,192 posts
  • Location:Unzud
  • Car:SS
  • Joined: 04-August 08
Garage View Garage

Posted 14 November 2014 - 09:11 AM

Problem with this radiator support panel is that the curved edges that form the bottom corners of the radiator opening don't even line up with the original

In that case maybe it is worth separating the two pieces to get it all sorted


1 user(s) are reading this topic

0 members, 1 guests, 0 anonymous users