i've learnt heaps! thanks to you all
still, don't go asking me to come and fine tune an engine for ya, will always be outta my league!
EVEN if my brain retains just the basics.. i'm a happy man 

 1 votes

Posted 26 June 2017 - 06:36 PM
i've learnt heaps! thanks to you all
still, don't go asking me to come and fine tune an engine for ya, will always be outta my league!
EVEN if my brain retains just the basics.. i'm a happy man
Lotsa Posts!


Posted 26 June 2017 - 07:24 PM
The threaded part of the carb that the fuel line goes into is a "special" adapter that screws into the carb and is part of the "needle and seat" that shuts off the fuel once the float bowel has been filled , there is a tang on the float that pushes the needle into the seat once the bowel gets to a certain level and cuts off the fuel flow so that it does not flood.(sort of , it leaks a bit all the time but that is another
story).
A common fault was that this adapter was over tightened and the thread in the carb got stripped , the carb should come with this fitting because it is part of the carb.
If at worst it does not come with the fitting ! , make sure that the thread in the carb is not stripped before you buy because it is a painful process trying to fix it rather than simply yelling out for the fitting.
Posted 26 June 2017 - 08:42 PM
cheers for info, all news to me!
and
"A common fault was that this adapter was over tightened and the thread in the carb got stripped , the carb should come with this fitting because it is part of the carb."
will check about that too, and the thread not stripped.
as unit is fully refurbished that SHOULDN"T be an issue.. but will check and make sure
..and inquire about adapter.. as can't see it in sellers image

http://www.ebay.com....OQAAOSwanRXhxYO
Forum Fixture

Posted 26 June 2017 - 09:01 PM
Matt, admire your persistence and abnility not to get overwhelmed by the task ahead. Two qualities I don't have. Also the only dumb question is the one that isn't asked.
I am running a WW Stromberg and couldn't find a definitive answer as to connecting up #9 (which I believe runs to the canister) and the #10 port (which I believe is a sort of fuel vapour overflow) so I am going to run #9 hose to a "T" piece to pick up #10 then one line into the canister.
Regarding the fuel line connection, I sourced one from Autobarn and just run rubber line to the fuel line, but I had the needle & seat. Not sure if yours come with it. Cheers Ron
Posted 26 June 2017 - 10:01 PM
heya cook 
checking with seller to see if comes with fuel line and needle and seat, will see
if have three posts on canister like mine could run one to "carb" and one to "purge" on canister ports..
although t-piece and then run one pipe bloody smarter!
just to add fuel to fire, what i've marked #7?... others state it's "dizz vac advance"port, which i had read and marked as #5
aargh!
Forum Fixture
Posted 26 June 2017 - 11:02 PM
Matt, there are a lot more knowledgeble people than me but I believe the small one on the base plate is Vac Advance and the larger one is to PCV.
The two in the middle as far as my research goes is, #9 the larger one goes to canister and the smaller one #5 runs to the manifold, but what for I don't know. Cheers Ron
Posted 27 June 2017 - 09:51 AM
but what for i don't know
lol
f@#kin engines!!
i/we can always try it a few ways around and see what works, as has been advised to do earlier in thread.
__________________
also, adding this as a reminder?? have come across same info a couple of times, and hoping to have further info if poss
"Did you remember to have the vacuum line unplugged when you did the timing for the new carbie? This must be done or the timing will be out when you accelerate."
and
"one other thing worth mentioning - buying a reco cab is not always as simple and just bolting it on and turning the key.
Edited by livo74, 27 June 2017 - 10:03 AM.
Forum Fixture
Posted 27 June 2017 - 11:02 AM
Matt, the other issue I created for myself was when turning over the crank to find TDC (which not surprising took me a number of goes) I had the fuel pump connected up and flooded the carby. You can imagine what happened when I fired it up. Luckily I had bought a fire extinguisher the day before. Paid for itself in one go. LOL. Cheers Ron
Posted 27 June 2017 - 11:11 AM
i tried to start a big fire, but didn't have the dizzy/plugs hooked up when tested carby/fuel pump lol!
cheers for heads up ron
(don't forget to THROW AWAY extinguisher and buy a new one. dry powders have gradual leak of pressure once seal has been broken. not something anyone should find out later, ..the hard way )
Posted 27 June 2017 - 11:28 AM
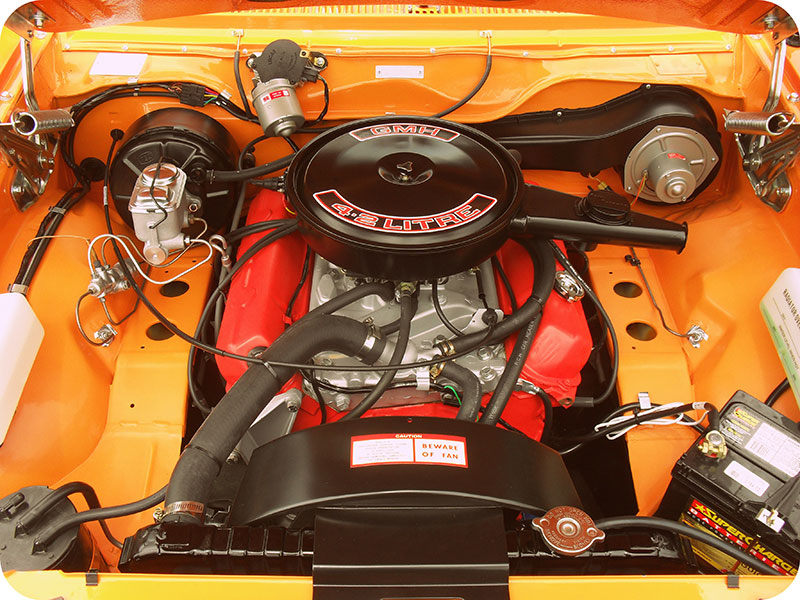
using max elery torana restoration workshop manual..
seems my setup was looking to use was for the 5l 308 in regards to heat tube for choke,.
__________
have contact supplier am buying carby from, and is being specifically chosen for my "later 253 lx torana auto" setup.
and all ports etc will be labeled for me.
will post pics when arrives.
__________
am posting images below for reference.
am sure others were expecting this.. but whoda thunk it that the difference in carby would dictate setup lol
Edited by livo74, 27 June 2017 - 11:47 AM.
Posted 27 June 2017 - 11:34 AM
max elery torana restoration workshop manual
emissions and pollution diagrams and schematics lx
manual and automatic transmissions
engine 253 308 4.2 5.0
1.

2.

3.

4.

5.

6.

7.

Lotsa Posts!
Posted 27 June 2017 - 07:54 PM
I wouldn't try to get too bogged down in what they had from model to model to control emissions , most of the sensors etc are probably NLA.
As far as ADR27a goes , can't find the list , stashed it in a safe place , and who will be checking tailpipe emissions ?
Try not to panic too much , you will get it sorted out step by step , steady as she goes , and ask heaps of questions
One thing i noticed about the little WW with no intake manifold heating is that the carb would freeze up in winter before any heat
could soak up the intake manifold and melt the ice , yes they frost up.
Posted 27 June 2017 - 10:25 PM
heya eunuch, imagining aren't gonna get too hard looked, but plan to make things as easy as poss, and once rego'd i can play to hearts content.
will just make look neat and proper hopefully.
and run ok too would be sweet!
freezing up isn't quite practical. what do you mean by no intake manifold heating? do you mean something run off manifold to the air cleaner? or to carb.
(some of the above schematics seem?? to show such a thing.. the v8 one manual ones, as best i can tell.)
Oh My, Don't you post alot

 View Garage
Posted 28 June 2017 - 08:42 AM
One thing i noticed about the little WW with no intake manifold heating is that the carb would freeze up in winter before any heat
could soak up the intake manifold and melt the ice , yes they frost up.
No water heating, but it has EGR to heat it doesn't it? All planes that run carbys have a system of directing warm air from the exhaust manifold to the carby to prevent icing in the venturi area. It can happen with an OAT up around 25 degrees with the right humidity and throttle settings. I guess it could happen in a car if you were going down a big hill with the throttle plates nearly closed. Not a problem in a car. BIG problem in a plane.
Posted 28 June 2017 - 11:17 AM
and yet have been advised to frock off egr. (that was said prior to ww strommy though)
this just gets easier and easier doesn't it ! jeezus!
Edited by livo74, 28 June 2017 - 11:22 AM.
Lotsa Posts!
Posted 28 June 2017 - 02:46 PM
Once you've fired engine up headers will heat up engine bay so doubt will be much of an issue unless in extreme climate lol.
Lotsa Posts!
Posted 28 June 2017 - 02:52 PM
Aircleaner on & charcoal canister hooked who would care or notice as long as it looks the part.
*pic from notna thread
Edited by gtrboyy, 28 June 2017 - 02:54 PM.
Lotsa Posts!
Posted 28 June 2017 - 03:59 PM
Yep , the pollution manifold will have internal exhaust manifold crossovers that heat the manifold so ice won't be a problem, mine was non pollution with water heating to intake manifold bypassed , on some days it was so bad the thing would stall on warm up or a couple
kays down the road at T intersection.
That aside , when new carb arrives it should not be too hard to get it hooked up to start her up....not fire her up....we don't want any
fires unless it's in the cylinders
Not sure how you went with the dizzy and timing but i found the easiest way was to pull #1 plug out , get a socket on a ratchet on the bolt that holds the harmonic balancer on and wind it over clockwise with the ratchet with one hand and hold a finger in the plug hole with the other hand until you feel pressure starting to build up , when you feel pressure starting keep winding slowly while looking at the harmonic balance for the notch to come around , wind it till that notch lines up with zero or the longest line on the timing cover , that will be #1 top dead center (TDC).
On the top of the body of the dizzy where the cap goes on there should be a line , fit the dizzy with the line on the rotor button to line up with the line on the body of the dizzy.That will give you zero degrees advance , they will run on that but not very nicely so turn the dizzy about 2mm anticlockwise ,nip up the bolt, this will give you a bit of advance but will need checking with timing light.
Edited by EunUCh, 28 June 2017 - 04:22 PM.
Posted 28 June 2017 - 05:16 PM
heya gtr, am pretty south so on frosty mornings might be an issue,
but not too often freezing. so will grin and bear for now.
as for "Aircleaner on & charcoal canister hooked who would care or notice as long as it looks the part."
haven't been thru this experience before.
and it's not so much vic roads am concerned about getting past, it's the mechanic who does rwc's that i guess might be the worry.
will indeed make it look neat and about right.
that said, the place am getting carby from are going to lable everything for my specific model, and i will follow that and just get on the road.. and then dump any unneeded post poll as poss.
Posted 28 June 2017 - 05:22 PM
heya eunuch, being able to more seriously say start her up, as opposed to fire her up.. is nearly there, now have checked no fuel line leaks etc
much appreciated is the specifi cinfo on tdc/dizzy/timing!
have (too much) been relying on the old bloke neighbor and best if i take in info myself whilst using his help.
have no timing gun, will use his for now
Posted 01 July 2017 - 04:41 PM
(well photobucket has just screwed us all!! goodbye images)
Edited by livo74, 01 July 2017 - 05:10 PM.
Posted 01 July 2017 - 05:17 PM
2" inch exhaust, kindly supplied by performance exhaust vermont
 IMG_2230.JPG 121.56K
7 downloads
IMG_2230.JPG 121.56K
7 downloads
Edited by livo74, 01 July 2017 - 05:19 PM.
Posted 01 July 2017 - 05:27 PM
exhaust
exhaust
exhaust
aargh
navigating site's uploader .. giving me grief
will chop along "splice" lines with angle grinder when have test fitted
IMG_2227.JPG 126.5K
7 downloads
IMG_2231.JPG 117.61K
4 downloads
Edited by livo74, 01 July 2017 - 05:21 PM.
Socially Distant

Posted 02 July 2017 - 01:58 AM
Yeah, screw photobucket, there are a heap of free uploaders out there, for the one I use (and find really good, especially if you install the windows app) see my post here:
http://www.gmh-toran...e-2#entry999594
I think there would be several million people around the world giving photobucket the finger right now!
Posted 02 July 2017 - 01:26 PM
it's unbelievable! ruined the resources of MILLIONS searching for help in every facet.
cheers for link, might use but concerned same thing will happen a few years down the track. will battle with the sites uploader and contemplate further.


0 members, 1 guests, 0 anonymous users

