
Bin it. Get one from boomfunk.
Torana LX Headlining
Started by
MR77LX
, Jul 31 2015 06:23 PM
35 replies to this topic
#26

hanra
-

- Members
-

- 10,946 posts
Oh My, Don't you post alot
- Name:Brad
- Location:Farrrrrr North Qld
- Car:1975 LH SL/R 5000, 1967 Morris Cooper S, E36 BMW, Toyota Corolla, Isuzu DMax
- Joined: 24-March 11
Posted 17 April 2016 - 06:14 PM
#27
torana_nick
-
- Members
-
- 759 posts
Forum Fixture
- Name:Nick
- Location:victoria
- Car:LH Torana Project
- Joined: 11-December 11
Posted 17 April 2016 - 06:34 PM
I am no pro but I had the similar issues from the pic obove dosent look like you have it tight at all. You realy need to pull it "tight"
Mine was from C&G auto
Mine was from C&G auto
Edited by torana_nick, 17 April 2016 - 06:35 PM.
#28
_Gaza39_
_Gaza39_
-

- Guests
Posted 17 April 2016 - 06:39 PM
Hi could be a problem from where you purchased the headlining. Try a velour material as I did , its a very forgiving material and looks great. It took me about 8 hours to do mine. I bought mine from Tonnos and stuff in NSW, you pay a bit more but its worth it in the end. Sometimes its to do with the way its packed by the seller, it ends up all wrinkled in the post. Tonnos take care in the way they pack your roof lining . They are on Ebay, good luck I hope the next roof lining works out for you:)
#29
_Mox_
_Mox_
-
- Guests
Posted 17 April 2016 - 07:54 PM
These old cars seem to know how to push you to the limit, everything i do on mine seems to need modifying and redone multiple times, Good luck Mate it will look great in the end. Cheers
#30
slar
 View Garage
-
- Members
-
- 498 posts
Forum Fan
- Name:AL
- Location:Newcastle
- Car:Rusty the Torana......Nearly complete
- Joined: 14-September 09
View Garage
Posted 17 April 2016 - 08:54 PM
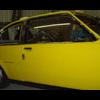
This is what mine looked like when I unpacked it.......this was from Boomfunk......dont worry about the creases

This is what it looks like stretched out......creases gone


You have to stretch it my friend......centralize the calico strips on your roof bows and wire then insert the wire onto the roof support and tap the little triangles over the wire to hold it firmly.
Then stretch front to back first.....use lots of peices of pinch weld to hold it around your window frames......then stretch it from side to side using the same method...try to keep the rear quater section central as you do this.
Once I got mine tight...I contact glued the front and rear to the window frame to firmly hold it in place then moved onto the sides doing the same thing...dont panic about the quaters leave them til last.
Once its tight start to work the quater sections little by little until you you pull them into shape.
Heres a little tip use a hair dry to warm the lining as you go...helps it stretch slightly.
Another tip when its all glued in and relatively tight....i used a paint stripper gun on LOW to tighten sections as the heat from this will shrink the lining and pull all the creases and wrinkes out....BUT BE CAREFULL with this method.....too long in one spot and you'll stuff it completely.
Had it done in about 6 hours no worries.
Cheers Al
#31
boomfunk
-
- Members
-
- 2,065 posts
Forum Trimmer
- Location:QLD
- Joined: 07-December 05
Posted 18 April 2016 - 07:59 AM
that looks 100% ^^ - its perfect, but it also take some no how and the way people go about it
well done to you Al
#32
hanra
-
- Members
-
- 10,946 posts
Oh My, Don't you post alot
- Name:Brad
- Location:Farrrrrr North Qld
- Car:1975 LH SL/R 5000, 1967 Morris Cooper S, E36 BMW, Toyota Corolla, Isuzu DMax
- Joined: 24-March 11
Posted 18 April 2016 - 09:52 AM
Im just going to dump a heap of pics I took of my install, completed images appear to be first I think, the last few look like it was still being fitted. Supplied by Boomfunk. Boomfunk also supplied templates for the dog leg and door tops and b pillar, I had my trimmer make these out of the Chamois vinyl that I supplied.


Edited by hanra, 18 April 2016 - 09:54 AM.
#33
Swarbs
-

- Members
-
- 1,671 posts
Forum Fixture
- Name:Dave
- Location:North West WA
- Car:LX 5000
- Joined: 18-April 07
Posted 30 April 2016 - 01:58 PM
How did you go Benno??
#34
BENN0
-

- Members
-
- 80 posts
Forum Member
- Location:Adelaide
- Joined: 01-January 10
Posted 03 May 2016 - 11:27 AM
Still no luck. Pulling it tight stretches the liner between the bow and the windscreen, but its still wrinkly between the bow and the rod.
This was after I measured and marked the middle of each wire/rod calico tube, marked the middle of the roof of the car at each connection point, made sure the wires and rods were centered, prior to install. Everything was lined up (installing wire forward of the interior light then working forward, then working back from the interior light)
Im going to try the herringbone style.
Could there be anything with the wires/rods adding to the drama? The rods are curved and dont look bent. Should the wires be dead straight or curved also?Im assuming they should be straight.
#35
hanra
-
- Members
-
- 10,946 posts
Oh My, Don't you post alot
- Name:Brad
- Location:Farrrrrr North Qld
- Car:1975 LH SL/R 5000, 1967 Morris Cooper S, E36 BMW, Toyota Corolla, Isuzu DMax
- Joined: 24-March 11
Posted 03 May 2016 - 05:49 PM
Do you have the rods installed in the correct colour coded order?
#36
BENN0
-
- Members
-
- 80 posts
Forum Member
- Location:Adelaide
- Joined: 01-January 10
Posted 02 June 2016 - 04:11 PM
Yeah rods were installed in the same position as they were removed from the factory lining.
Ended up buying another head liner. This time the ribbed version.
It is in and and im in the process of pulling it all tight. Its a much much better looking job. Same method as the last liner (measure it all out of the car, mark the centre of each wire/rod section, ensure it lines up with the centre of the roof etc)
Its not complete yet. Im taking my time in the pulling it all tight. But it looks like it will end up looking pretty good.
It looks like its a better fit (doesnt bunch around the rods) and the not so shiny gloss finish doesn't highlight as many creases.
Im sure i'll be posting back in here when it times to navigate the material around the a, b and c pillars......


1 user(s) are reading this topic
0 members, 1 guests, 0 anonymous users

