i cant help myself either.........Original plans were quick sand rust repair and respray but we started using paint stripper and thought why not plus its piece of mind knowing whats underneath the paint
LX Torana Rebuild
#26

Posted 28 September 2006 - 12:00 AM
#27
 _caseyo69_
Posted 28 September 2006 - 12:02 AM
#28
 _slr_5000torana_
Posted 28 September 2006 - 12:14 AM
#29
 _caseyo69_
Posted 28 September 2006 - 12:21 AM
#30
 _slr_5000torana_
Posted 28 September 2006 - 12:30 AM

#31

Posted 28 September 2006 - 12:38 AM
Edited by ALX76, 28 September 2006 - 12:39 AM.
#32
 _caseyo69_
Posted 28 September 2006 - 12:39 AM
#33
 _slr_5000torana_
Posted 28 September 2006 - 12:51 AM

#34
 _slr_5000torana_
Posted 28 September 2006 - 12:52 AM
#35
 _caseyo69_
Posted 28 September 2006 - 01:07 AM
#36

Posted 28 September 2006 - 02:18 AM
#37
 _caseyo69_
Posted 28 September 2006 - 09:28 AM
#38

Posted 28 September 2006 - 09:30 AM
Your blackouts/warpaint is a combination of LH SLR and LX SLR 5000, that's why it's unique.
#39
 _caseyo69_
Posted 28 September 2006 - 09:36 AM
#40
 _caseyo69_
Posted 28 September 2006 - 10:02 AM
#41
 _QIKSLR_
Posted 28 September 2006 - 11:34 AM


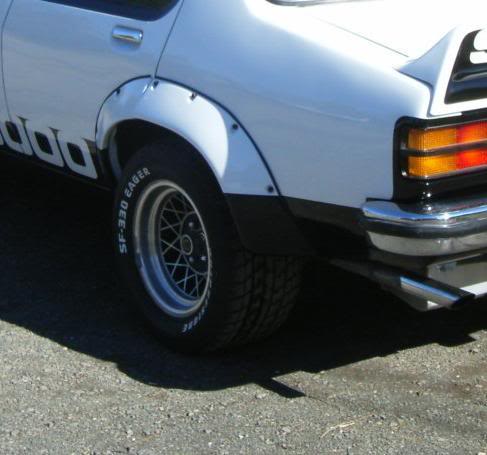
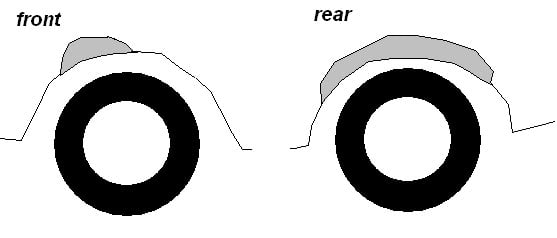
That's how mine is cut out. I am taking it back in a few months to be re-done as it is not cut high enough. It was cut out to suit the wheels that are pictured on the car. Those wheels clear, but now I'm trying to jam 26x12" tyres under it and theres not enough clearance at the top. I'm very happy with the job that was done on mine, its just got high enough. There's room for about 1.5"s to come off. You don't need to cut it out any wider than the inner part of the flare, but you want to take it as close to the bolt holes as possible at the top. You'll also need to cut out the part that goes behind the door and trim some metal off the door (behind the flare).
If you need any more detail shots let me know.
PS: Your projects looking great
Cheers
Marty
#42

Posted 28 September 2006 - 01:04 PM
how is it a combo of both? It looks like standard LX to me except where it follows the bumper.Bolt the flares on, draw a line on the inside of the flares with a texta, take the flare off and cut (not necessarily the full height of the line though, but at least you will know your limit)
Your blackouts/warpaint is a combination of LH SLR and LX SLR 5000, that's why it's unique.
Marty, how is yours coming along? I havnt heard anything about it for ages
#43
 _caseyo69_
Posted 28 September 2006 - 01:59 PM
#44
 _QIKSLR_
Posted 28 September 2006 - 02:16 PM
It's a combo of both coz it's got the black ass end on it like an LH with the black bonnet and stencils like an LX.how is it a combo of both? It looks like standard LX to me except where it follows the bumper.Bolt the flares on, draw a line on the inside of the flares with a texta, take the flare off and cut (not necessarily the full height of the line though, but at least you will know your limit)
Your blackouts/warpaint is a combination of LH SLR and LX SLR 5000, that's why it's unique.
Marty, how is yours coming along? I havnt heard anything about it for ages
It's getting there mate, I'm actually at the same stage as casey, I've started getting it in primer. I'm giving the engine bay the full bare metal treatment, but I'll just be sanding back the outside as i know its the original paint. I'm going absynth yellow with the full LX blackouts and SLR5000 stencils. Hoping to have the body complete by the end of summer.
Casey, for the test tyre, I reckon cut the guards and fit the flares based off a 26" diameter tyre. Just cut out a round peice of cardboard 26" in diameter. That is pretty much as big as you'll ever get under a flared torana without re-shaping the flares. That way if u ever go drag racing you can stick a 26x10x15" slick on (very common size), or run some big arse 17s with low profiles if thats what floats your boat. Don't make the mistake I made and assume that you'll stick with the wheels and tyres that you happen to have at the time. If you want to run it low you need to go as close to the bolt holes at the top as possible.
Marty
Edited by QIKSLR, 28 September 2006 - 02:26 PM.
#45
 _caseyo69_
Posted 28 September 2006 - 04:10 PM
#46

Posted 28 September 2006 - 04:36 PM
the outer quarter panel needs to be welded to the inner wheel arch panel to include strength from the cut and seal out road grime to prevent rust etc.
EDIT oh and when cutting grinding and welding try to keep as much heat out of the quarter panel as possible to reduce distortion.
Edited by ALX76, 28 September 2006 - 04:39 PM.
#47
 _caseyo69_
Posted 30 September 2006 - 10:32 PM
#48

Posted 30 September 2006 - 10:37 PM
#49

Posted 30 September 2006 - 10:41 PM
plus the look, the sound, the resale value and ease of upgrade to bigger cubes.
just my 2c
#50
 _caseyo69_
Posted 30 September 2006 - 10:48 PM
2 user(s) are reading this topic
0 members, 2 guests, 0 anonymous users


 View Garage


