Jump to content


- - - - -

The Sally Report

LC GTR Restoration 1971 The Marty Report Girl Power

  • Please log in to reply
984 replies to this topic

#226 Rockoz

Rockoz

    Oh My, Don't you post alot

  • Members
  • PipPipPipPipPipPipPip
  • 4,007 posts
  • Name:Rob
  • Location:Cowra NSW
  • Joined: 21-September 08

Posted 20 May 2020 - 11:12 AM

Hi Marty


Im just guessing, but is the Rust Blast a phosphoric acid mix similar to all the other rust convertors on the market?

Ive got close to 20 litres of phos acid, and have used it beside a couple of the other commercial ones and I cant see the difference so far.


Cheers


Rob


#227 sibhs

sibhs

    Lotsa Posts!

  • Members
  • PipPipPipPipPipPip
  • 2,707 posts
  • Name:Martin
  • Location:Perth
  • Car:LJ Coupe S
  • Joined: 27-July 12

Posted 20 May 2020 - 08:33 PM

Hi Marty


Im just guessing, but is the Rust Blast a phosphoric acid mix similar to all the other rust convertors on the market?

Ive got close to 20 litres of phos acid, and have used it beside a couple of the other commercial ones and I cant see the difference so far.


Cheers


Rob

Hi Rob, Zinc Phosphate based so I'd say similar.  I don't think it matters what brand you use. 


Marty


#228 sibhs

sibhs

    Lotsa Posts!

  • Members
  • PipPipPipPipPipPip
  • 2,707 posts
  • Name:Martin
  • Location:Perth
  • Car:LJ Coupe S
  • Joined: 27-July 12

Posted 20 May 2020 - 09:04 PM

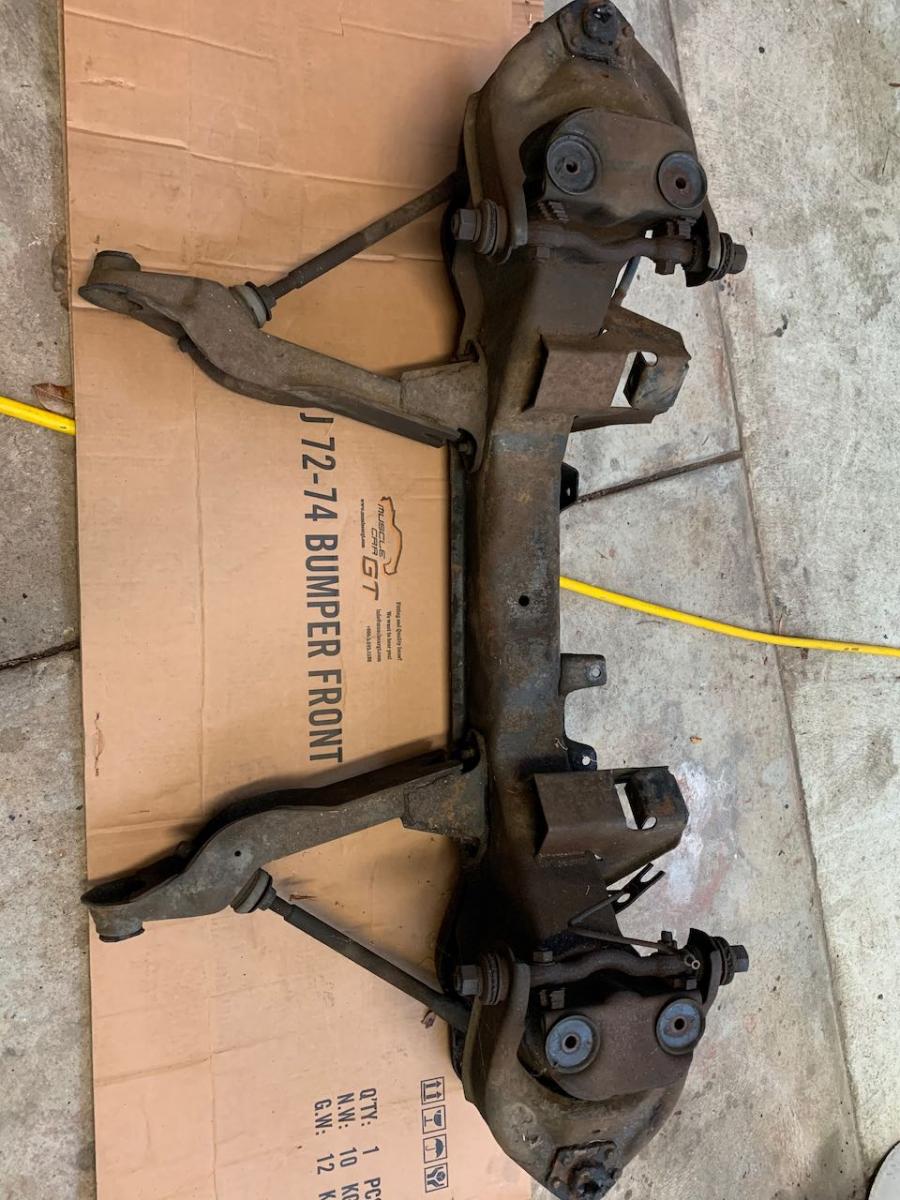
I finally stripped down the K Frame and made a bit of a mess on the driveway. I high pressure cleaned it sending lumps of grease and dirt in all directions which ended up on my boots and in the house carpet. Incredible Sally stayed calm and helped me attempt a bit of carpet cleaning.


The front of the frame has copped a hit and curled over the lip so I'll have to check it all carefully for anything out of alignment.


Attached File  IMG_9727.jpeg   176.47K   15 downloads


Attached File  IMG_9771.jpeg   160.32K   10 downloads


Got the callipers reconditioned

Attached File  IMG_9784.jpeg   157.34K   10 downloads


Attached File  IMG_0971.jpeg   149.77K   10 downloads


Attached File  IMG_0974.jpeg   174.09K   10 downloads


Attached File  IMG_0976.jpeg   217.16K   10 downloads


Attached File  IMG_0980.jpeg   309.45K   11 downloads


Marty


#229 sibhs

sibhs

    Lotsa Posts!

  • Members
  • PipPipPipPipPipPip
  • 2,707 posts
  • Name:Martin
  • Location:Perth
  • Car:LJ Coupe S
  • Joined: 27-July 12

Posted 23 May 2020 - 09:29 PM

It's time to cut out the boot rust.

The back end is very rusty and has had another boot floor grafted in many years ago. It has been overlapped and fully oxy welded along the front edge creating a lot of grinding off.

I'll be fitting rares boot floors, tyre well, rear beaver and both lower quarters.


Attached File  IMG_1047.jpeg   169.75K   11 downloads


Attached File  IMG_1048.jpeg   162.67K   12 downloads


Attached File  IMG_1049.jpeg   171.22K   10 downloads


Attached File  IMG_1050.jpeg   137.14K   10 downloads


Attached File  IMG_1051.jpeg   215.91K   11 downloads


Attached File  IMG_1052.jpeg   262.65K   9 downloads


Attached File  IMG_1053.jpeg   231.84K   8 downloads


Attached File  IMG_1054.jpeg   193.99K   9 downloads


Attached File  IMG_1055.jpeg   207.98K   10 downloads


Attached File  IMG_1056.jpeg   165.89K   9 downloads


Edited by sibhs, 23 May 2020 - 09:31 PM.


#230 sibhs

sibhs

    Lotsa Posts!

  • Members
  • PipPipPipPipPipPip
  • 2,707 posts
  • Name:Martin
  • Location:Perth
  • Car:LJ Coupe S
  • Joined: 27-July 12

Posted 23 May 2020 - 09:36 PM

Attached File  IMG_1057.jpeg   145.12K   9 downloads


Attached File  IMG_1058.jpeg   222.75K   9 downloads


Attached File  IMG_1059.jpeg   215.42K   10 downloads


Attached File  IMG_1060.jpeg   144.89K   9 downloads


Attached File  IMG_1061.jpeg   221.46K   10 downloads


Attached File  IMG_1062.jpeg   250.24K   9 downloads


Attached File  IMG_1063.jpeg   175.79K   10 downloads


Attached File  IGYR5292.jpeg   204.43K   9 downloads


Attached File  IBYC8910.jpeg   179.29K   11 downloads


#231 sibhs

sibhs

    Lotsa Posts!

  • Members
  • PipPipPipPipPipPip
  • 2,707 posts
  • Name:Martin
  • Location:Perth
  • Car:LJ Coupe S
  • Joined: 27-July 12

Posted 23 May 2020 - 09:41 PM

Attached File  IMG_1066.jpeg   220.55K   11 downloads


Attached File  IMG_1067.jpeg   195.14K   10 downloads


Attached File  IMG_1068.jpeg   195.13K   11 downloads


Hows this wasp nest I found deep up in the chassis. I didn't see it at first but after some banging it dropped down into view.


Attached File  IMG_1069.jpeg   121.63K   10 downloads


Attached File  IMG_1072.jpeg   231.46K   9 downloads


Marty


Edited by sibhs, 23 May 2020 - 09:42 PM.


#232 claysummers

claysummers

    Lotsa Posts!

  • Members
  • PipPipPipPipPipPip
  • 3,530 posts
  • Name:Clay
  • Location:Willunga
  • Car:186 FB Ute, 3.3 EK sedan
  • Joined: 13-December 18

Posted 23 May 2020 - 10:17 PM

Hoeing in to it Marty


Sent from my iPad using Tapatalk

#233 purrlx

purrlx

    Forum Fixture

  • Members
  • PipPipPipPipPip
  • 1,330 posts
  • Name:Danny
  • Location:Gladstone
  • Car:LX hatch
  • Joined: 23-December 11
Garage View Garage

Posted 24 May 2020 - 06:42 AM

A big job ahead there, i'm sure it will come out nice. It gets a bit scary when you cut it all out and look at it and go crap what have I done.


#234 jd lj

jd lj

    Forum Fixture

  • Members
  • PipPipPipPipPip
  • 2,106 posts
  • Name:James D
  • Location:in the shed
  • Car:LJ SVO
  • Joined: 03-December 10

Posted 24 May 2020 - 09:00 AM

That was a nasty looking rear end there Marty. However whether it's only got a bit of rust or a lot it all has to come off and be replaced. Mine was nowhere near as rusty as that but almost all of tgose panels have needed replacement. I have a growing pile of rusted or dinged up panels.

#235 S pack

S pack

    Scrivet Counter

  • Members
  • PipPipPipPipPipPipPip
  • 15,659 posts
  • Name:Dave
  • Location:Luggage Point
  • Car:73 LJ
  • Joined: 25-January 10

Posted 24 May 2020 - 09:29 AM

Hey Marty got your work cut out for ya there.

I noticed that K frame has the outrigger bushes installed the correct way.  :spoton:

post-29243-0-86854100-1589972074.jpeg


#236 Ice

Ice

    Cool

  • Members
  • PipPipPipPipPipPipPip
  • 15,175 posts
  • Name:Gene
  • Location:Galaxy's away from Ipswich
  • Car:77 HZ Sandman Van
  • Joined: 03-January 07

Posted 24 May 2020 - 10:41 AM

Thats some serious rust you got growing in there Marty
but im sure it will be as rust free as possible when you're done

#237 grumpy xu1

grumpy xu1

    Lotsa Posts!

  • Members
  • PipPipPipPipPipPip
  • 2,812 posts
  • Name:Gary
  • Location:Queensland
  • Car:lj xu1
  • Joined: 01-February 10

Posted 24 May 2020 - 11:14 AM

It doesn't look to bad, now that you have removed the last guys poor repairs. We know who will be spending a day on the sand blaster now, that's for sure. But then you will have nice clean metal to start with.

#238 Indy Orange

Indy Orange

    Lotsa Posts!

  • Members
  • PipPipPipPipPipPip
  • 2,895 posts
  • Name:Paul
  • Location:Australia
  • Joined: 03-July 09

Posted 24 May 2020 - 12:00 PM

Hope you've got loose stuff tucked away or tied down Sibhs?

#239 sibhs

sibhs

    Lotsa Posts!

  • Members
  • PipPipPipPipPipPip
  • 2,707 posts
  • Name:Martin
  • Location:Perth
  • Car:LJ Coupe S
  • Joined: 27-July 12

Posted 24 May 2020 - 01:46 PM

Hoeing in to it Marty


Sent from my iPad using Tapatalk

Hey Clay, At first I was like I'll take one bit off at a time and fit new before moving on. But, Nah! Jumping straight in and hopefully it all falls into place.


A big job ahead there, i'm sure it will come out nice. It gets a bit scary when you cut it all out and look at it and go crap what have I done.

Hi purrix, Scary, but I'm growing in confidence after some of the other bits i've fixed. Gotta get back to ground zero before starting to put it all together.


That was a nasty looking rear end there Marty. However whether it's only got a bit of rust or a lot it all has to come off and be replaced. Mine was nowhere near as rusty as that but almost all of tgose panels have needed replacement. I have a growing pile of rusted or dinged up panels.

Hi James, There's a few bits I'll have to make to fill in the missing blanks, looking forward to getting the rear end done.


Hey Marty got your work cut out for ya there.

I noticed that K frame has the outrigger bushes installed the correct way.  :spoton:

post-29243-0-86854100-1589972074.jpeg

Dam you Dave, I was hoping you wouldn't notice, I even took a few picks as I pulled them out but wasn't going to let you see them. Haha

Attached File  IMG_0978.jpeg   114.61K   9 downloads


Attached File  IMG_0979.jpeg   157.21K   9 downloads


#240 sibhs

sibhs

    Lotsa Posts!

  • Members
  • PipPipPipPipPipPip
  • 2,707 posts
  • Name:Martin
  • Location:Perth
  • Car:LJ Coupe S
  • Joined: 27-July 12

Posted 24 May 2020 - 01:48 PM


Thats some serious rust you got growing in there Marty
but im sure it will be as rust free as possible when you're done

Hi Gene, dam right there is. At least the chassis looks good so something solid to start with.


It doesn't look to bad, now that you have removed the last guys poor repairs. We know who will be spending a day on the sand blaster now, that's for sure. But then you will have nice clean metal to start with.

Hi Gary, I like your optimism. I'm cleaning up next to repairs and once repaired and on the rotisserie I'll sand blast it all. The chassis internals etc will be cleaned and rust preventative applied before welding startes.


Hope you've got loose stuff tucked away or tied down Sibhs?

Hi Paul, yes, did a tip run yesterday getting rid of some loose stuff around the house. For those that don't know, we are expecting a once in 10 year storm to hit WA tonight so we're battening down the hatches. I've kept all my rust and old GTR stuff lying around for reference.


Marty


#241 sibhs

sibhs

    Lotsa Posts!

  • Members
  • PipPipPipPipPipPip
  • 2,707 posts
  • Name:Martin
  • Location:Perth
  • Car:LJ Coupe S
  • Joined: 27-July 12

Posted 24 May 2020 - 04:24 PM

This next set of pictures shows the overlap and the work involved in grinding off the weld and old metal.


Attached File  IMG_1083.jpeg   140.04K   10 downloads


Attached File  IMG_1094.jpeg   166.65K   8 downloads


Attached File  IMG_1095.jpeg   182K   9 downloads


Unfortunately I couldn't cut off that metal due to replacement pieces not going that far forward.


Marty


#242 claysummers

claysummers

    Lotsa Posts!

  • Members
  • PipPipPipPipPipPip
  • 3,530 posts
  • Name:Clay
  • Location:Willunga
  • Car:186 FB Ute, 3.3 EK sedan
  • Joined: 13-December 18

Posted 24 May 2020 - 11:18 PM

Or you could have fabricated a section to fill the gap maybe...
What ever works isn’t it?


Sent from my iPad using Tapatalk

#243 sibhs

sibhs

    Lotsa Posts!

  • Members
  • PipPipPipPipPipPip
  • 2,707 posts
  • Name:Martin
  • Location:Perth
  • Car:LJ Coupe S
  • Joined: 27-July 12

Posted 25 May 2020 - 10:57 PM

Decided to cut out a bit of the rear floor to remove chassis dents and clean inside of rails.

There were also a few dents in floor pan I heated up and knocked back into position.


Attached File  IMG_1156.jpeg   241.15K   7 downloads


Attached File  IMG_1157.jpeg   239.58K   7 downloads


Attached File  IMG_1158.jpeg   272.41K   8 downloads


Attached File  IMG_1159.jpeg   149.3K   8 downloads


Attached File  IMG_1160.jpeg   251.29K   7 downloads


Attached File  IMG_1161.jpeg   254.95K   7 downloads


Attached File  IMG_1163.jpeg   256.2K   7 downloads


Attached File  IMG_1164.jpeg   231.95K   9 downloads


I think this car did a bit of rally driving? Unofficially.


Marty


#244 Shadow17

Shadow17

    Forum Member

  • Members
  • PipPipPip
  • 143 posts
  • Name:James
  • Location:Perth
  • Car:lj
  • Joined: 05-October 11

Posted 26 May 2020 - 09:33 AM

Nice work as usual it is going to be perfect by the time you finish.


James


#245 Heath

Heath

    I like cars.

  • Administrators
  • PipPipPipPipPipPipPip
  • 18,368 posts
  • Name:Heath
  • Location:Eastern Suburbs, Melbourne
  • Car:Heavily Modified UC Sunbird Hatchback
  • Joined: 07-November 05
Garage View Garage

Posted 26 May 2020 - 12:33 PM

This is an amazing build thread, Marty. Just read it start-to-finish.


Very inspiring and informative.


Plus, you couldn't have selected a better paint & trim combo for the car. Spectacular.


#246 sibhs

sibhs

    Lotsa Posts!

  • Members
  • PipPipPipPipPipPip
  • 2,707 posts
  • Name:Martin
  • Location:Perth
  • Car:LJ Coupe S
  • Joined: 27-July 12

Posted 26 May 2020 - 10:05 PM

This is an amazing build thread, Marty. Just read it start-to-finish.


Very inspiring and informative.


Plus, you couldn't have selected a better paint & trim combo for the car. Spectacular.

Hi Heath, glad your getting something out of this thread. I know you love the modified builds so thought this might be a bit boring.

Cheers

Marty


The rear driver floor had a bit of rust which I was going to cut and patch but again decided to fit a new floor from Rares. Exposing the internals of the chassis is always a bonus, look at all this crap that could of stayed inside. I'm going to run hose and scrapey thingy through to boot opening and make sure there's no more shit in there either.


Attached File  IMG_1118.jpeg   189.07K   7 downloads


Attached File  IMG_1153.jpeg   215.72K   7 downloads


Attached File  IMG_1154.jpeg   193.06K   8 downloads


Attached File  IMG_1155.jpeg   204.13K   9 downloads


#247 sibhs

sibhs

    Lotsa Posts!

  • Members
  • PipPipPipPipPipPip
  • 2,707 posts
  • Name:Martin
  • Location:Perth
  • Car:LJ Coupe S
  • Joined: 27-July 12

Posted 26 May 2020 - 10:22 PM

There's been a heap of cleaning up in the boot. Firstly scraping that horrible bitumen crap that people used to spread everywhere. Here it was used to help hide the dual layer boot floor.


Secondly paint stripper and scraping, then a hit with nylon paint stripper wheel, another round of Coopers paint stripper and then another go with the nylon wheel.


Once I have this on rotisserie I'll sand blast the remaining stuff.


Attached File  IMG_1049 (1).jpeg   171.22K   7 downloads


Attached File  IMG_1085.jpeg   216.9K   8 downloads


Attached File  IMG_1086.jpeg   206.22K   7 downloads


Attached File  IMG_1101.jpeg   181.54K   7 downloads


Keeping all covered up against the crap that's about to fly.


Attached File  IMG_1102.jpeg   196.38K   7 downloads


Attached File  IMG_1103.jpeg   231.32K   6 downloads


Attached File  IMG_1152.jpeg   217.85K   6 downloads


Marty


#248 madtoranajzedded

madtoranajzedded

    Sir ask alot

  • Members
  • PipPipPipPipPipPip
  • 2,893 posts
  • Name:Maz
  • Location:Southern Tasmania
  • Car:72 LJ SL SEDAN.
  • Joined: 30-September 13

Posted 27 May 2020 - 02:19 AM

Your floor looks a little like mine atm 😂

When i had mine on the rotisserie there was heaps of
dirt coming out of rails at front using compressor to
blow it out.took bloody ages to get most out.still
managed a little bit in the paint lol when i primed
the undercarriage ..

Your going well mate.have you sourced the inner beaver
panel bro or you going to fab one up yourself..

#249 sibhs

sibhs

    Lotsa Posts!

  • Members
  • PipPipPipPipPipPip
  • 2,707 posts
  • Name:Martin
  • Location:Perth
  • Car:LJ Coupe S
  • Joined: 27-July 12

Posted 27 May 2020 - 09:01 AM

Your floor looks a little like mine atm

When i had mine on the rotisserie there was heaps of
dirt coming out of rails at front using compressor to
blow it out.took bloody ages to get most out.still
managed a little bit in the paint lol when i primed
the undercarriage ..

Your going well mate.have you sourced the inner beaver
panel bro or you going to fab one up yourself..

Good spot Maz, the inner beaver is 40% stuffed. Looking at finding second hand if it can happen quickly otherwise I'm keen to try make a new one.

Marty


#250 308 Sunbird

308 Sunbird

    Forum Fixture

  • Members
  • PipPipPipPipPip
  • 973 posts
  • Name:Stuart
  • Location:Melbourne
  • Car:SS Hatch, 308 Sunbird sedan-Improved Prod racer (sold), HZ Kingy wagon
  • Joined: 20-November 10

Posted 27 May 2020 - 09:54 AM

Great work Marty-very motivating.  :clap:


Also tagged with one or more of these keywords: LC GTR, Restoration, 1971, The Marty Report, Girl Power

2 user(s) are reading this topic

0 members, 2 guests, 0 anonymous users